
 There are many tools to manage passwords and sensitive resources, some cost money or are closed commercial products. I’m going to show you how to create a secure, distributed and encrypted remote password repository using Open Source tools like GPG and Git. I use the GPG vim plugin for easy decryption, editing and encryption of files. This is one simple, secure way for a distributed team to share sensitive data. Let’s get started.
Benefits
- 2-Factor+ Secure – There are a few things you need to know and have for access. You need a valid GPG keyid listed in any remote file to open it, you need to have access to your local GPG keyring and a corresponding passphrase to open that keyring. Further, you can lock down git clone access via passwords or optimally SSH public key access
- Distributed – While the Git repo can reside on a remote server it’s distributed amongst anyone that has a copy locally, making it easy to recreate in case of data loss.
- Revision Controlled – The nature of using the Git SVN makes merging changes and managing edits from multiple users easy and seamless.
- Easy Revocation – The GPGRecipients functionality makes it simple to quickly audit and revoke access for updated files. Historical copies can also be purged from Git history.
- Free and Simple – These are Open Source tools, free and simple to use. There is no database backend required or anything else, just simple flat encrypted files.
Requirements
You will need the following requirements to have this in place:
- A UNIX-like server with SSH access for hosting a Git repo, or an existing Git repo where you can add a new, GPG-encrypted file(s).
- GPG public key for encryption, decryption
- Public GPG keyid for every person you wish to share the repository with
Setup your Repo User
The first step is to create a non-privileged user for ssh access to the git repo that will hold your information. This will be done on a remote server, here I’m targeting CentOS/RHEL Linux but you could easily use BSD or OSX or any UNIX-like operating system of your choice.
On the Git server as root run the following commands to create the user/password:
useradd repouser
repouserpass=`date | md5sum | cut -c1-10` && echo "$repouserpass" \
| passwd repouser --stdin && echo "password is $repouserpass"
Note the password displayed, this is auto-generated and you’ll use this only to add your SSH keys for future access as it’s not ideal using password authentication for git activities.
Setup SSH Key Access
This user will host the git repo accessible over ssh. Now you’ll want to copy over your public SSH keys for access from your machine if you don’t want to use passwords.
ssh-copy-id repouser@reposerver
This should prompt you for the password once, after that you’ll no longer need a password so long as you have invoked your ssh-agent via the ssh-add command upon logging in to your local machine. Once you have access it’s recommended to disable password logins going forward. New users can be added by putting their SSH public key inside the ~/.ssh/authorized_keys file on the remote system.
Create your Git Repo
Install git and create your git repo as the user created above.
First install Git
yum install git -y
Now become the repouser and create the repo locally and enter it.
su - repouser
mkdir passwords ; cd !$
Create the Git repo
git init --bare
At this point you’ll have a bare repo setup, accessible to clone and use via SSH. You’re not done yet, we’re going to walk you through first-time setup on your client(s) and then the very simple steps to use this resource in the future.
Setup your Editor
You’ll need to have the vim-gpg plugin for easy edits of the repository so let’s set that up first. If you already have an existing set of vim plugins you like please download the plugin and copy it manually into ~/.vim/plugin/ otherwise you can do the following for new setups:
yum install vim-enhanced -y
(as your normal user)
mv ~/.vim ~/.vim-bak
git clone https://github.com/jamessan/vim-gnupg ~/.vim/
Alternatively you can just follow the instructions to clone my vim setup if you want this plugin plus a lot of other neat functionality.
Setup GPG
If you already have a GPG key you can skip this part and proceed with the second step.
yum install gnupg -y
(as your normal, local user)
gpg --gen-key
Follow the prompts here, and make sure to use a good passphrase. I normally go with option #2 – Elgamal / DSA and 2048bit keys.
Once your GPG key is created you’ll need the uid for editing your encrypted password file.
gpg --list-keys will@example.com
When you first add yourself and subsequently others the bold text below is the UID used in vim.
pub   1024D/07BC7E81 2008-08-18
uid                  Will Foster <will@example.com>
uid                  Will Foster <wfoster@example.com>
sub   2048g/E3886BC8 2008-08-18
Lastly, export your armored GPG public key for inclusion into your repo for others.
gpg --export --armor will@example.com > wfoster-pubkey.pub
Clone your Password Repo
Now you’re ready to start using the password repository. First you’ll want to clone it somewhere locally. In this example we’ll be cloning it into a directory called ‘password-repo’
git clone ssh://repouser@reposerver/home/repouser/passwords/ password-repo
You should see something like below, also noting it’s currently empty.
Cloning into 'password-repo'...
warning: You appear to have cloned an empty repository.
Checking connectivity... done.
Add Content for First Commit
Now you’re ready to add new content. Change into the repository and add a directory for your public keyid. We’ll also add an encrypted file.
cd password-repo && mkdir keyid
gpg --export --armor will@example.com > keyid/wfoster.pub
git add keyid/wfoster.pub
git commit -m "adding first content"
git push origin master
You should now see something like following, showing you successfully pushed the content.
Counting objects: 3, done.
Delta compression using up to 8 threads.
Compressing objects: 100% (3/3), done.
Writing objects: 100% (3/3), 956 bytes | 0 bytes/s, done.
Total 3 (delta 0), reused 0 (delta 0)
To ssh://repouser@reposerver/home/repouser/passwords/
 * [new branch] master -> master
Note: In future usage you’ll only need to invoke git push, the origin master command here creates your master branch for the first time.
Creating / Editing Encrypted Files
Now we’re at the whole point of this setup – managing encrypted content. Start by opening up a test file.
vim my-secret-passwords.asc
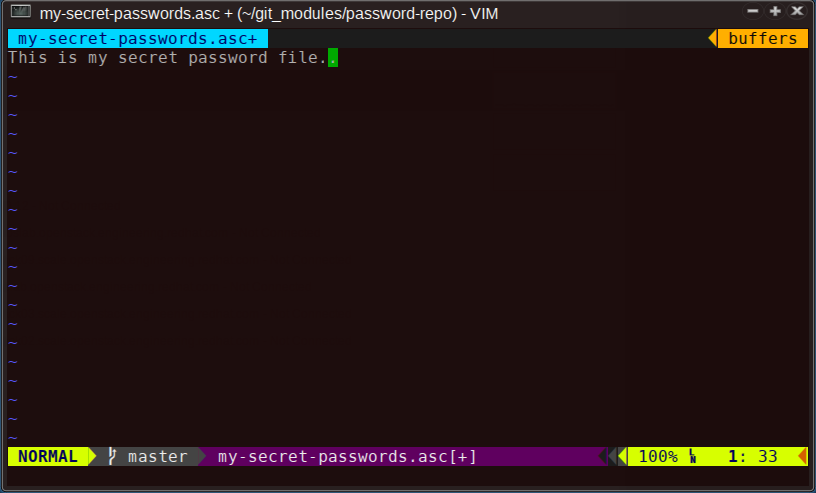
You should now see vim open up the new file. You can start adding some test content here if you like.
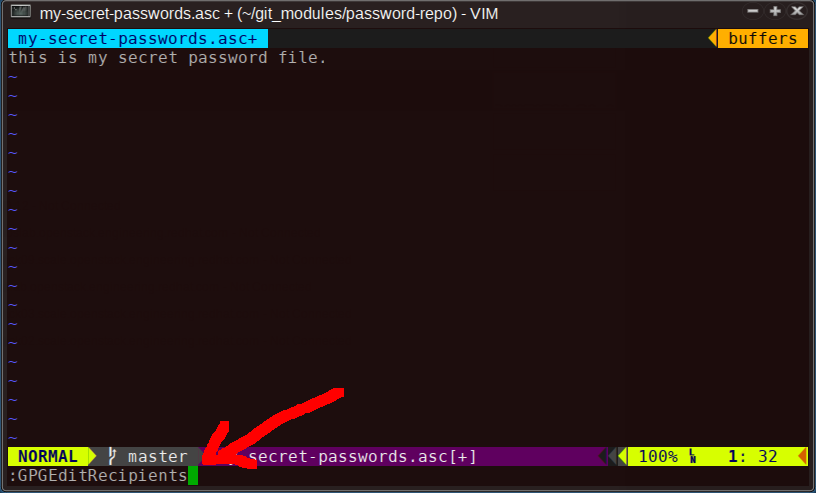
Add GPG Recipients
This is the most important step, remember our GPG public UID from above? Add yourself to it via :GPGEditRecipients exactly as it is shown from the output of gpg –list-keys. These will be the people allowed to decrypt, view, edit and re-encrypt your file.
Note that I am adding just the line how it appears under uid, add that after the commented text. For each new user you’ll want their GPG UID and so long as their keys are in your keyring it will auto-populate when it’s opened.
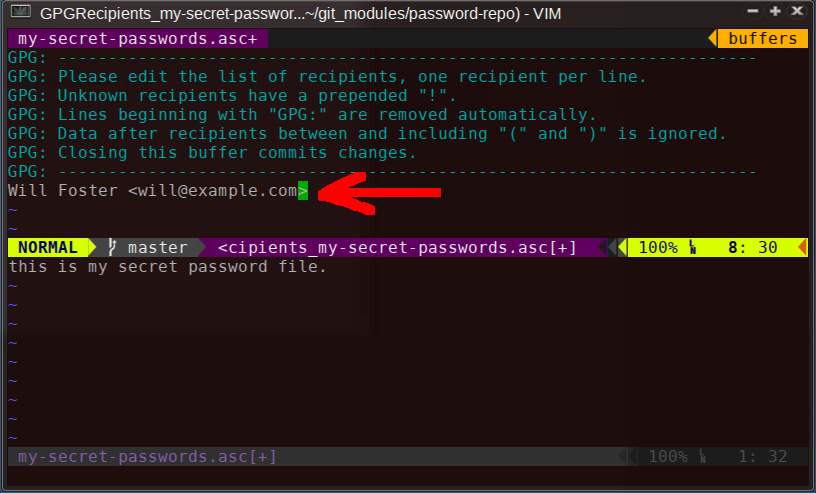
- Exit the GPGEditRecipients buffer with :q
- Exit and save the file with :wq
Now, commit the file back into the repository:
git add my-secret-passwords.asc
git commit -m "adding secret password file"
git push
Further Usage and Sharing with Others
You will be prompted for your local GPG passphrase anytime this file is opened. To use the repository with others ensure that you have their public GPG key in your keyring, and they have yours. You will have issues with opening encrypted files when you do not have all of the public keys associated with it or if they are expired.
We created a keyid directory before with your public key inside of it, simply add others keys to this that will be using the repo. A good workflow to follow might be the following:
For New Users
git clone ssh://repouser@reposerver/home/repouser/passwords/
cd passwords
gpg --import keyid/*.pub
vim my-secret-passwords.asc
git add my-secret-passwords.asc
git commit
git push
For Existing Users
cd passwords
git pull
gpg --import keyid/*.pub
vim my-secret-passwords.asc
git add my-secret-passwords.asc
git commit
git push
Note: You don’t need the gpg –import command if you’re sure no new users have been added or regenerated new keys for whatever reason.
Extending Further
We use this method for sharing passwords and sensitive data inside a small, geographically distributed Devops team. There was a recent thread on the Reddit Sysadmin board about managing passwords so I took this opportunity to type this up for someone who wanted it. So far it’s been a simple solution for us (and K.I.S.S. is good).
I would highly advise not placing your GPG-encrypted files on any public Git services like github, or at least don’t make the repo public if you do. While it’s not currently possible to brute-force something that has multiple factors of authentication (several things you have, something you know) it’s just not good practice. For our usage we store this sort of thing behind a corporate VPN and then layer SSH access or Kerberos/LDAP control.
Update: Someone on Reddit pointed out that there’s a more full-featured Open Source utility called pass that achieves the same result using the same tools and some shell code wrapped around it all and looks a bit more intuitive. If you just want simple, encrypted flat files to organize as you wish you may want something more basic like this however.
If you have any comments or suggestions please comment below.


Great write up. Thank you.
LikeLike