
![]()
RNNoise provides an excellent Open Source solution for intelligent microphone noise suppression. I’ve found it performs better than other proprietary AI solutions like Nvidia’s RTX Voice and with no visible performance hit. RNNnoise utilizes a neural network and deep learning to provide microphone noise suppression in real-time and it’s easy to setup system-wide on Linux as a pipewire plugin. Let’s get started.
What is RNNoise?
RNNoise is effectively a real-time neural network layer that analyzes speech in real-time to provide low-cost, high-performance noise suppression. It uses deep learning and is trained against “non voice” noises. A few high-profile Open Source projects like Mumble and OBS Studio ship RNNoise with their applications. RNNoise is cross-platform so it will work on any operating system but we’re focusing on the Linux desktop here.
A standard noise cancellation workflow might look like this:
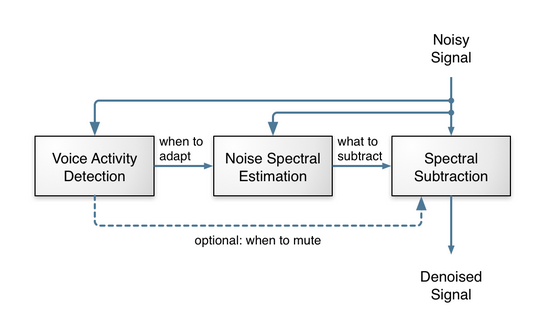
What makes RNNoise different is it utilizes a recurrent neural network to model time sequences instead of just considering input and output frames independently.

There’s a lot of more detailed information over on the RNNoise official page.
How to Setup System-Wide RNNoise via Pipewire Plugin
While you can get RNNoise cancellation through any of the applications that can utilize its libraries or plugins, you can enable it system-wide at the OS level in Linux via a pipewire plugin. This means that any microphone device on your system will leverage it seamlessly. This Github repository has a range of plugins for us (VST2, VST3, LV2, LADSPA, AU, AUv3).
First, download the compiled library from: https://github.com/werman/noise-suppression-for-voice/releases/tag/v1.03
wget https://github.com/werman/noise-suppression-for-voice/releases/download/v1.03/linux-rnnoise.zip
Next, unzip the source and copy the plugin in place
unzip linux-rnnoise.zip
sudo cp linux-rnnoise/ladspa/librnnoise_ladspa.so /usr/lib64/pipewire-0.3/
Adjust permissions and edit the pipewire configuration file
sudo chmod +x /usr/lib64/pipewire-0.3/librnnoise_ladspa.so
mkdir -p ~/.config/pipewire/pipewire.conf.d/
Now (as your normal user) edit your local pipewire config file to utilize the plugin.
vim ~/.config/pipewire/pipewire.conf.d/99-input-denoising.conf
Configuration Options
There’s a number of configuration options in the example configuration file below for finer tuning, you can roll with the example or adjust the values:
VAD Threshold (%)– if probability of sound being a voice is lower than this threshold – it will be silenced. In most cases the threshold between 85% – 95% would be fine. Without the VAD some loud noises may still be a bit audible when there is no voice.VAD Grace Period (ms)– for how long after the last voice detection the output won’t be silenced. This helps when ends of words/sentences are being cut off.Retroactive VAD Grace Period (ms)– similar toVAD Grace Period (ms)but for starts of words/sentences. ⚠️ This introduces latency!
More details can be found on the Github docs.
Barring any changes you can just paste the following configuration file and save it.
context.modules = [
{   name = libpipewire-module-filter-chain
    args = {
        node.description =  "Noise Canceling source"
        media.name =  "Noise Canceling source"
        filter.graph = {
            nodes = [
                {
                    type = ladspa
                    name = rnnoise
                    plugin = /usr/lib64/pipewire-0.3/librnnoise_ladspa.so
                    label = noise_suppressor_mono
                    control = {
                        "VAD Threshold (%)" = 50.0
                        "VAD Grace Period (ms)" = 200
                        "Retroactive VAD Grace (ms)" = 0
                    }
                }
            ]
        }
        capture.props = {
            node.name =  "capture.rnnoise_source"
            node.passive = true
            audio.rate = 48000
        }
        playback.props = {
            node.name =  "rnnoise_source"
            media.class = Audio/Source
            audio.rate = 48000
        }
    }
}
]
Lastly, as your normal user restart the pipewire service
systemctl restart --user pipewire.service
After this you may need to restart any applications that were using audio.
Now you should be able to select Noise Canceling source as input device for any of your applications e.g. Google Meet example below.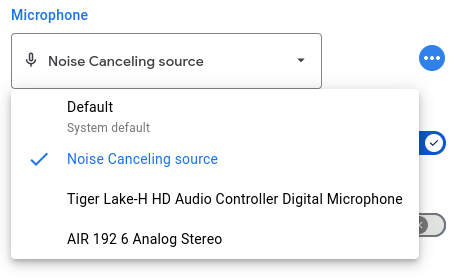
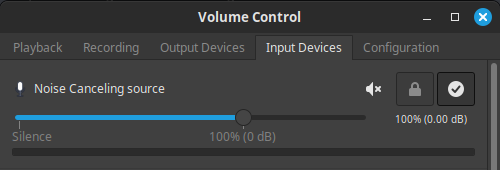
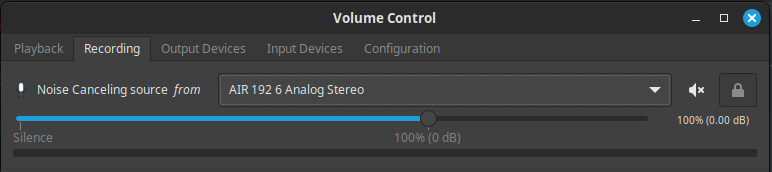
In PulseAudio you should also see noise cancelling source being utilized.
Experiences and Testing
Anecdotal testing with RNNoise has shown it to be very adaptive and accurate. A colleague of mine tapped vigorously on a glass full of water next to the microphone during a video call and it was entirely silenced.
Already using RNNoise in Mumble I am able to walk outside to a busy street with lots of cars and street activity and other people do not hear anything at all. Even when I speak it adjusts in real-time to only allow my voice. The CPU hit is very very low, it is not noticeable at all on any of the systems where I am using RNNoise.


You should suggest that the developers rename RNNoise. “Recurrent neural n[etworks]oise” is just not that catchy. HASTEN – How About Shutting That Extra Noise
LikeLike
welcome back
LikeLiked by 1 person