
 It might seem like stepping back in time, but sometimes you start something with a VM and the desire for resources and usage skyrockets and you need to transplant it onto a bare metal server. This was my situation with Plex Media Server. I’ll walk you through using Clonezilla to get the job done.
Why VM to Bare Metal
Sometimes things outgrow their capacity and ability. I started off with a moderate spec CentOS7 VM for the Plex Media Server. Over time the usage started to become more frequent and demanding, particularly the x264/ffmpeg transcoding workloads common with Plex. I didn’t want to re-install the OS or perform extra work, I just wanted an easy system transplant.
Server Conversion Details
My server VM is a bog-standard qcow2 CentOS7 image with around 20GB of XFS filesystem storage. The destination bare metal hardware is much more ideal. Note that I initially tried this using qemu-img convert and dd over SSH but ran into issues with moving to a UEFI system and MBR/grub entries. It turns out Clonezilla is a really excellent tool for this as it also uses partclone so it only copies used space.
Things You Need:
- 1GB or larger USB thumbdrive
- Clonezilla Live OS media
- SSH access to a machine for transferring the disk image.
- Clonezilla supports NFS, CIFS and other options if you don’t want to use SSHFS.
Overview of Steps
There are only a few steps here but I’ll walk you through them all. This approach is for a Linux VM but it should work just as well with Windows.
- Boot VM to Clonezilla LiveOS
- Backup VM disk to remote server over SSHFS
- Boot bare-metal server to Clonezilla LiveOS via USB thumb drive
- Pull the VM disk image to the bare-metal server via Clonezilla
- Resize your server hard disk, LVM subsystem and hard disk as needed
Backup VM Image
Before we do anything we’ll want a backup copy of your VM image. If it’s currently running you can still back it up via rsync but it’s recommended to shut it down and make a copy of it.
rsync -av --progress plex.qcow2 plex-convert.qcow2
First download the Clonezilla live image and then copy it to a USB memory stick. You can use the Fedora Media Writer program for other platforms too.
dnf install mediawriter -y
While you’re at it, copy the Clonezilla image over to your Hypervisor storage domain so it’s accessible from KVM as you’ll be booting your VM to it to backup the disk image.
Boot VM Disk with Clonezilla
These next steps are aimed at using virt-manager connected remotely to your Hypervisor, there are CLI equivalents but I’m not going to cover those.
I opened virt-manager on my laptop and connected to the Libvirt instance on my hypervisor to run the following tasks below, but you could also tunnel this over SSH if you wanted to and virt-manager was installed on the server.
Shutdown your VM and edit the details, you’re going to load the Clonezilla ISO as a CD-ROM device.
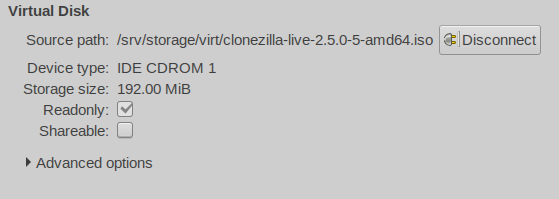
Next, bump the boot order up so CDROM boots first.

Now, boot your VM into the Clonezilla media.
Backup VM with Clonezilla
The next set of choices and menus will basically go like this:
- Pick default options
- Select backup images and partitions (device-image)
- Use a remote SSH server
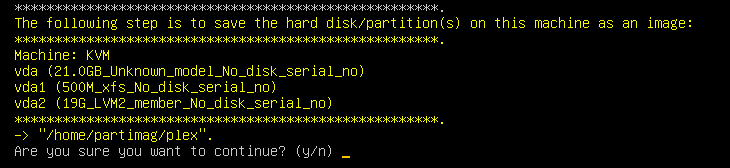
- Backup the entire disk

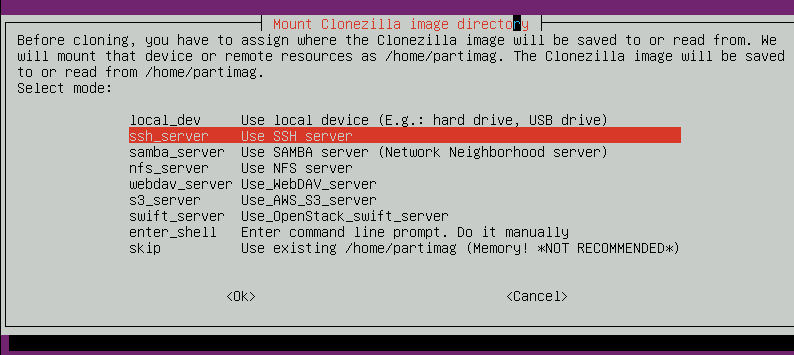
The SSH server should be where you want to backup your VM disk image, it should have ample storage to match the used space on your VM as Clonezilla uses diskpart and doesn’t copy empty, unused space/blocks.


You’ll want to choose local_disk here so Clonezilla can take care of your GRUB and MBR entries. You can however selectively back up individual partitions but that’s not what we’re after today.

Remember the image name you give below, we’ll need it later.

If all goes well you’ll see Clonezilla start copying your disk image to the remote server.


Post Clonezilla Modification
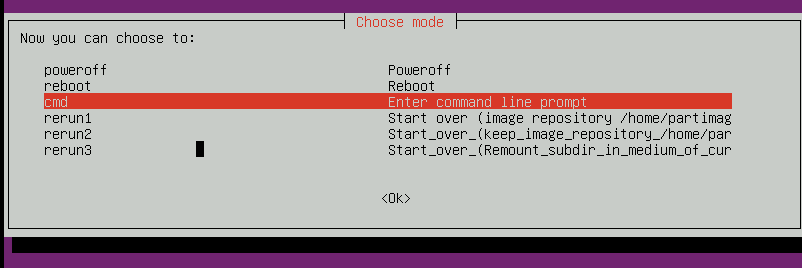
This might take a while so go get a snack. When it’s finished you’ll be prompted with what you’d like to do next. DO NOT EXIT. Since this is a VM we need to change all references to the VM disk (vda) so it jives with the bare metal server disk (sda).
Select cmd from the options.
Now you’ll want to enter the following command, adjusting for your image name above.
sudo su -
cnvt-ocs-dev -d /home/partimag plex vda sda
Here’s what it should say. Say Yes.

Now you’re set. The next steps will be simple – you’ll simply boot your bare-metal server to the Clonezilla LiveUSB and reverse the steps.
Migrate VM Image to Bare Metal
Boot your server with the Clonezilla LiveUSB image on your USB stick, you may need to press F8 (or consult your motherboard/server manual) to select the boot device.
From here you’ll basically reverse the steps except you’ll pick the restore option instead of the save option.

Clonezilla will find the saved disk image from earlier once you point it to the SSH server where it’s located.
You’ll see a similar progress dialogue. When it finishes you’re good – you should have a fully bootable image of your VM copied into your bare-metal server hard disk. Picking the disk-to-disk option will also ensure grub, ntldr (for Windows) and other MBR entries are present and it boots.
Disk Expansion
You probably aren’t done yet. If you’re like me your source VM disk is much smaller than the hard disk on the bare-metal server. If not you’re extremely lucky.
First you’ll want to re-create the partition table with fdisk. This seems a little scary but don’t worry so long as you don’t exit out of fdisk without making a new one it’s harmless.
[root@plex ~]# fdisk /dev/sda
Welcome to fdisk (util-linux 2.23.2).

Changes will remain in memory only, until you decide to write them.
Be careful before using the write command.
Command (m for help): p

Disk /dev/sda: 128.0 GB, 128035676160 bytes, 250069680 sectors
Units = sectors of 1 * 512 = 512 bytes
Sector size (logical/physical): 512 bytes / 512 bytes
I/O size (minimum/optimal): 512 bytes / 512 bytes
Disk label type: dos
Disk identifier: 0x000b6954

   Device Boot      Start         End      Blocks   Id  System
/dev/sda1   *        2048     1026047      512000   83  Linux
/dev/sda2         1026048    40959999    19966976   8e  Linux LVM
I’m going to be deleting and re-creating the second (the last) partition on the system, it’s my LVM subsystem and OS filesystem.
Command (m for help): d
Partition number (1,2, default 2): 2
Partition 2 is deleted
Now I’m going to create it over again, just go with the defaults.
Command (m for help): n
Partition type:
   p   primary (1 primary, 0 extended, 3 free)
   e   extended
Select (default p): p
Partition number (2-4, default 2):
First sector (1026048-250069679, default 1026048):
Using default value 1026048
Last sector, +sectors or +size{K,M,G} (1026048-250069679, default 250069679):
Using default value 250069679
Partition 2 of type Linux and of size 118.8 GiB is set
Now I need to set the partition type to 8e or Linux LVM like it was before
Command (m for help): t
Partition number (1,2, default 2): 8e
Partition number (1,2, default 2): 2
Now let’s look at it again, you can see a large increase of usable space for partition 2.
Command (m for help): p

Disk /dev/sda: 128.0 GB, 128035676160 bytes, 250069680 sectors
Units = sectors of 1 * 512 = 512 bytes
Sector size (logical/physical): 512 bytes / 512 bytes
I/O size (minimum/optimal): 512 bytes / 512 bytes
Disk label type: dos
Disk identifier: 0x000b6954

   Device Boot      Start         End      Blocks   Id  System
/dev/sda1   *        2048     1026047      512000   83  Linux
/dev/sda2         1026048   250069679   124521816   8e  Linux LVM
Save your changes and reboot.
Command (m for help): w
The partition table has been altered!
Resize LVM Subsystem and Filesystem
Now you’ll need to resize LVM and and your filesystem since if you’ve moved to a larger disk during this process.
pvresize -v /dev/sda2

    Using physical volume(s) on command line.
    Found same device /dev/sda2 with same pvid mclr30SpC7XRj25w9EfRoimsyMVisn4Y
    Archiving volume group "centos" metadata (seqno 4).
    Resizing volume "/dev/sda2" to 249043632 sectors.
    Resizing physical volume /dev/sda2 from 0 to 30400 extents.
    Updating physical volume "/dev/sda2"
    Creating volume group backup "/etc/lvm/backup/centos" (seqno 5).
  Physical volume "/dev/sda2" changed
Now expand the storage on your logical volume
lvextend -l +100%FREE /dev/centos/root

  Size of logical volume centos/root changed from 17.05 GiB (4364 extents) to 116.80 GiB (29900 extents).
  Logical volume root successfully resized.
Lastly resize the underlying filesystem on top of your logical volume.
xfs_growfs /dev/centos/root

meta-data=/dev/mapper/centos-root isize=256    agcount=4, agsize=1117184 blks
         =                       sectsz=512   attr=2, projid32bit=1
         =                       crc=0        finobt=0
data     =                       bsize=4096   blocks=4468736, imaxpct=25
         =                       sunit=0      swidth=0 blks
naming   =version 2              bsize=4096   ascii-ci=0 ftype=0
log      =internal               bsize=4096   blocks=2560, version=2
         =                       sectsz=512   sunit=0 blks, lazy-count=1
realtime =none                   extsz=4096   blocks=0, rtextents=0
data blocks changed from 4468736 to 30617600
That’s it, you should be set.
Further Tuning
Since you’ve moved to bare-metal from a VM you also might want to use a different tuned profile.
yum install tuned -y
tuned-adm profile throughput-performance
Experiences After Migration
I was using Libvirt/KVM on RHEL6 for my hypervisor, VM images on SSD disk. Two or more simultaneous transcodes things got to be a little shaky (high load average, CPU-bound, etc). Occasionally it would just randomly lag out usually after media scans so I had a cronjob to restart plex after every media scan (once a day) which helped that but I wanted to support 2+ streams and it wasn’t cutting it. I did a bunch of tuning but it didn’t seem to help too much (open files, limits, etc). A contributing factor could be that I run three other unrelated VMs’ on that machine and they were fighting for contention.
Either way the Hypervisor CPU was a Q3-2012 i7 mobile (in a fanless itx setup) so it was probably showing its age.
Multi-Transcodes on the i7-6700
After migrating to bare-metal I can easily handle 3-4 simultaneous transcodes raging and things are in general much more responsive and snappy. This equates to about 40-60% CPU usage across all 8 CPUs and a steady 1.0 to 2.5 load average. This is early on so I’ll report back when I have more usage and numbers.
Current Setup
Below is my home server setup, I’ve got the existing hypervisor and 8-bay eSATA storage array on the right. I serve out NFS from the hypervisor and it’s quite busy with a few other VMs. You can see the new Plex Media Server on the left under my trusty ASUS tomato router.


Hi Will !
Nice article. I would really appreciate a solution here… :)
I am looking for the following solution in some easy manner (not a dev guy):
Create a media server, e.g., Jellyfin, in Ubuntu AWS, then take the Jellyfin VM in, for example, VHD format, from AWS and boot a x86 Linux PC with it without the hassle of putting this VHD into, say a Proxmox setup.
https://docs.aws.amazon.com/vm-import/latest/userguide/vmexport.html
1. Can Rufus do this? Is Rufus VHD and AWS VHD the same format for the purpose?
Rufus can backup images to PC in VHD format as the following first answer says (dd image +512 byte header.) So does this mean Rufus on USB stick can take this AWS VHD VM image backup copied to a PC, and burn (install) on another bare metal PC?
https://superuser.com/questions/1489113/getting-rufus-to-output-to-a-disk-image-file
2. If #1 is not possible, can you suggest a method to transfer AWS VMs to bare metal PCs?
LikeLike
Thiss was a lovely blog post
LikeLike