

 There’s plenty of useful articles and guides on managing Linux software RAID floating around. I recently had a disk failure in my 8-bay eSATA array and thought I’d add to the mix. Here’s what I did, including some notes specific to the Sans Digital 8-bay eSATA tower and recovery on RHEL6.
Fileserver and Disk Setup
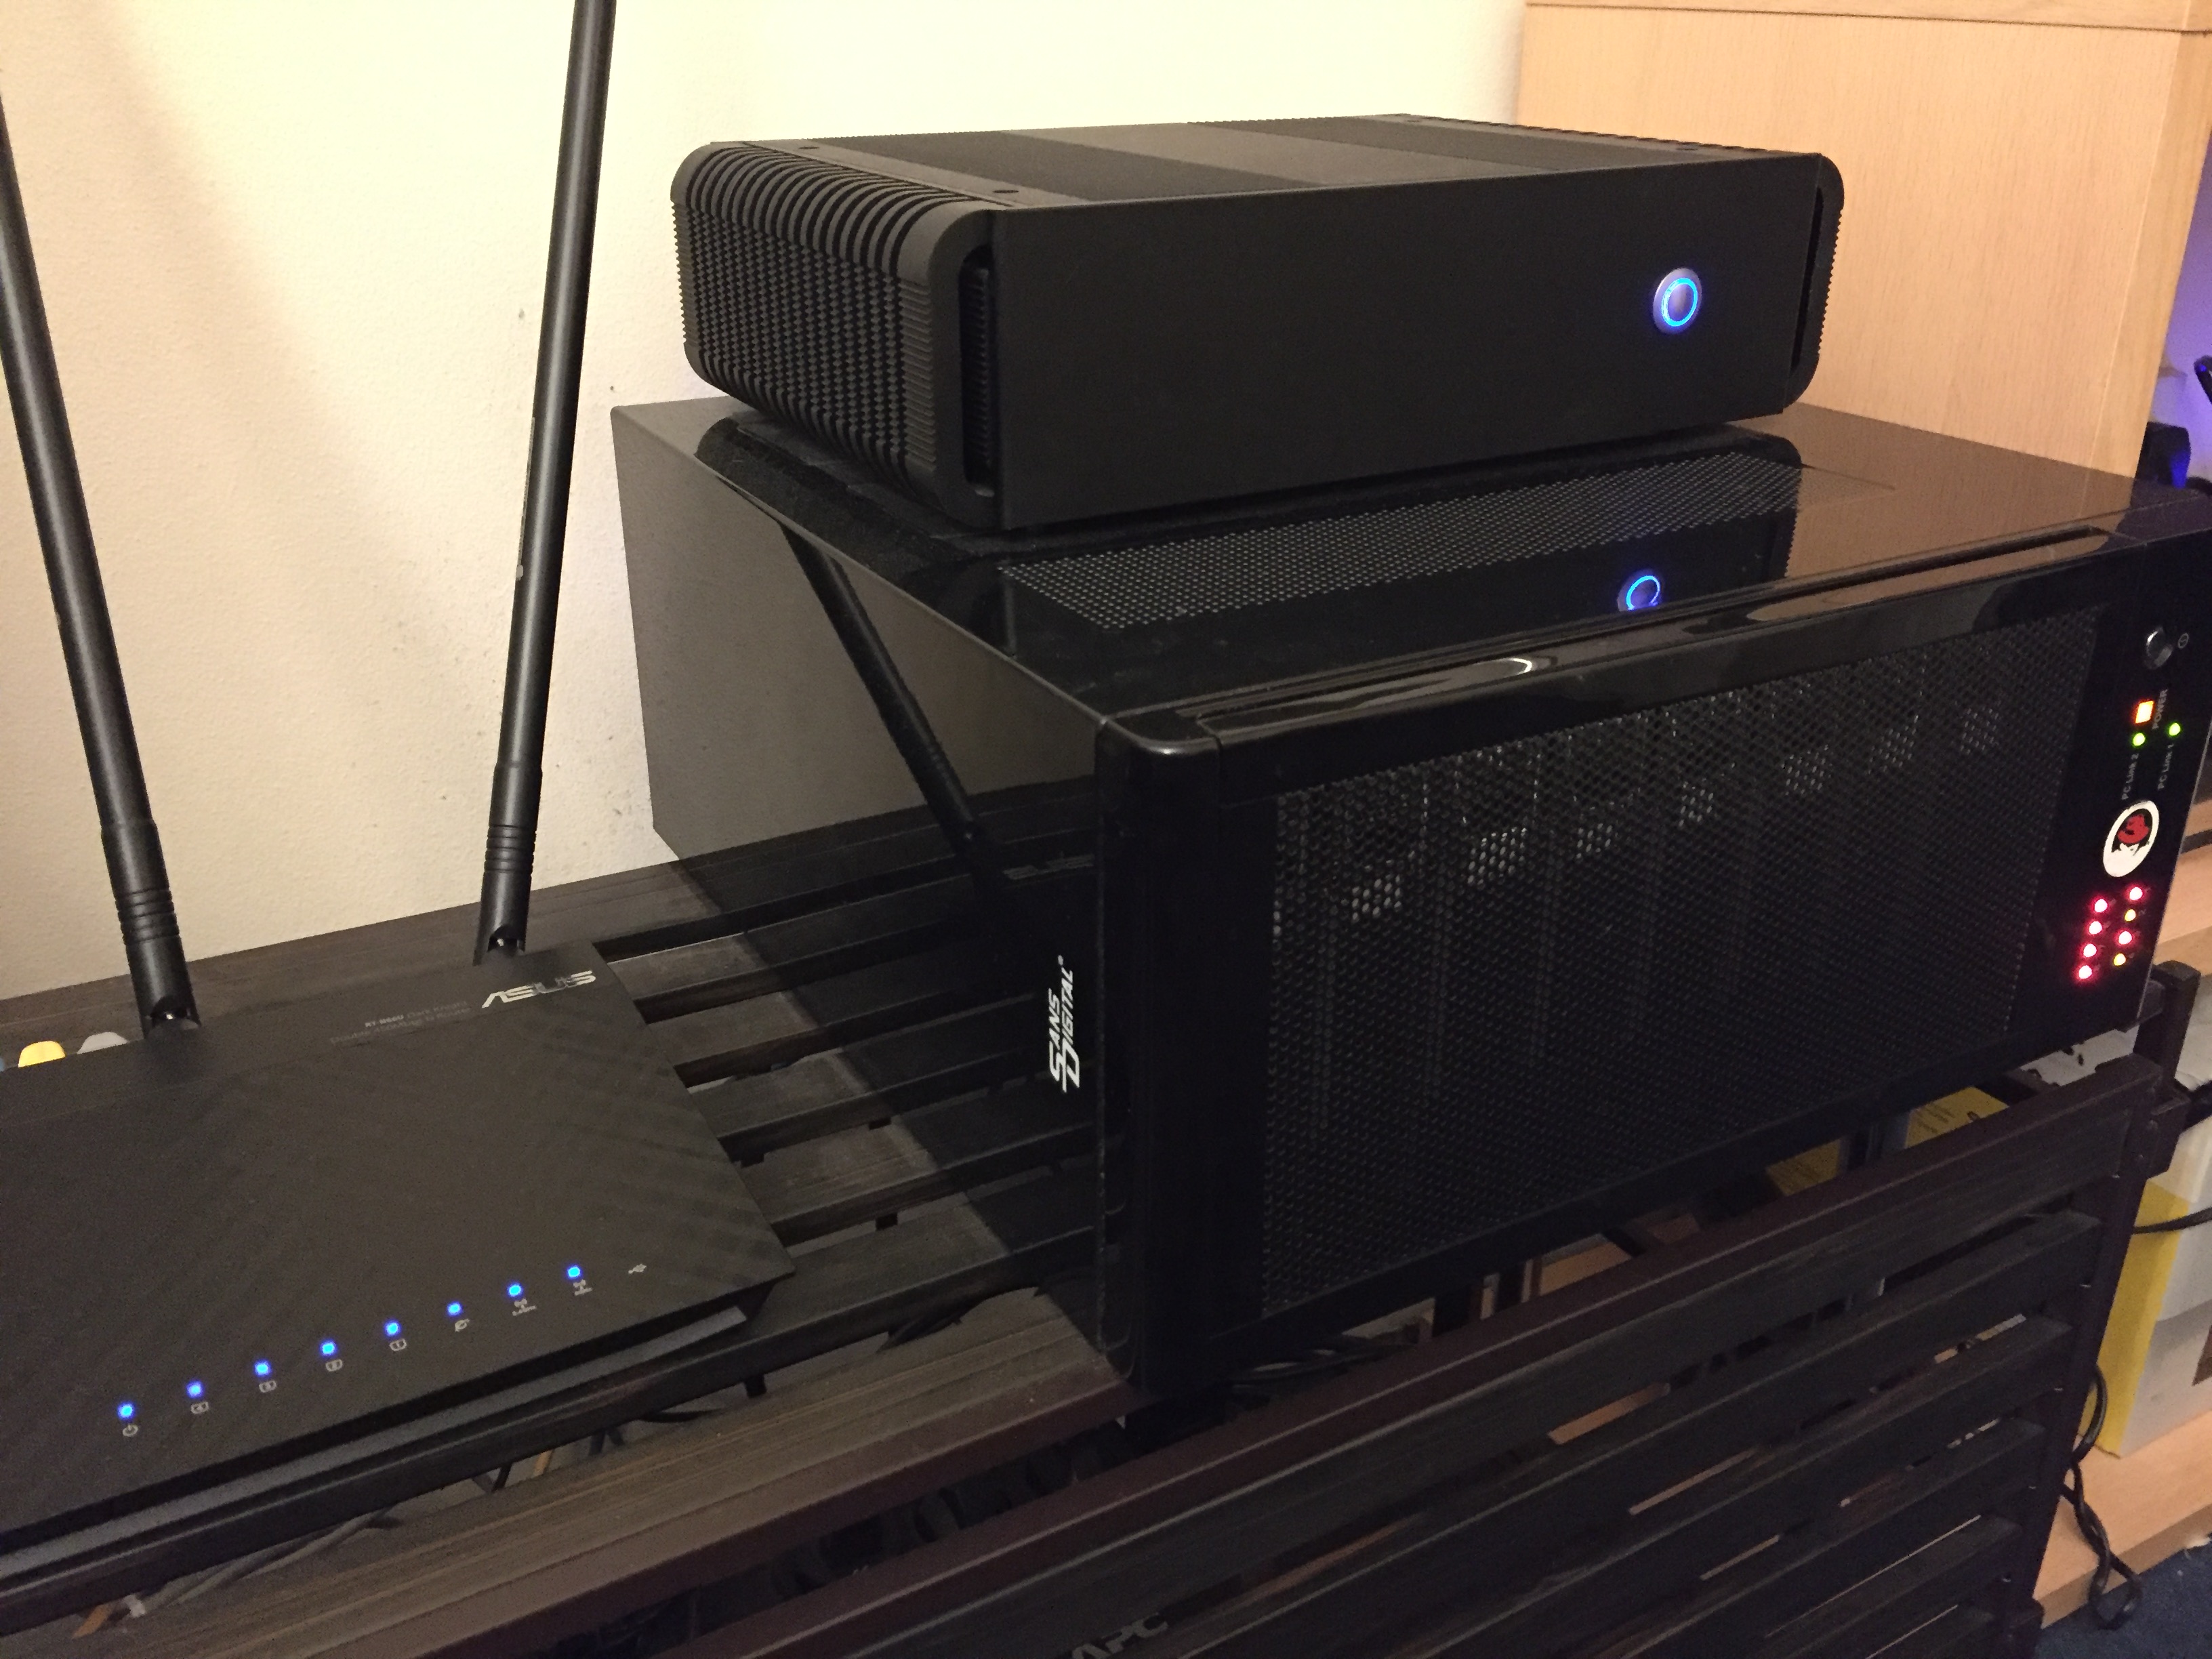
I’ve consolidated all my various home machines onto a single, low-power fanless Hypervisor with an external 8-bay eSATA tower for NFS and local VM storage.
- Fanless Core i7 Hypervisor (i7-3630QM CPU @ 2.40GHz, 16G RAM)
- Sans Digital 8-bay eSATA tower
- Addonics ADSA3GPX1-2E eSATA PCI-E (in JBOD, using native sata_sil24 kernel module)
- 8 x 2TB Samsung Spinpoint F4 (mdadm RAID6 via XFS – 11TB usable)
- RHEL 6.7 x86_64
Failure Scenario
I setup mdadm to send me emails if I receive any failure events, this array has been very good to me with no failures since I purchased it back in 2010, until now. Linux mdadm does a nice job of summarizing what went wrong and the most likely culprit. Note that /dev/sde is going to be our failed disk, and in mdadm parlance “_” denotes a failed disk while “U” denotes an active, healthy one.
This is an automatically generated mail message from mdadm
running on poopsock.example.com

A Fail event had been detected on md device /dev/md1.

It could be related to component device /dev/sde.

Faithfully yours, etc.

P.S. The /proc/mdstat file currently contains the following:

Personalities : [raid6] [raid5] [raid4]
md1 : active raid6 sdh[5] sdb[4] sde[9](F) sdg[10] sdd[1] sdf[8]
      sdi[6] sdc[2]
      11721080448 blocks super 1.2 level 6, 64k chunk, algorithm 2
      [8/7] [_UUUUUUU]
      bitmap: 5/15 pages [20KB], 65536KB chunk
Here’s my /etc/mdadm.conf for reference:
MAILADDR root,will@example.com
DEVICE partitions
ARRAY /dev/md1 level=raid6 num-devices=8 UUID=ae9b6c81-db90-4476
Sans Digital Specifics
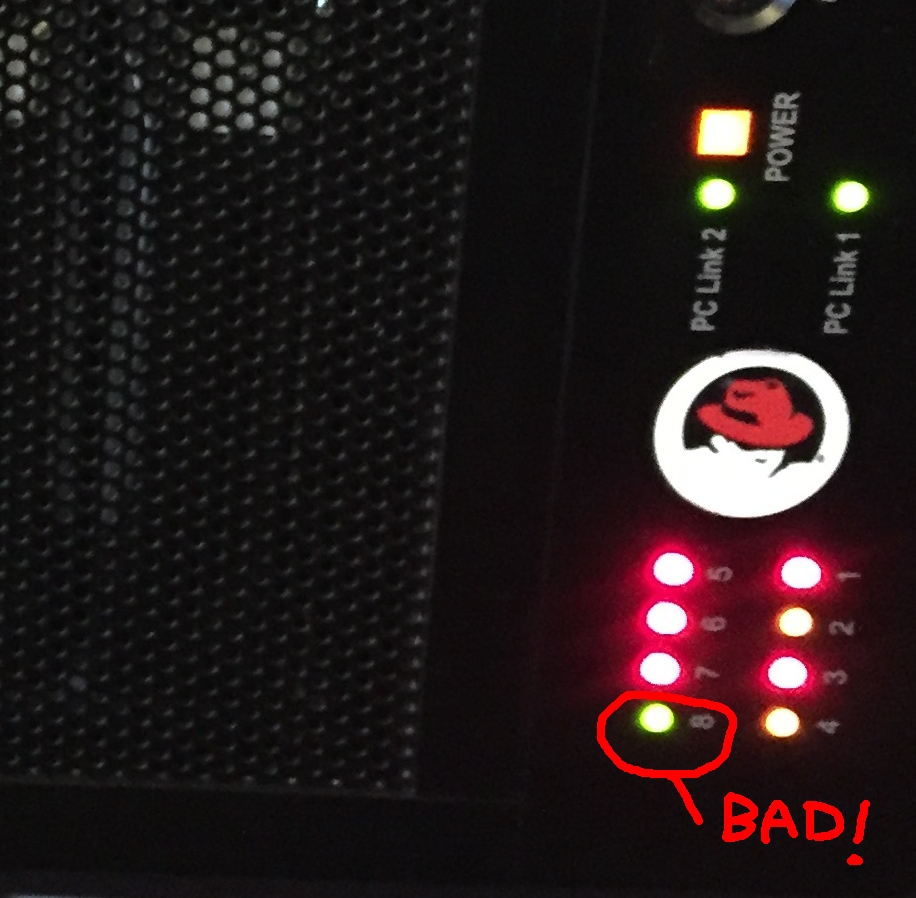
The Sans Digital 8-bay eSATA tower I have has a specific mapping as to what disk corresponds to what slot. For my model it’s pretty straightforward:
- Count starts from bottom-up
- bottom slot = slot 1
- top slot = slot 8
- sata_sil24 kernel module automatically fails out disks
- e.g. (no need for mdadm –manage /dev/md1 –fail /dev/sde)
- Failed disks will not show red/amber LED activity
Note below, slot 8 is a solid green light while slots 1-7 are red/amber
Replace the Physical Disk
This tower has hot-swappable sleds, making replacement very easy. Simply remove the failed disk and replace it with the same size disk or larger and pop it back in. You should then see:
Feb 3 06:21:12 poopsock kernel: scsi 6:3:0:0: Direct-Access
ATA      ST32000542AS     CC35 PQ: 0 ANSI: 5
Feb 3 06:21:12 poopsock kernel: sd 6:3:0:0: [sde] 3907029168
512-byte logical blocks: (2.00 TB/1.81 TiB)
Feb 3 06:21:12 poopsock kernel: sd 6:3:0:0: [sde] Write Protect off
Feb 3 06:21:12 poopsock kernel: sd 6:3:0:0: [sde] Write cache:
enabled, read cache: enabled, doesn't support DPO or FUA
Feb 3 06:21:12 poopsock kernel: sd 6:3:0:0: Attached scsi generic
sg4 type 0
Feb 3 06:21:12 poopsock kernel: sde: unknown partition table
Feb 3 06:21:12 poopsock kernel: sd 6:3:0:0: [sde] Attached SCSI disk
Check mdadm status
One overlooked gotcha with mdadm is sometimes the sync_action flag might be busy, causing rebuilds or recoveries to fail. Let’s quickly check that it is idle. If it’s not you can echo “idle” into it to set it as such.
cat /sys/block/md1/md/sync_action
idle
Start Recovery
Now you can re-add your replacement disk to the array. I don’t bother with pre-partitioning anything – it’s a waste of time and it’s a relic from SCSI LUN days and not needed for most modern filesystems. I simply use the entire disk and let mdadm and XFS figure it out. If you’re using disks > 3TB you may need GPT labels for some setups but I’ve not hit any issues yet.
mdadm --manage /dev/md1 --add /dev/sde
mdadm: re-added /dev/sde
Check Rebuild Status
You should be set now, but let’s check that it’s rebuilding as it should. First, check that sync_action reports recovery:
cat /sys/block/md1/md/sync_action
recover
Great, now let’s check the actual progress via mdstat as well as with mdadm –detail:
cat /proc/mdstat
Personalities : [raid6] [raid5] [raid4]
md1 : active raid6 sde[9] sdg[10] sdf[8] sdi[6] sdb[4] sdc[2]
      sdh[5] sdd[1]
      11721080448 blocks super 1.2 level 6, 64k chunk, algorithm 2
      [8/7] [_UUUUUUU]
      [====>...............] recovery = 20.3% (397693684/1953513408)
      finish=1344.3min speed=19287K/sec
      bitmap: 13/15 pages [52KB], 65536KB chunk
mdadm --detail /dev/md1
/dev/md1:
        Version : 1.2
  Creation Time : Tue Mar  8 20:15:00 2011
     Raid Level : raid6
     Array Size : 11721080448 (11178.09 GiB 12002.39 GB)
  Used Dev Size : 1953513408 (1863.02 GiB 2000.40 GB)
   Raid Devices : 8
  Total Devices : 8
    Persistence : Superblock is persistent

  Intent Bitmap : Internal

    Update Time : Wed Feb  3 12:40:39 2016
          State : clean, degraded, recovering
 Active Devices : 7
Working Devices : 8
 Failed Devices : 0
  Spare Devices : 1

         Layout : left-symmetric
     Chunk Size : 64K

 Rebuild Status : 20% complete

           Name : localhost.localdomain:1
           UUID : ae9b6c81:db904476:a418a6df:d91356ae
         Events : 1370671

    Number   Major   Minor   RaidDevice State
       9       8       64        0      spare rebuilding   /dev/sde
       1       8       48        1      active sync   /dev/sdd
       2       8       32        2      active sync   /dev/sdc
       6       8      128        3      active sync   /dev/sdi
       4       8       16        4      active sync   /dev/sdb
       8       8       80        5      active sync   /dev/sdf
      10       8       96        6      active sync   /dev/sdg
       5       8      112        7      active sync   /dev/sdh
Adjusting Rebuild & Check Speeds
You can limit the amount of available IOPS that are thrown into the rebuild process via the following as with this array normal storage access can sometimes be problematic during rebuilds or scrubs:
echo "500" > /proc/sys/dev/raid/speed_limit_min
echo "50000" > /proc/sys/dev/raid/speed_limit_max
Conversely, you can increase this amount (100M/sec is default) to speed things up:
echo "200000" > /proc/sys/dev/raid/speed_limit_max
Lastly, you might want adjust the normal raid-check cronjob to only run once a month, mdadm devs do err on the side of caution but I’ve never seen an issue with checking for bad blocks and data once a month instead.
cat /etc/cron.d/raid-check
# Run system wide raid-check once a week on Sunday at 1am by default
#0 1 * * Sun root /usr/sbin/raid-check <-- comment this out
# Once a month is good
* * 1 * * root /usr/sbin/raid-check
Business as Usual
After some amount of time your recovery should complete. Note that large, slow SATA disks while great at archival and general-purpose storage take a really long time to rebuild. This is why I urge everyone using SATA RAID to use RAID6 instead of RAID5 for the extra parity disk. It’s not uncommon to experience an additional disk failure during long rebuild times.
If all looks good your mdstat output should be clear again:
cat /proc/mdstat
Personalities : [raid6] [raid5] [raid4]
md1 : active raid6 sde[9] sdg[10] sdf[8] sdi[6] sdb[4] sdc[2] sdh[5]
      sdd[1]
      11721080448 blocks super 1.2 level 6, 64k chunk, algorithm 2
      [8/8] [UUUUUUUU]
      bitmap: 4/15 pages [16KB], 65536KB chunk

unused devices: <none>
More Drives Lost? Failed eSATA Cable
As luck would have it, I had another failure of /dev/sde (my replacement drive was faulty) and during rebuild I had an eSATA cable go bad. This caused the loss of the additional 4 drives on lane2 so the array went away.
The below message was printed for each drive on lane2 or the 4 x drives connected to the second eSATA cable:
Feb 17 06:47:06 poopsock kernel: sd 7:2:0:0: [sdh] Add. Sense: Scsi parity error
Feb 17 06:47:06 poopsock kernel: sd 7:2:0:0: [sdh] CDB: Write(10): 2a 00 00 00 00 08 00 00 02 00
Feb 17 06:47:06 poopsock kernel: end_request: I/O error, dev sdh, sector 8
Feb 17 06:47:06 poopsock kernel: end_request: I/O error, dev sdh, sector 8
Feb 17 06:47:06 poopsock kernel: md: super_written gets error=-5, uptodate=0
Feb 17 06:47:06 poopsock kernel: md/raid:md1: Disk failure on sdh, disabling device.
Feb 17 06:47:06 poopsock kernel: md/raid:md1: Operation continuing on 4 devices.
Feb 17 06:47:06 poopsock kernel: sd 7:2:0:0: rejecting I/O to offline device
Feb 17 06:47:06 poopsock kernel: end_request: I/O error, dev sdh, sector 0
Feb 17 06:47:06 poopsock kernel: sd 7:1:0:0: rejecting I/O to offline device
Feb 17 06:47:06 poopsock kernel: end_request: I/O error, dev sdg, sector 0
Feb 17 06:47:06 poopsock kernel: sd 7:1:0:0: rejecting I/O to offline device
Feb 17 06:47:06 poopsock kernel: ata8: EH complete
Feb 17 06:47:06 poopsock kernel: ata8.00: detaching (SCSI 7:0:0:0)
I know /dev/sde in this case is failed and was rebuilding but the other drives are fine. mdadm is conservative and will make a FAULTY flag on the good drives if they disappear.
The Fix
First, I commented out the /dev/md1 array out of /etc/fstab so that when it boots it won’t try and mount. Then I powered down the server and array, replaced the faulty eSATA cable and power things back up, array first so the drives are spun up.
Next, I force assembled the array to clear the FAULTY flags – for just the known good disks. /dev/sde has not been fully rebuilt yet and so needs to be omitted.
mdadm --assemble --force /dev/md1 /dev/sdd /dev/sdc /dev/sdi /dev/sdb /dev/sdf /dev/sdg /dev/sdh
mdadm: forcing event count in /dev/sdf(5) from 1733689 upto 1733732
mdadm: forcing event count in /dev/sdg(6) from 1733689 upto 1733732
mdadm: forcing event count in /dev/sdh(7) from 1733689 upto 1733732
mdadm: forcing event count in /dev/sdi(3) from 1733688 upto 1733732
mdadm: clearing FAULTY flag for device 2 in /dev/md1 for /dev/sdi
mdadm: clearing FAULTY flag for device 4 in /dev/md1 for /dev/sdf
mdadm: clearing FAULTY flag for device 5 in /dev/md1 for /dev/sdg
mdadm: clearing FAULTY flag for device 6 in /dev/md1 for /dev/sdh
mdadm: Marking array /dev/md1 as 'clean'
mdadm: /dev/md1 has been started with 7 drives (out of 8).
Rebuild Again
Now I can rebuild the replaced disk /dev/sde.
mdadm --manage /dev/md1 --add /dev/sde
mdadm: added /dev/sde
Note that if you have data drives that get inadvertently added as spares you can also use the assemble command above to make them appear as data drives / raid members again.
Sans Digital and Port Lane Resets
Specific to this type of port-multiplier eSATA style unit, occasionally a failed or failing disk will make all the disks in that particular 4-port lane reset entirely. This may disguise itself like a bad cable or even a faulty array.
kernel: ata8.00: failed to read SCR 1 (Emask=0x40)
kernel: ata8.00: failed to read SCR 0 (Emask=0x40)
kernel: ata8.01: failed to read SCR 1 (Emask=0x40)
kernel: ata8.01: failed to read SCR 0 (Emask=0x40)
kernel: ata8.02: failed to read SCR 1 (Emask=0x40)
kernel: ata8.02: failed to read SCR 0 (Emask=0x40)
kernel: ata8.03: failed to read SCR 1 (Emask=0x40)
kernel: ata8.03: failed to read SCR 0 (Emask=0x40)
kernel: ata8.04: failed to read SCR 1 (Emask=0x40)
kernel: ata8.05: failed to read SCR 1 (Emask=0x40)
kernel: ata8.15: exception Emask 0x100 SAct 0x0 SErr 0x200000 action 0x6 frozen
kernel: ata8.15: irq_stat 0x02060002, PMP DMA CS errata
kernel: ata8.15: SError: { BadCRC }
kernel: ata8.00: exception Emask 0x100 SAct 0x0 SErr 0x0 action 0x6 frozen
kernel: ata8.00: failed command: FLUSH CACHE EXT
kernel: ata8.00: cmd ea/00:00:00:00:00/00:00:00:00:00/a0 tag 9
kernel: res 82/31:04:04:00:00/00:00:00:90:82/00 Emask 0x2 (HSM violation)
Typically with this unit you can determine which disk is failing or troublesome by sight, it’ll have a lingering amber LED just a little longer than the others do that would normally denote read/write activity.
Determining from log messages a particular drive may be difficult because of the port-multiplier setup where they either show up as one identifier or the other (2 x 4 ports).
ls -l /sys/block/sd* | sed -e 's@.*-> \.\..*/ata@/ata@' -e 's@/host@ @' -e 's@/target.*/@ @'
All 6’s or 7’s, not that useful from the logs above.
/sys/block/sda -> ../devices/pci0000:00/0000:00:1f.2 0 sda
/sys/block/sdb -> ../devices/pci0000:00/0000:00:1f.2 1 sdb
/sys/block/sdc -> ../devices/pci0000:00/0000:00:1c.6/0000:03:00.0 6 sdc
/sys/block/sdd -> ../devices/pci0000:00/0000:00:1c.6/0000:03:00.0 6 sdd
/sys/block/sde -> ../devices/pci0000:00/0000:00:1c.6/0000:03:00.0 6 sde
/sys/block/sdf -> ../devices/pci0000:00/0000:00:1c.6/0000:03:00.0 6 sdf
/sys/block/sdg -> ../devices/pci0000:00/0000:00:1c.6/0000:03:00.0 7 sdg
/sys/block/sdh -> ../devices/pci0000:00/0000:00:1c.6/0000:03:00.0 7 sdh
/sys/block/sdi -> ../devices/pci0000:00/0000:00:1c.6/0000:03:00.0 7 sdi
/sys/block/sdj -> ../devices/pci0000:00/0000:00:1c.6/0000:03:00.0 7 sdj
You can also try reading from each drive individually to see if you can trigger a CRC error as well via dd or determining impending failure via smartctl below also.
The main point here specific to the Sans Digital style 8-bay port-multiplier style arrays is that often what may appear to be a flaky cables, card or array when it comes to port resets is really just a failing disk that hasn’t yet been kicked out but is troublesome enough to trigger port resets for the rest of the member disks in that line of ports.
kernel: ata8: controller in dubious state, performing PORT_RST
kernel: ata8: softreset failed (SRST command error)
kernel: ata8: reset failed (errno=-5), retrying in 8 secs
kernel: ata8: controller in dubious state, performing PORT_RST
kernel: ata8: softreset failed (SRST command error)
kernel: ata8: reset failed (errno=-5), retrying in 33 secs
kernel: ata8: limiting SATA link speed to 1.5 Gbps
kernel: ata8: controller in dubious state, performing PORT_RST
Futher Notes
Sometimes mdadm will kick a drive out of an array if it doesn’t respond after a predetermined amount of time (30sec by default for reads). In a lot of cases mdadm is conservative and errs on the side of caution. Of note, eSATA cables are notoriously unreliable and are known to become flaky or poop out entirely.
Unless you’ve got spares lying around and want to really play it safe, sometimes it’s worth trying to re-insert the failed disk back into the array and let it rebuild first before replacing, especially if you don’t hear any tell-tale failure sounds (clicking noises).
You can also do a simple dd test to check for CRC errors, if you get these your drive is most likely failed.
dd if=/dev/sde of=/root/testdisk bs=5G count=1
dd: reading `/dev/sde': Input/output error
0+0 records in
0+0 records out
Lastly you can use smartctl to investigate closer, paying attention to the UDMA_CRC_Error_Count value, though smartctl isn’t always the best at determining this either and can have a lot of false positives.
8-Bay Tower and Software RAID Caveats
If you have issues with disks being renamed, or not coming up or being thrown out of the array with the SANS Digital tower make sure you’re doing the following:
Use a write-intent bitmap, this helps store disk partition information and parity information for recovery. You can set this up at any time via:
mdadm /dev/md1 --grow --bitmap=internal
Use DEVICE partitions in your /etc/mdadm.conf, this will omit the need to use UDEV or disk-by-id labeling for your disks within mdadm. Here’s my /etc/mdadm.conf
DEVICE partitions
ARRAY /dev/md1 level=raid6 num-devices=8 UUID=ae9b6c81-db90-4476-a418-a6dfd91356ae
Drive Timeouts, Rebuilds and SCTRC / TLER
My older eSATA controller and drive bay can be a bit ornery when it comes to timeouts, this often results in drives being kicked out of the array during rebuild.
A blog post I found recently did a great job of providing a a workaround here by either enabling the SCT Error Recovery Control setting in your drives (if it’s supported) or worse case setting a higher timeout within Linux itself.
First, determine if your drive(s) supports SCTRC / TLER functionality:
for drive in /sys/block/sd*; do drive="/dev/$(basename $drive)"; echo "$drive:"; smartctl -l scterc $drive; done
If you see this then they support it:
SCT Error Recovery Control:
 Read: 70 (7.0 seconds)
 Write: 70 (7.0 seconds)
You can then apply this setting via smartctl again on the drives that do:
smartctl -q errorsonly -l scterc,70,70 /dev/sdb
If they all do, cool. If you’re like me and they are cheap, older consumer drives and they do not you’d see something like:
SCT Error Recovery Control:
 Read: Disabled
 Write: Disabled
You can instead set a liberal per-drive timeout as a workaround, this got me through my rather old, ornery e-SATA controller kicking out a drive repeatedly during replacement and subsequent rebuild.
for drive in sdh sdf sdi; do echo "180" > /sys/block/$drive/device/timeout; done
NOTE: This needs to be added to your boot startup to run once everytime, you can use the rc-local systemd service in Centos7 or beyond or /etc/rc.local in EL6 and below for this. It’s important to also note that mdadm can be conservative about failure conditions based on timeouts, but in most modern controllers even with consumer-level drives this shouldn’t always be needed.
Lowering SATA Speed
Sometimes it may help to force a lower SATA speed for your drives, this might help you rule out issues dealing with saturation, NCQ or in the case where you have a mix of various rotational speed and/or SATA generations in the same array.
Adding this to your Linux kernel boot line for example will force SATA speed to 1.5 Gbps.
libata.force=1.5G
In general, Linux will know what’s best to operate under.


What a fantastic writeup. This is going to come in handy in the future. Thanks Will!
LikeLike