
![]()
![]() “It’s not done unless it’s documented,” says the wise Ops sage. Frequently updated documentation is critical, it’s also one of the most neglected parts of technology. Learn how we auto-generate server resource wiki data with Python, WordPress and Foreman.
“It’s not done unless it’s documented,” says the wise Ops sage. Frequently updated documentation is critical, it’s also one of the most neglected parts of technology. Learn how we auto-generate server resource wiki data with Python, WordPress and Foreman.
Stop Manually Editing Things
Gone are the days of a shared spreadsheet containing your critical infrastructure documentation (servers, switches, racks, etc) hopefully. At the very least you are using some kind of shared infrastructure wiki and occasionally some poor sod has to manually edit this when you expand servers or details change. Perhaps you even have the documentation format generation automated.
When we built out a new large-scale R&D environment with our very small 2-person DevOps team we decided we never again wanted to manually edit server/switch/out-of-band infrastructure documentation. Humans are too prone to errors, and those errors matter when something goes wrong. It’s also a mind-numbing task and we’d rather spend our time building stuff than writing about it.
Update: 2016-12: We’ve included this functionality into the QUADS project, updated below.
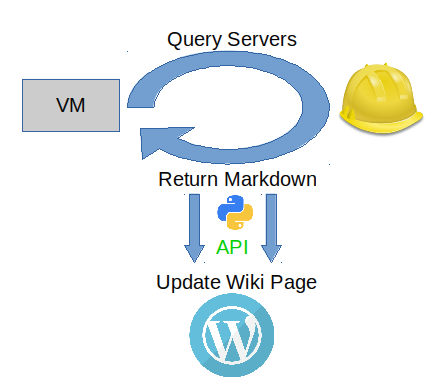
Our Approach: Foreman-driven Documentation
Being huge fans of Foreman for driving provisioning and orchestration it made sense to use Foreman to be the authoritative source for everything in our environments: servers, switches, out-of-band management and general ownership.
Benefits
- Automated, up-to-date documentation generation
- When new servers are added or removed docs are updated
- No human error: data taken directly from Foreman
- Extensible to other data sources like ownership or assignment
Components
- Ansible-deployed WordPress + Nginx on EL7
- Foreman 1.12.2 on EL7 manages all infrastructure DNS/DHCP/PXE
- A shell script calls Foreman CLI, parses output to markdown
- Python-wordpress-xmlprc library pushes this to WordPress
- You may need to install python-wordpress-xmlrpc RPM or use pip if your distribution is missing the package.
Deploy WordPress via Ansible
You can use the following Ansible playbook to deploy WordPress. We will not cover installing Foreman here or using it to setup and manage your infrastructure utilities, fleet management or orchestration. Please see the Foreman documentation here.
git clone https://github.com/redhat-performance/ops-tools
Now edit a few things:
cd ansible/wiki-wordpress-nginx-mariadb
vi group_vars/all
You’ll want to change these values to something that makes sense for you.
# These are the WordPress database settings
wp_db_name: wordpress
wp_db_user: wordpress
wp_db_password: YourPasswordHere
Next, replace the example host with your destination server or VM.
sed -i 's/wiki.example.com/yourservername/' hosts
Now run Ansible to deploy WordPress + Nginx + MariaDB
ansible-playbook -i hosts site.yml
When Ansible finishes deploying WordPress and friends you’ll need to finish the setup manually by going to to your example at http://wiki.example.com

Enable Markdown Post Support
Once WordPress is setup you’ll need to enable markdown support via the JP Markdown plugin. Login to your wp-admin area and go to Plugins -> Add New. On the far right you’ll see a search box. Type in JP Markdown. Click Install Now.

Setup Foreman CLI
The next steps will be heavily dependent on what kind of information you want to capture from Foreman. You should have the hammer CLI tool setup and ready to go. On RHEL7/CentOS7 systems you may need a few extra repos if you aren’t running this on your Foreman server itself. The below repo links are for Foreman 1.12.2 on EL7, substitute appropriately.
yum install http://yum.theforeman.org/releases/1.12/el7/x86_64/foreman-release-1.12.2-1.el7.noarch.rpm
yum install http://yum.theforeman.org/releases/1.12/el7/x86_64/centos-release-scl-rh-2-2.el7.centos.noarch.rpm
yum install http://yum.theforeman.org/releases/1.12/el7/x86_64/centos-release-scl-2-2.el7.centos.noarch.rpm
Install Hammer CLI
Hammer is the powerful CLI tool that lets you query, interact and control Foreman. You’ll need this to pull information from Foreman about your servers and resources that you want automatically documented.
yum install tfm-rubygem-hammer_cli_foreman
Setup Hammer Credentials
You’ll also need to setup Foreman credentials in a configuration file so you can run Hammer without having to pass username/passwords every time. These will be located in /etc/hammer/cli.modules.d/foreman.yml
It should look like this:
:foreman:
  # Enable/disable foreman commands
  :enable_module: true

  # Your foreman server address
  :host: 'https://foreman.example.com/'

  # Credentials. You'll be asked for them interactively if you leave them blank here
  :username: 'admin'
  :password: 'aaaabbbbccccdddd'
If all goes well you should be able to get a list of your hosts:
hammer host list
Automate Pulling Data from Foreman
The next step is to automate pulling data from Foreman. We use a shell script to pull and parse this information. Feel free to pull this down and modify to your needs, we are using this to build/update tables containing server and rack information specifically.
wget https://raw.githubusercontent.com/redhat-performance/quads/master/bin/create-input.sh
We make some assumptions on hostname conventions, for example:
- Out-of-band interface FQDN is the same as your server, appended with mgmt-
- Naming convention has the rack location in the name:
- e.g. rackname-Ulocation-model
We also use the yay.sh tool for YAML templating so we can utilize almost everything as a variable in our configuration file. You can opt to enter this in manually as it makes sense for you or use this method (which we prefer).
This will poll Foreman via Hammer, obtain a list of servers and devices and parse them into a table structure.

Create Your Pages
You’ll need to manually create the WordPress page that will be used to routinely keep automatically updated with new information as it appears in Foreman. Go to Pages -> Add New. Make a title and save it.

Note the Page ID
After you’ve created the page there will be an ID associated with it, you can identify it via the URL bar.

You’ll need the page ID for automation via the wordpress-python-xmlrpc library.
Also note the page title you typed above, e.g. “My Automated Server Page.”
Automate Wiki Updates with Python
The last step is to use the python-wordpress-xmlrpc library to take your markdown document and use Python to update it within WordPress.
Download our racks-wiki.py tool
wget https://raw.githubusercontent.com/redhat-performance/quads/master/bin/racks-wiki.py
Download and edit the regenerate-wiki.sh wrapper. This calls both create-input.sh which queries Foreman and returns markdown and racks-wiki.py which pushes the generated markdown to your WordPress instance to update the page.
wget https://raw.githubusercontent.com/redhat-performance/quads/master/bin/regenerate-wiki.sh
Items to Edit – regenerate-wiki.sh
You will need to edit a few parameters for this to work with your WordPress instance (note that we load all these as YAML variables via yay.sh but you can code them in as well if its’ easier).
- add our appropriate page-id
- add your wordpress url
- add your wordpress credentials
- add your wordpress page title
- remove the below three lines (we generate more than one page, namely an assignments page as well – you can branch out and automate more things like this).
- # generate assignments and ownership page
- sh create-input-assignments.sh 1>$tmpfile  2>&1
- ./racks-wiki-ownership.py --markdown $tmpfile --wp-url http://wiki.example.com/xmlrpc.php --wp-username admin --wp-password admin --page-title "Title of your Systems Ownership Page" --page-id 357
Test Manually
You should be able to test pushing a test page to WordPress by calling racks-wiki.py directly:
python racks-wiki.py --markdown testfile.md \
--wp-url http://wiki.example.com/xmlrpc.php --wp-username admin \
--wp-password admin --page-title "Title of your Dashboard"
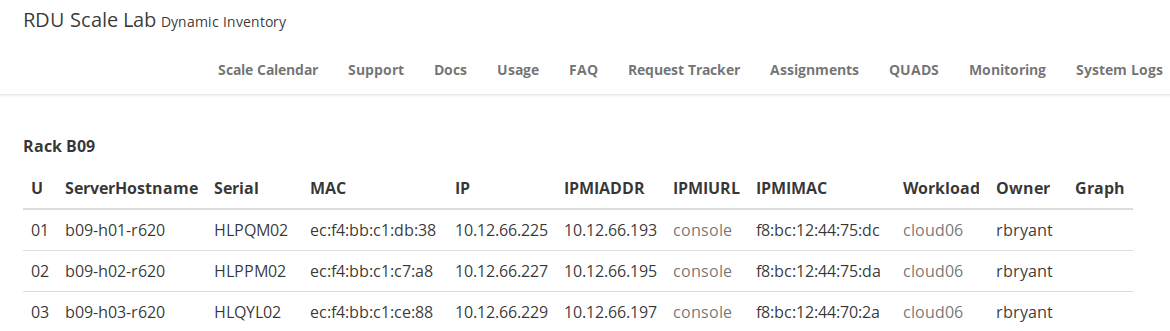
If all goes well you should see the page automatically update. Here is snippet from our auto-generated inventory wiki.
Add Cron Entry
If all looks good you should add an entry in cron to do this automatically. We use the following entry:
0 * * * * /root/quads/bin/regenerate-wiki.sh 1>/dev/null 2>&1
Themes, CSS and Tables
We currently use the Krusze theme as it’s clean, responsive and simple. You should also take a look at working around word-wrapping issues with WordPress.
Extending Further
Update: 2016-12
We are also auto-generating system ownership documentation via our QUADS scheduler using the same approach. You can clone our git repo below and poke around, re-use whatever is useful for you. Check back often, we’re constantly updating things and adding features.
git clone https://github.com/redhat-performance/quads
cd quads
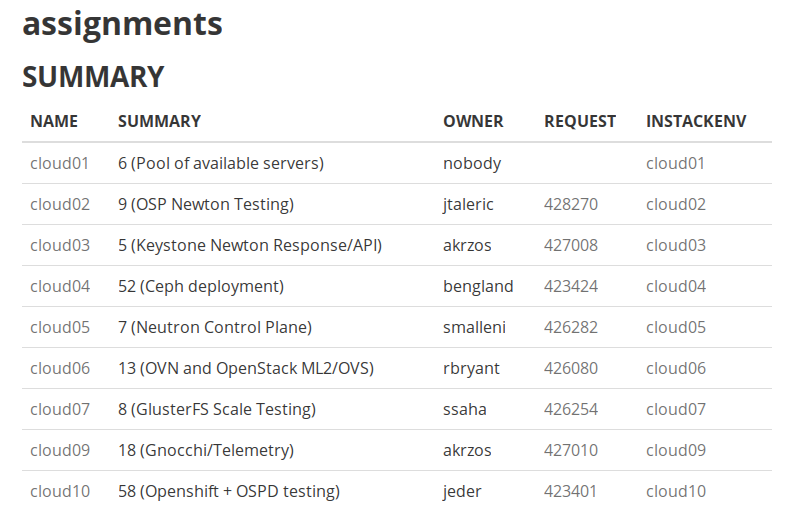
You can see an example of the auto-generated assignments summary page below.
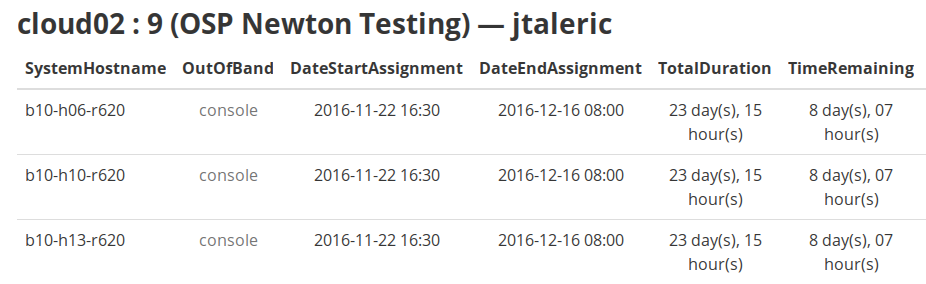
Drilling down into individual workloads/assignments:
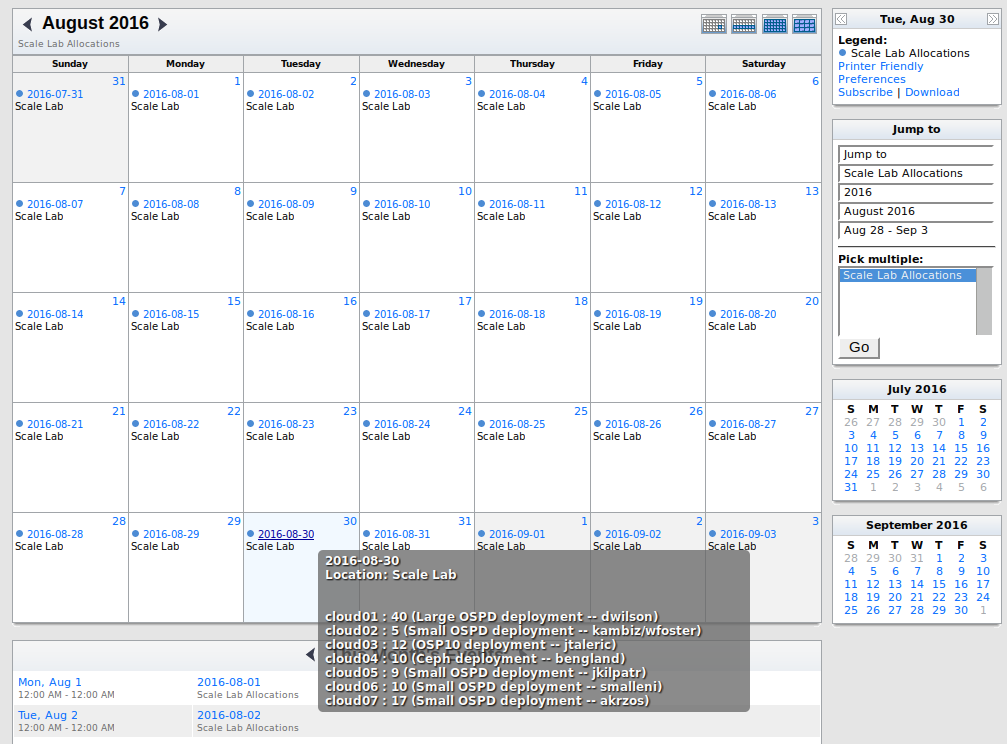
Additionally, our tool also generates an assignments and workload calendar for a heavily utilized, fully-automated large R&D lab.
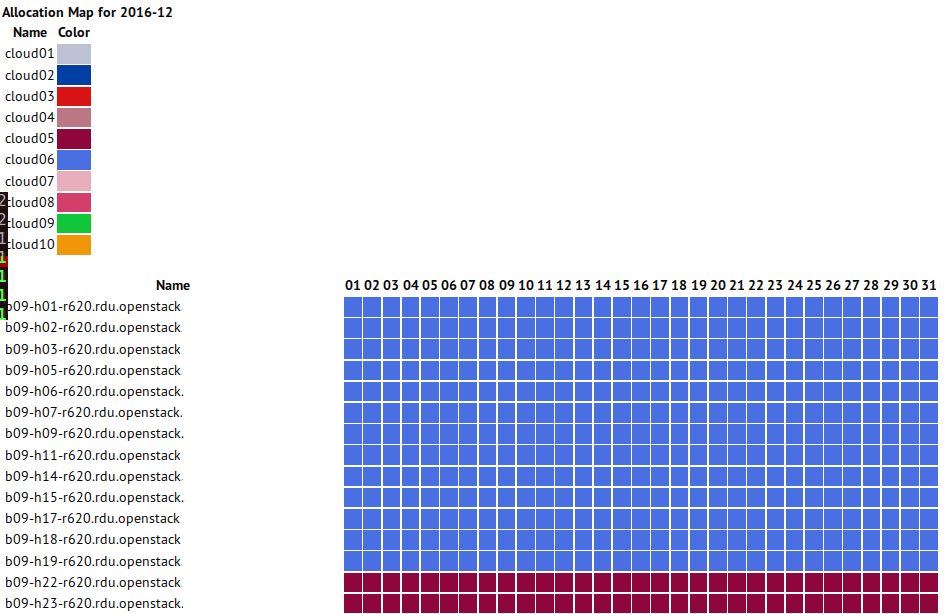
We also generate a heat map visualization for assignments on a per-month basis:


Why on earth would you use Python and then spoil it by using WordPress, what about Django, Pyramid, etc etc etc
LikeLike
There’s nothing inherently wrong with WordPress, it does a decent enough job of page/post revisions and supports markdown. It’s also easy for less-technical folks to use. It could be easily substituted for something else like Jekyll, MediaWiki, anything if you’re allergic to it. The purpose of the post is less about what the underlying wiki is and more the workflow of automating things.
LikeLike