
![]() I recently setup Pi-hole on an existing Raspberry Pi running CentOS on my home network to serve as my DNS server and block advertising and unwanted domains for all internet-connected devices. I’m still using an ASUS router with Shibby Tomato firmware for routing, DHCP and private VLANs so I had to make a few changes. This is how I got up and running along with some performance tuning.
I recently setup Pi-hole on an existing Raspberry Pi running CentOS on my home network to serve as my DNS server and block advertising and unwanted domains for all internet-connected devices. I’m still using an ASUS router with Shibby Tomato firmware for routing, DHCP and private VLANs so I had to make a few changes. This is how I got up and running along with some performance tuning.
What’s Pi-Hole?
Pi-hole is a set of software packages that provide filtering and advertisement blocking for all internet services on your network. It alleviates what might traditionally be done via adblockers or per-device software because it blocks things at the DNS level. It uses dnsmasq, lighttpd, FTL and some other packages to tie all this together into a nice, easy-to-use web interface. Pi-hole can be installed on any existing Linux device or VM.
Pi-hole utilises several well known and trusted internet blacklists and keeps them up-to-date. At the DNS level it can then thwart unwanted ads, malware domains and other unsavoury internet denizens from appearing on any of your internet devices or computers.
This video gives a decent overview.
How It Works
You can have pi-hole handle your DNS, DHCP or both. On the LAN side it uses dnsmasq as a caching DNS server where filtering/discarding happens. Upstream lookups are performed by choosing one of the several free options like Google DNS, OpenDNS, Level3 and others or you can enter your own.
For my purposes I wanted Pi-hole to perform bare-minimum caching DNS duties as my Tomato router does a good enough job of handling DHCP and address assignment. I am also using private, isolated VLANs for devices that are less than trustworthy like Smart TVs.
Update: 2018-04: If you want to setup Pi-Hole as a Docker container and have it “on the go” on your laptop via local DNS scroll to the bottom of this guide.
Getting Started – My Network
I am running pi-hole on an existing Raspberry Pi for DNS services, but this could be any host or VM inside your network. I have DHCP services handled by my router. Once setup I just needed to point static DNS from my Tomato router to use the new pi-hole service.
Install Pi-Hole
I am going to assume you’re using a Linux-based device like a Raspberry Pi running on CentOS but any VM or host will work. The official instructions tell you to curl a script and pipe it to bash as root but we’re not going to do that.
Install Git and EPEL Repository for ARM
yum install git -y
Next, ensure you have the EPEL repository installed. On ARM devices like the Raspberry Pi you can use the snippet below to enable it.
cat > /etc/yum.repos.d/epel.repo << EOF
[epel]
name=Epel rebuild for armhfp
baseurl=https://armv7.dev.centos.org/repodir/epel-pass-1/
enabled=1
gpgcheck=0

EOF
Update to PHP 7.x If you’re on CentOS7
CentOS currently ships with PHP 5.6 which is quite old, to take advantage of additional language support and better security as well as to curb some possible bugs you should also update to PHP7. There’s a current pull request on the Pi-hole Github to get this in place by default but for now you should upgrade on your own.
On Raspberry Pi / ARM there are some repos available here:
cat > /etc/yum.repos.d/php72-testing.repo << EOF
[php72-testing]
name=Remi php72 rebuild for armhfp
baseurl=https://armv7.dev.centos.org/repodir/community-php72-testing/
EOF
Now install the PHP72 versions of what will be required from the Pihole installer.
yum install php-cli php-json php php-common php-pdo
If you’re using CentOS7 for x86_64 or non-ARM then just use the Remi PHP repositories here. If you’re not using any of these consult your distribution documentation.
Now you’re ready to clone pi-hole and run the automated installation script.
Clone and Run the Installation Script
git clone --depth 1 https://github.com/pi-hole/pi-hole.git Pi-hole
cd "Pi-hole/automated install/"
sudo bash basic-install.sh
The automated installation script will now execute.
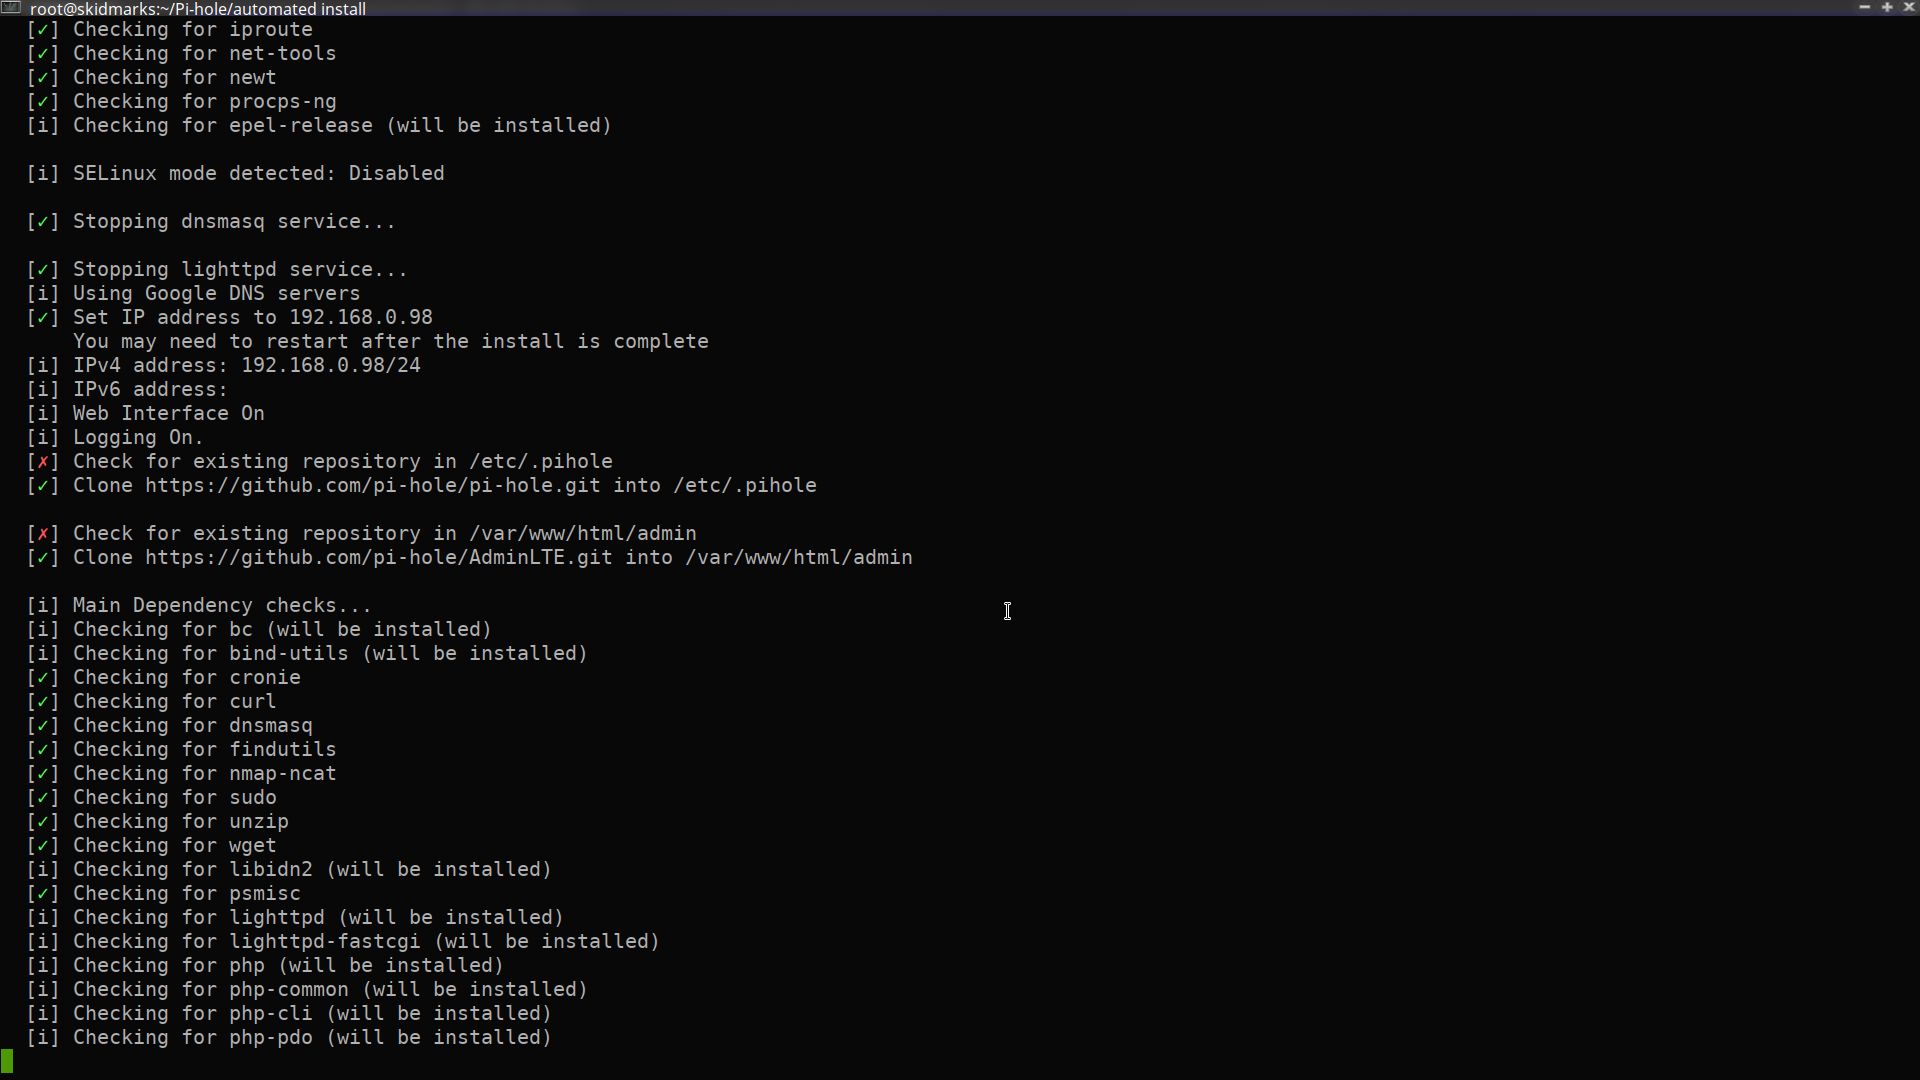
After any missing packages are installed it will setup and configure itself and you’ll be presented with configuration details.
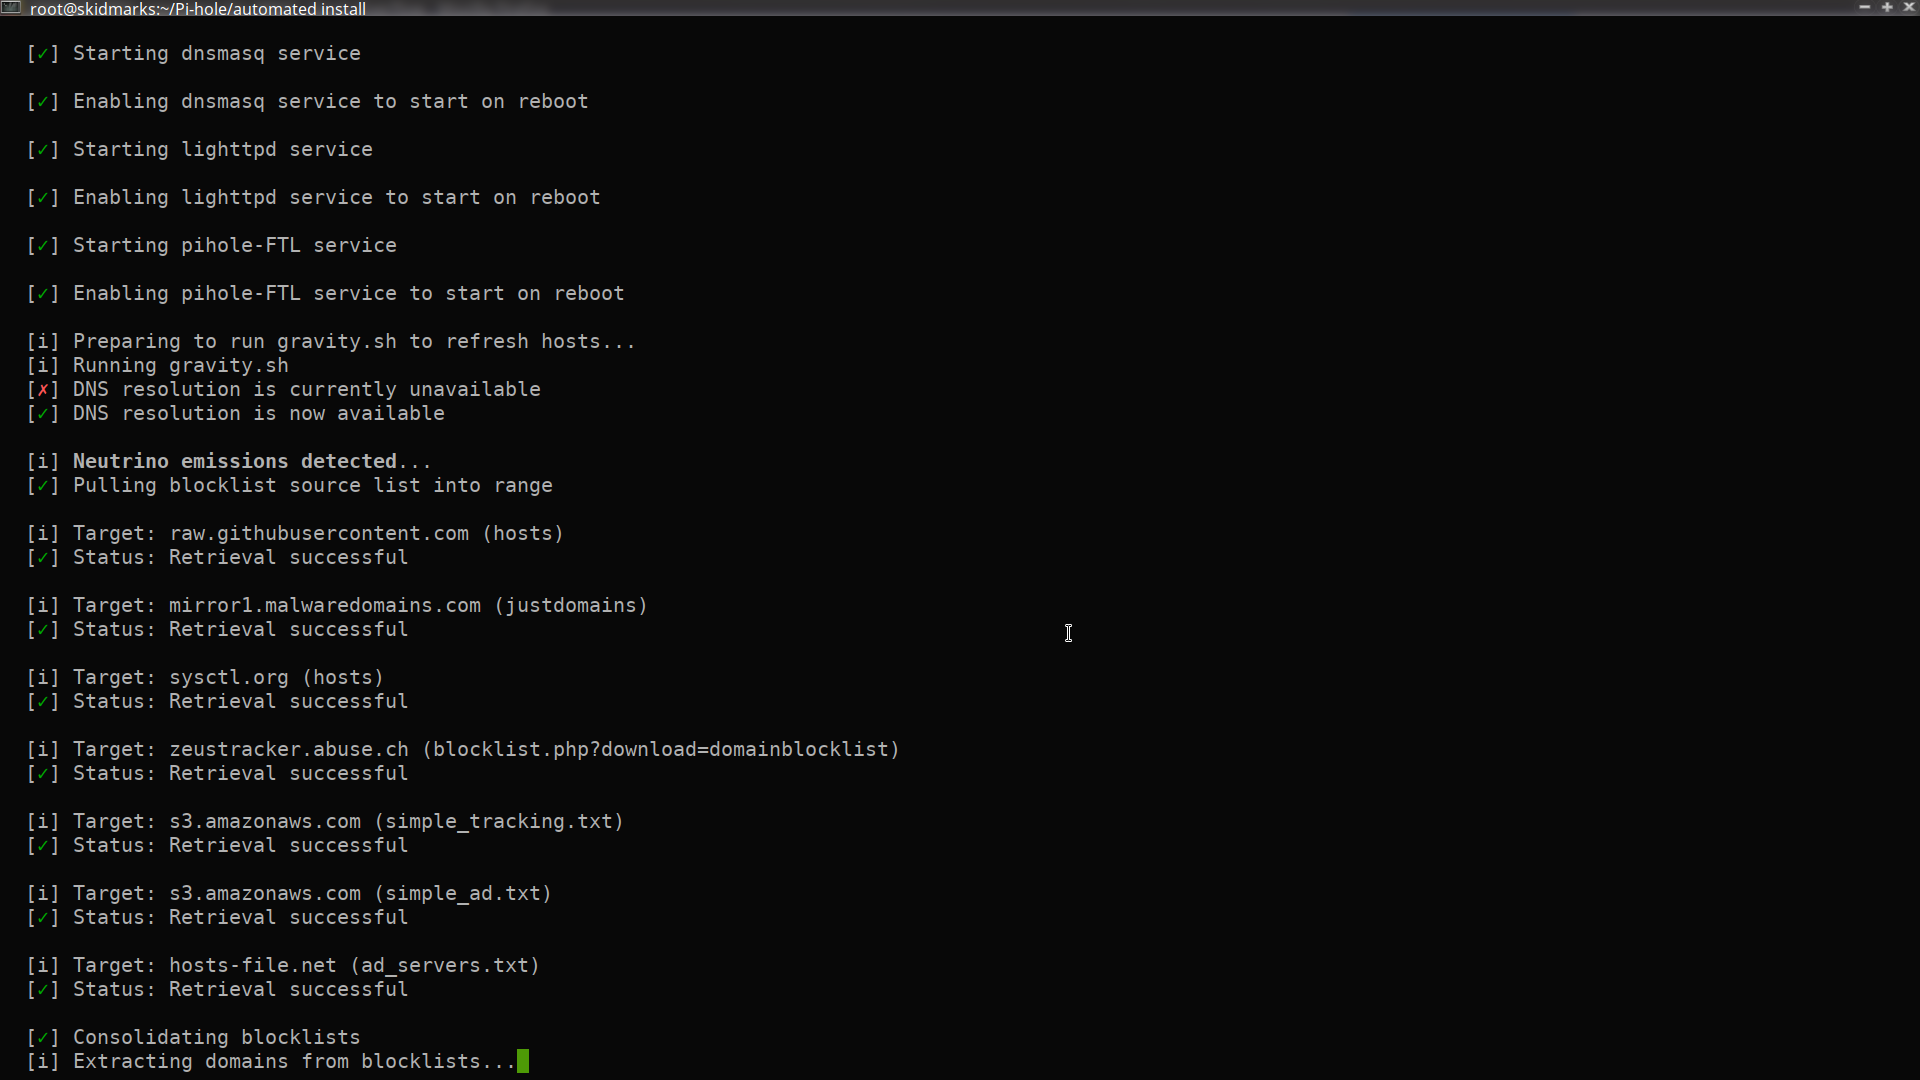
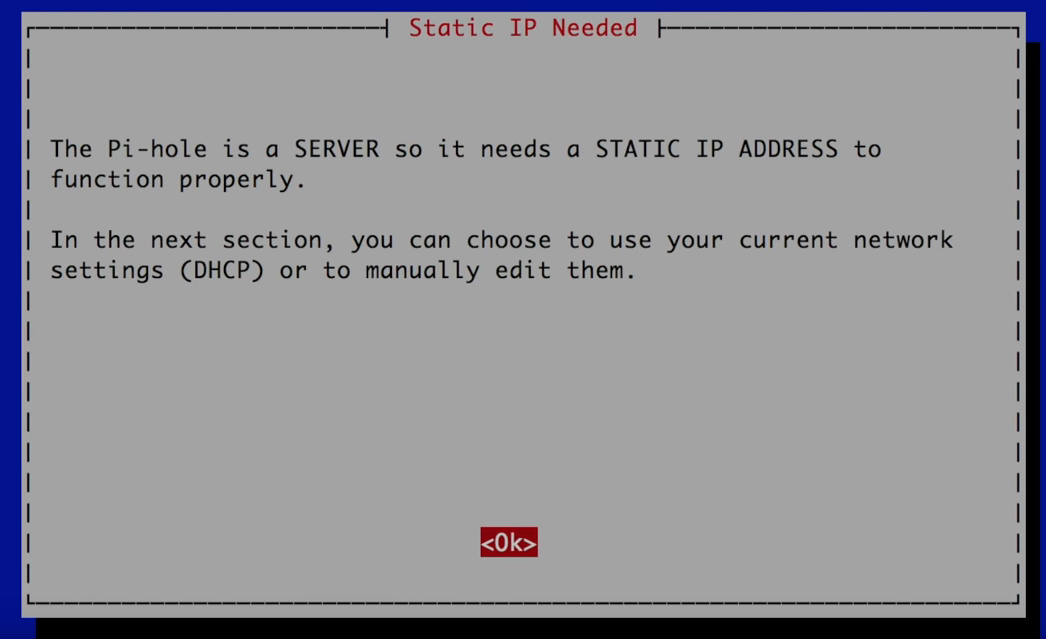
You’ll then be presented with an ncurses configuration guide, the defaults are just fine.
At this point you should be able to access http://your-pi-hole-machine/admin/index.php to access the web interface. Be sure to copy the web GUI admin password printed on the screen and keep it somewhere safe. You may need to manage your own firewall rules here, so make sure that UDP/53 (DNS) and TCP/80 (HTTP) are open on your Pi-hole host.
Limit Writes to Solid State Devices
It’s recommended to lower the DBINTERVAL setting for the FTL service from the default of 1second to 60 seconds to limit the frequency of database writes. This should prolong the life of your SD, SSD, M2, or similar solid state device if you’re using one.
cat > /etc/pihole/pihole-FTL.conf << EOF
# Lower DB writes for SD card life to 60
# https://wiki.archlinux.org/index.php/Pi-hole#FTL
DBINTERVAL=60

EOF
Now restart the FTL service to take effect.
systemctl restart pihole-FTL
Resolving Internal Domain Names
If you’re not using Pi-hole for managing both DHCP and DNS then you’ll want to maintain a static mapping of local (LAN) ip addresses to hostnames for local resolution.
Pi-hole needs this so you will show hostnames instead of local ip addresses in your query logs, dashboard and visualizations.
You can do this with the /etc/hosts file on your Pi-hole host.
192.168.0.22   localwebserver01
192.168.0.23   localwebserver02
192.168.0.24   mysketchytelevision
Tuning dnsmasq for Higher Traffic
Before you point your router or clients to start using pi-hole for your DNS you may want to tune settings for more demanding networks or a larger amount of clients. I added the following to my /etc/dnsmasq.d/02-custom-settings.conf.
cat > /etc/dnsmasq.d/02-custom-settings.conf << EOF
#### EDIT SETTINGS
dns-forward-max=5096
min-cache-ttl=300
rebind-domain-ok=/plex.direct/
#### END EDIT

EOF
Let me explain these above:
- dns-forward-max = this increases the max DNS forward limit, if you have a rather busy internal network you will easily hit the limit of 150 which in my opinion is way too low. 1024+ is more realistic.
- min-cache-ttl = This extends the minimum time-to-live settings for cached lookups and ensures all DNS lookups will be cached for at least 300 seconds. This is a very useful setting and lets you take full advantage of caching nameserver capabilities.
- rebind-domain-ok = this lets you specify domains where DNS rebind support is needed like the Plex Media Server. If this doesn’t mean anything to you then you probably don’t need it.
Apply the new tunings by restarting the dnsmasq service.
systemctl restart dnsmasq
Test DNS resolution on another system in your network, you should quickly get responses back from dig requests
dig @192.168.0.98 hobo.house
If all is clear now it’s time move your DNS to pi-hole. If you specify DNS servers for each of your clients then you just need to update them to point to your newly setup device.
This article explains how to switch to pi-hole DNS for your devices or router.
At this point you’re done, skip past the Tomato section if this doesn’t apply to you for Pi-hole usage, common commands and useful tips.
Pointing your ASUS Tomato Router to Pi-Hole for DNS
I am using an ASUS Black Knight router running the Shibby Tomato firmware, which I will use for demonstration purposes.
First I need to point it to use my new pi-hole DNS (192.168.0.98 in my case)

Next, I need to turn off the existing DNS settings that Shibby Tomato previously managed for me.

Additionally you might need these settings for dnsmasq.conf within Tomato to ensure that all wireless clients obtain Pi-hole DNS via Tomato DHCP if you see (forwarded) in query logs.
If you see the following in Pi-hole query logs then you need to set the below setting

Besides setting the below dnsmasq Tomato settings I also enabled the two SLAAC and DHCP IPv6 options below.
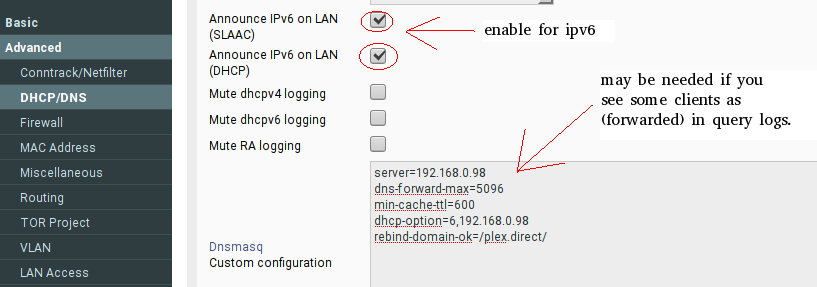
Here are the dnsmasq lines for easy copy/paste, you should substitute my 192.168.0.98 for your Pi-hole address.
server=192.168.0.98
dns-forward-max=5096
min-cache-ttl=600
dhcp-option=6,192.168.0.98
Lastly I need to add a static route for any private, isolated VLANS I am managing with Tomato Shibby. In my case I was using 172.16.0 for my private VLAN but I use 192.168.0 networks for everything else. This is needed to allow DNS traffic between the normally-isolated networks. You can disregard this step if you don’t have such a setup.

Without the static route I would never be able to route 172.16.0 –> 192.168.0.98 (Pi-hole) for DNS traffic.
Testing and Using Pi-Hole
At this point clients in your home network, including all wireless clients should be immediately benefiting from the ad, malware and bad-people-on-the-internet filtering provided by pi-hole. You can access the web UI and note stats, percentage of traffic , statistics per client, blocks, common domains and other useful information.
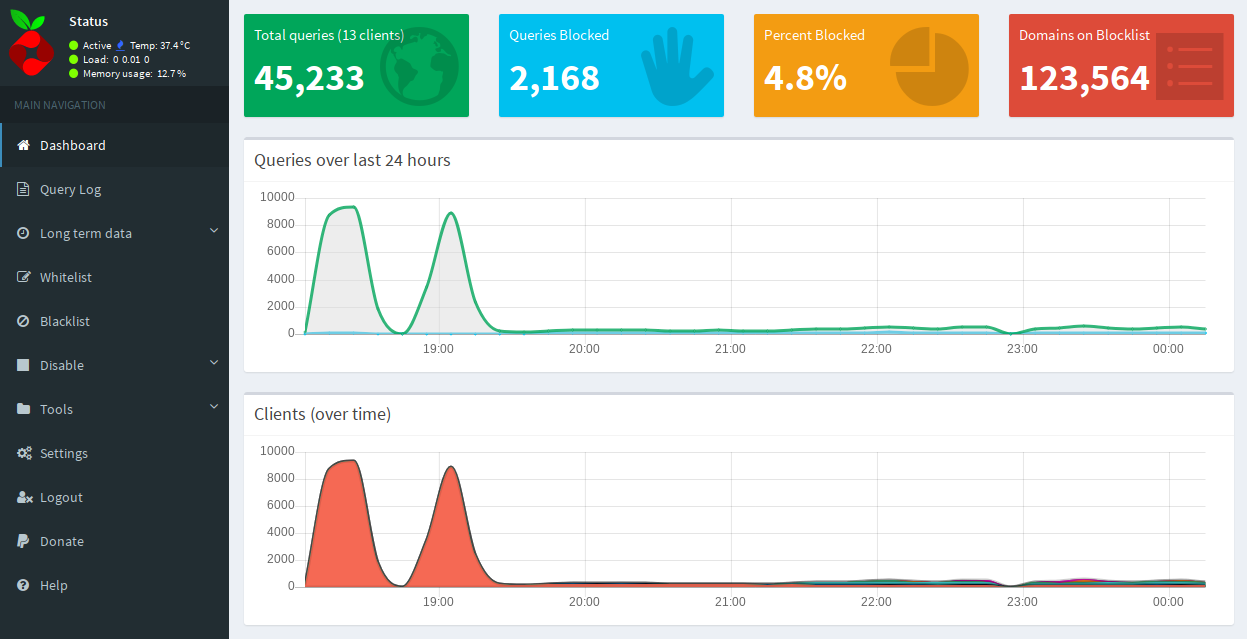
Note that the Percent Blocked are DNS queries to/from undesirable locations like known advertising, beacons, trackers which would normally denote some level of accompanying network traffic – it’s not actual network traffic blocked.
For reference these are the DNS settings I have set in the UI. You can just as easily manage these in /etc/dnsmasq.d/01-pihole.conf via SSH and restarting the dnsmasq service.
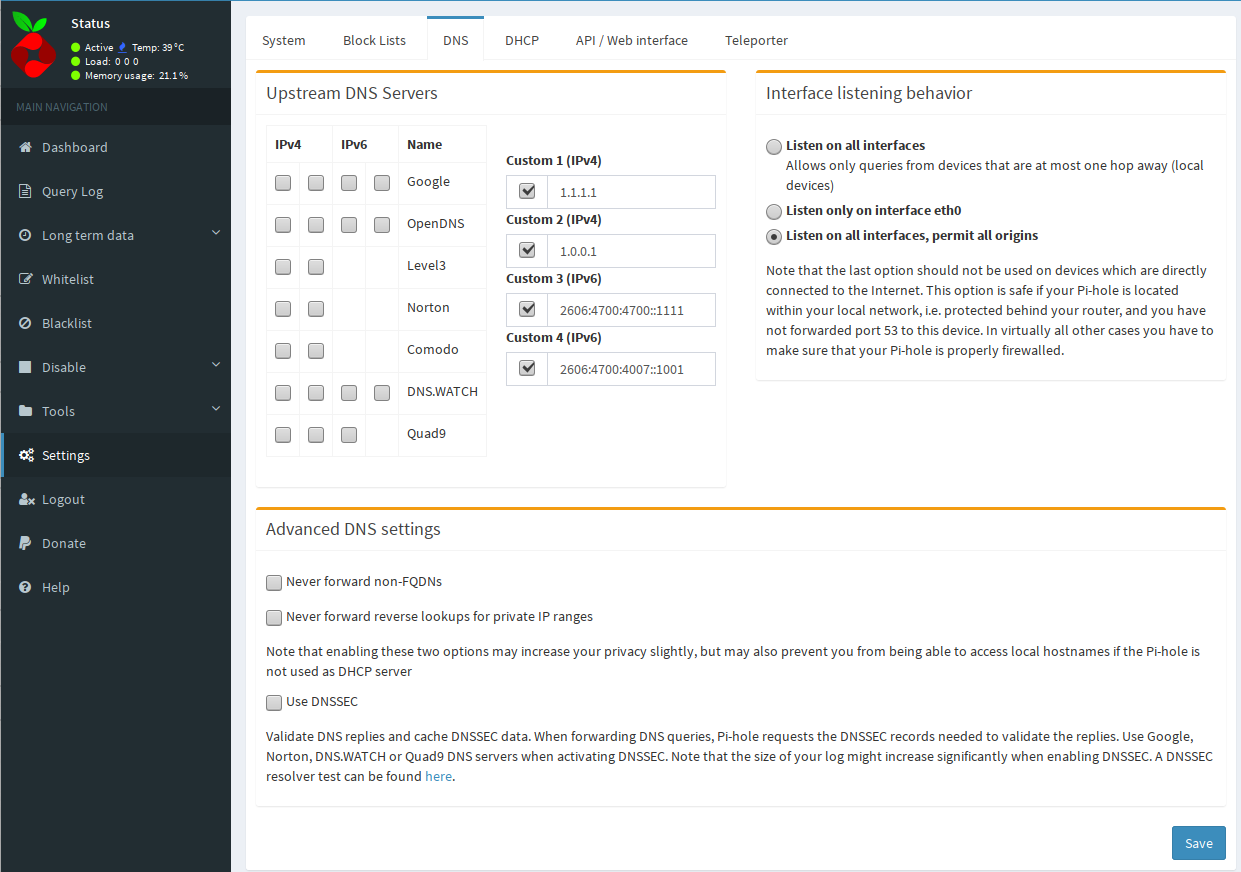
Note: I am now using the Cloudflare DNS 1.1.1.1 / 1.0.0.1 and their IPv6 servers in lieu of Google DNS or others.
Here they are for your convenience:
IPv4 DNS #1 -> 1.1.1.1
IPv4 DNS #2 -> 1.0.0.1
IPv6 DNS #1 -> 2606:4700:4700::1111
IPv6 DNS #2 -> 2606:4700:4007::1001
I have opted for listening/permitting all origin traffic as my Pi-hole is firewalled behind my Tomato router and I need to accept multi-hop origin requests from private VLANs from within my network. Most people can use “Listen only on interface eth0” for example.
There are also options for blacklisting and whitelisting domains, you can access this in the UI settings.
Updating Pi-Hole
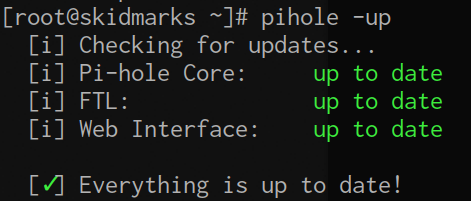
You can run the supplied pihole script to update it over SSH – this will update the core version if there is an update available.
pihole -up
Pi-hole already sets up a cron job in /etc/cron.d/pihole however which updates the ad sources once a week, the above is just for updating the released version. You can also run this inside the web interface.
Pi-Hole CLI
You can also issue common commands as needed via SSH, check pihole -h for more info.
Blacklisting domain(s)
pihole -b unwantedsalescrap.net moreunwantedjunk.com
White listing domain(s)
pihole -w myfriendsblogthing.org thisotherblog.net
Blacklisting wildcard domains, e.g. any url and associated subdomains.
This is for single domains only (note: syntax was changed in 4.0 from -wild).
pihole --wild reallyirritatingmarketing.com badpeople.org
Querying the ad lists domains. You can also pass -exact to match more precisely.
pihole -q domain.match.here
Changing the web admin password. If you leave the new password blank it will simply not prompt for one.
pihole -a -p
You can tail DNS queries that come in as well, with color indication of what’s new, cached or blocked. Use control+c to quit.
pihole -t

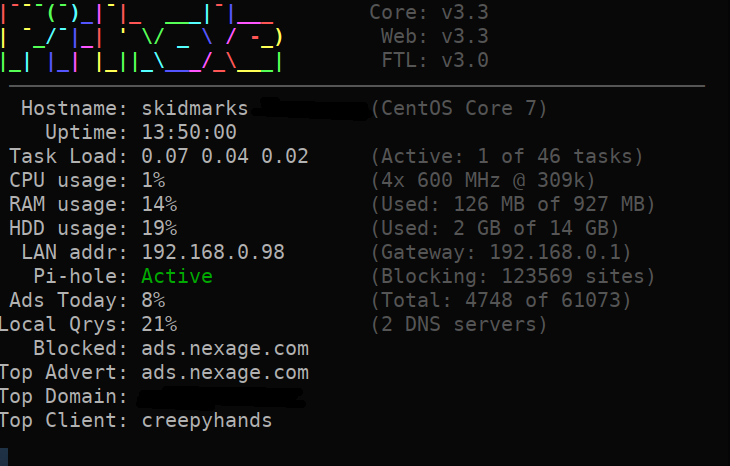
Pi-hole also comes with a nice top-like chronometer utility
pihole -c
Adding More Block Lists
While you can use either the pihole -b (blacklist) or pihole -wild (wildcard domain block) for blocking single domains the most efficient way to protect your network is through domain block lists.
Domain block lists are cultivated 3rd party lists that contain many many domains that are known to be malicious or contain unwanted advertising and trackers. When you add block lists your pi-hole will query them and keep your block lists updated via cron.
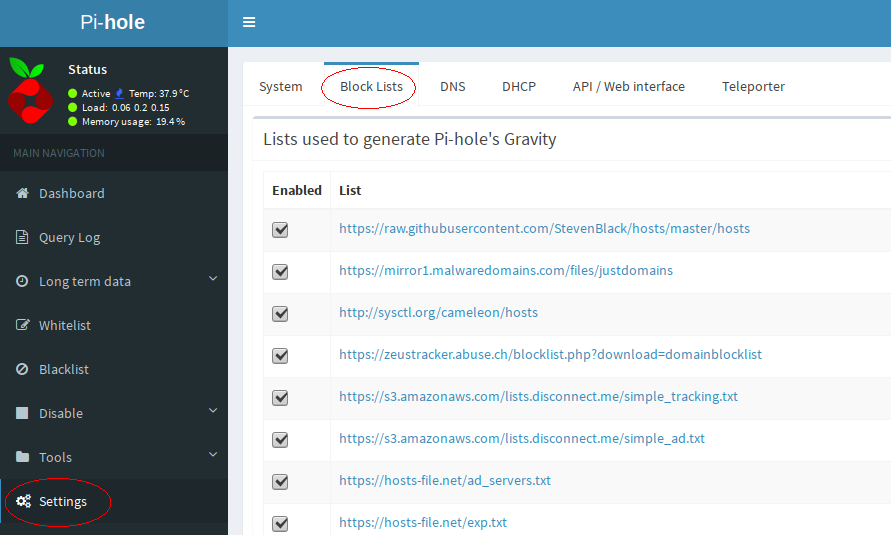
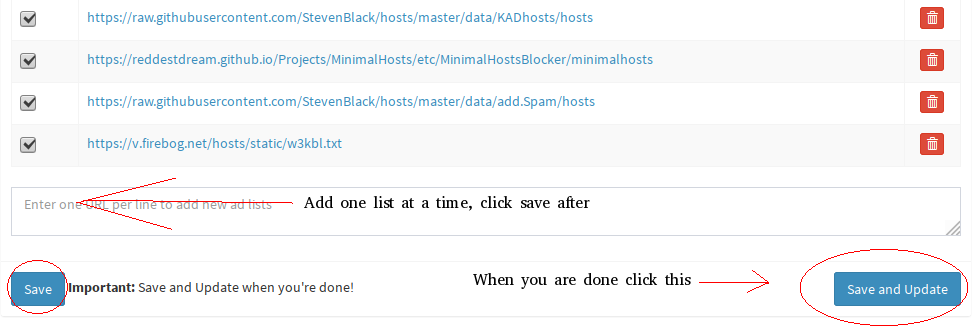
I’ve found a great source of additional block lists over at the cryptoaustralia.org blog as well as wally3k is also excellent. You can easily add/manage block lists in the web UI under Settings -> Block Lists. Enter each block list one at a time and hit save, click save and update when you are finished and it will regenerate.
You can also manage them via the CLI by adding entries new sources to 3rd party blocklists in /etc/pihole/adlists.list and then tell pi-hole about it.
pihole -g
Here are the additional 3rd party block lists I am using, they’ve worked for me with no issues and block around 555,000 domains. Out of the box Pi-hole should block around 123,000 domains as of typing this.
Below you can paste this and it will add all my blocklists to your Pi-hole
pihole tee -a /etc/pihole/adlists.list >/dev/null << EOF
### hobo.house list
https://raw.githubusercontent.com/StevenBlack/hosts/master/hosts
https://mirror1.malwaredomains.com/files/justdomains
http://sysctl.org/cameleon/hosts
https://zeustracker.abuse.ch/blocklist.php?download=domainblocklist
https://s3.amazonaws.com/lists.disconnect.me/simple_tracking.txt
https://s3.amazonaws.com/lists.disconnect.me/simple_ad.txt
https://hosts-file.net/ad_servers.txt
https://hosts-file.net/exp.txt
https://hosts-file.net/emd.txt
https://hosts-file.net/psh.txt
https://v.firebog.net/hosts/Airelle-hrsk.txt
https://v.firebog.net/hosts/Shalla-mal.txt
https://ransomwaretracker.abuse.ch/downloads/RW_DOMBL.txt
https://ransomwaretracker.abuse.ch/downloads/LY_C2_DOMBL.txt
https://ransomwaretracker.abuse.ch/downloads/CW_C2_DOMBL.txt
https://ransomwaretracker.abuse.ch/downloads/TC_C2_DOMBL.txt
https://ransomwaretracker.abuse.ch/downloads/TL_C2_DOMBL.txt
http://www.networksec.org/grabbho/block.txt
https://isc.sans.edu/feeds/suspiciousdomains_Medium.txt
http://someonewhocares.org/hosts/hosts
https://s3.amazonaws.com/lists.disconnect.me/simple_malvertising.txt
http://www.joewein.net/dl/bl/dom-bl.txt
https://raw.githubusercontent.com/crazy-max/WindowsSpyBlocker/master/data/hosts/spy.txt
https://v.firebog.net/hosts/static/SamsungSmart.txt
https://gist.githubusercontent.com/anudeepND/adac7982307fec6ee23605e281a57f1a/raw/5b8582b906a9497624c3f3187a49ebc23a9cf2fb/Test.txt
https://raw.githubusercontent.com/StevenBlack/hosts/master/data/KADhosts/hosts
https://reddestdream.github.io/Projects/MinimalHosts/etc/MinimalHostsBlocker/minimalhosts
https://raw.githubusercontent.com/StevenBlack/hosts/master/data/add.Spam/hosts
https://v.firebog.net/hosts/static/w3kbl.txt

EOF
Now you’ll want to reload Pi-hole with the new list:
pihole -g
You may want to keep an eye on your DNS queries the first 24hours or so to make sure you’re not blocking any false positives. You can unblock/whitelist domains with the pihole CLI (it’s reported doing this via the UI doesn’t always work currently).
Domains I Whitelist Manually
There were a few I had to white list for example:
pihole -w youtu.be opensubtitles.org www.opensubtitles.org t.co
Update: here are a few more I had to add, wrapped for your convenience. Your mileage here may vary depending on the services you use.
pihole -w pubsub.plex.tv plugins.plex.tv chapterdb.plex.tv cloudfront.net \
plex.direct csi.gstatic.com dl.opensubtitles.org speedvideo.net ton.twimg.com \
twimg.com chapterdb.plex.tv tinyurl.com bit.ly ton.twimg.com dropbox.com \
pubsub.plex.bz fonts.gstatic.com assets.adobedtm.com www.googletagmanager.com \
links.services.disqus.com ump.plex.tv meta.plex.tv goo.gl cdnjs.cloudflare.com
Domains I Block Manually
On that same note, here are domains I’ve manually blacklisted after a few weeks of watching my query logs. These either came from my hawkish observations or known telemetry domains, one or two even traced back to questionable entities located in the Washington, D.C. area. Some of these are just downright ridiculous, come on Microsoft ..
pihole -b dxp.baidu.com hmma.baidu.com pasta.esfile.duapps.com \
neweegg.net config.a-mo.net nrc.tapas.net xpu.samsungelectronics.com \
upu.samsungelectronics.com dns.msftncsi.com bn2wns1b.wns.windows.com \
a-0001.a-msedge.net msnbot-65-52-108-90.search.msn.com a-0011.a-msedge.net \
bn2ap002.device.ra.live.com a.ads1.msn.com a.ads2.msn.com ad.doubleclick.net \
adnexus.net adnxs.com ads.msn.com ads1.msads.net ads1.msn.com \
az361816.vo.msecnd.net az512334.vo.msecnd.net ca.telemetry.microsoft.com \
cache.datamart.windows.com choice.microsoft.com corp.sts.microsoft.com \
choice.microsoft.com.nsatc.net choice.microsoft.com.nstac.net \
choice.microsoft.com.nstac.net compatexchange.cloudapp.net corp.sts.microsoft.com \
corpext.msitadfs.glbdns2.microsoft.com cs1.wpc.v0cdn.net \
db3wns2011111.wns.windows.com df.telemetry.microsoft.com \
diagnostics.support.microsoft.com fe2.update.microsoft.com.akadns.net \
fe3.delivery.dsp.mp.microsoft.com.nsatc.net feedback.microsoft-hohm.com \
feedback.search.microsoft.com feedback.windows.com i1.services.social.microsoft.com \
i1.services.social.microsoft.com.nsatc.net msnbot-207-46-194-33.search.msn.com \
oca.telemetry.microsoft.com oca.telemetry.microsoft.com.nsatc.net \
pre.footprintpredict.com preview.msn.com rad.msn.com \
redir.metaservices.microsoft.com reports.wes.df.telemetry.microsoft.com \
settings-sandbox.data.microsoft.com settings-win.data.microsoft.com \
settings.data.microsof.com sls.update.microsoft.com.akadns.net spynet2.microsoft.com \
spynetalt.microsoft.com sqm.df.telemetry.microsoft.com sqm.telemetry.microsoft.com \
sqm.telemetry.microsoft.com.nsatc.net ssw.live.com statsfe1.ws.microsoft.com \
statsfe2.update.microsoft.com.akadns.net statsfe2.ws.microsoft.com \
survey.watson.microsoft.com telecommand.telemetry.microsoft.com \
telecommand.telemetry.microsoft.com.nsatc.net telemetry.appex.bing.net \
telemetry.microsoft.com telemetry.urs.microsoft.com view.atdmt.com \
v10.vortex-win.data.microsoft.com vortex-sandbox.data.microsoft.com \
vortex-win.data.microsoft.com vortex.data.microsoft.com watson.live.com \
watson.microsoft.com watson.ppe.telemetry.microsoft.com \
watson.telemetry.microsoft.com watson.telemetry.microsoft.com.nsatc.net \
wes.df.telemetry.microsoft.com win10.ipv6.microsoft.com adservice.google.com \
ads.aws.viber.com stats.appsflyer.com adservice.google.ie referrer.disqus.com \
browser.pipe.aria.microsoft.com tracking.campaign-tracking-service.placelocal.com \
primoitaliablob.blob.core.windows.net srv.dc-1.net \
wdcpeurope.microsoft.akadns.net wdcp.microsoft.akadns.net
Blocking Additional Advertising
For example if you want to block the advertising in Spotify (on some clients spclient block may break functionality, works fine for me however:
pihole -b open.spotify.com ads.converge-digital.com \
heads-ak.spotify.com.edgesuite.net i.scdn.co audio-fac.scdn.co \
beta.spotify.map.fastly.net spclient.wg.spotify.com \
platform-lookaside.fbsbx.com
If you’re a premium subscriber to Spotify and want to block “sponsored” advertising:
pihole -b platform-lookaside.fbsbx.com
If you want to block advertising in-app for Viber messenger:
pihole -b ads.aws.viber.com
Wildcard Domains I Block Manually
Additionally I also started blocking these wildcard domains as they were advertisers, trackers or just sketchy connections from China that showed up with an older Android tablet I use as an alarm clock.
pihole --wild bidr.io 88-f.net mythings.com
All individual blacklisted domains can be found in /etc/pihole/blacklist.txt so you can also just edit/update this if you wanted an easy way to remove something then re-initialize:
pihole -g
I will be keeping all these lists updated
First Impressions
Right away I saw an increase in general responsiveness across all my devices, most likely due to the caching name server settings. I expect a further increase in responsiveness soon due to blocking many of the known advertising sources. The graphing, logging and dashboard information is easy to read and inspect.
I really like the idea of this project and how it ties everything together. Ad-blocking using 3rd party block lists isn’t a new concept but packaging this into an easy-to-use solution that works on any existing machine using OSS tools is really useful.
In upcoming versions the FTLDNS or “Faster than Light DNS” should make an appearance which adds more direct hooks into dnsmasq and speed things up even more from a user perspective, though it’s already pretty snappy.
Performance and Usage
A few hours after implementing Pi-hole around 10% of the DNS lookups on my home network showed to be attempts by advertisements, trackers and other undesirables, this is now curbed. I even managed to blacklist some additional domains from China (baidu.com) I noticed in the query log that I’m not sure had any reason to be talking to my network. It is also very lightweight to run, consuming around 9mb of memory and a very nominal amount of CPU on the Raspberry Pi2 and CentOS7.
Whitelisting not Working via Web UI
As of Pi-hole 3.3 there are some known issues with whitelisting domains via the web interface, the workaround for this is to remove the whitelist via the web interface and re-add it via pihole -w domain.name.here. This does not affect all users, only some due to a locale issue and should be fixed soon. This did not affect me on CentOS7 / Raspberry Pi2 in the GMT timezone.
Issues Updating to 4.x
If you have issues upgrading from 3.X to 4.x via pihole -up you may need to manually remove the dnsmasq package. In later 4.x versions of pi-hole they have their own custom version of dnsmasq bundled with FTL.
You may then need to run the repair script
pihole -r
Pihole-FTL Service 100% or Not Starting
If you have a rather large /var/log/pihole.log file (>=800mb) sometimes it’s too large for the pihole-FTL service to parse on lower-end hardware. The result is that your web UI statistics and query list cannot be rendered.
-rw-r--r-- 1 nobody root 888M Jul 30 00:18 pihole.log
Usually this file should be rotated, otherwise you can remove it and restart the pihole and it should resolve itself.
Statistics 24 Hours after Install
After 24hours I started to see the real DNS blocking imprint with 20-some-odd devices on my home network, a few friends over contributing to the fray and a full day of working remotely. I also added a dozen more block lists to the mix, pushing my block domains up to around 555,000.
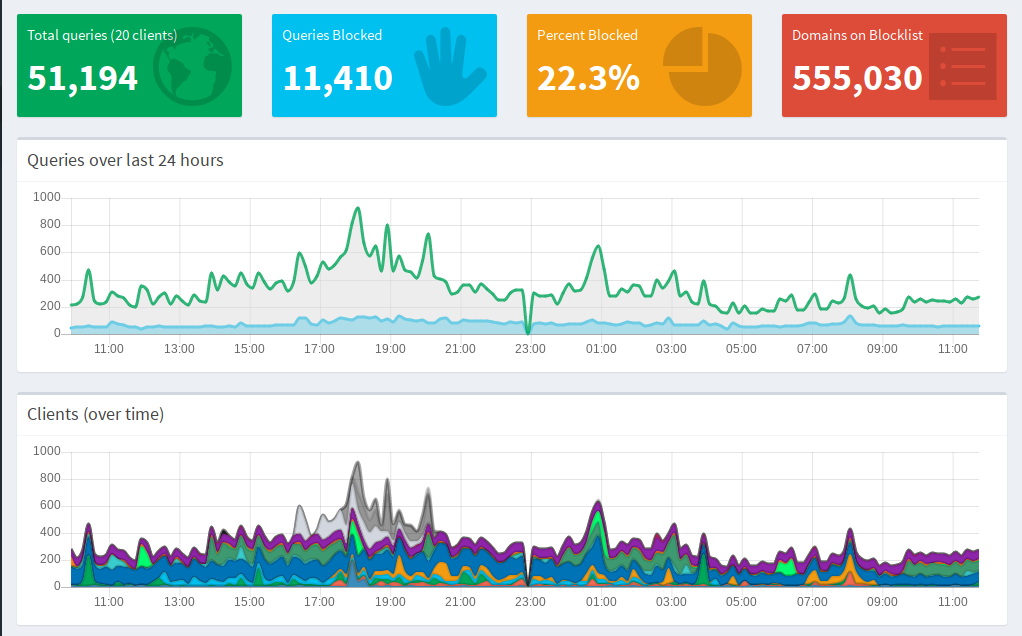
Upwards of 22% of the DNS lookups were blocked which normally would have incurred some additional traffic overhead. CPU and memory usage stayed about the same, it’s pretty lightweight. General device network responsiveness to queries continued to be snappier than they were before it was deployed.
Containerized Pi-hole on the Go
You can also install Pi-hole as a docker container and then set it up on your laptop and set the Pi-hole container as your DNS. This works pretty well, and supports any platform that can run Docker containers. Credit goes to Kayvan Sylvan for providing the script and idea for this.
Here’s a quick and dirty guide to get this going, note that I’m not a docker expert so there may be a better way – if so please leave me a comment.
Install and Setup Docker
First you need docker installed and running on your system. I used to just use the docker packages that came with Fedora but they are a bit older and I’ve hit issues running some of the newer container images. We’re going to use Docker CE instead (community version) Substitute these commands for your distribution/OS.
dnf config-manager --add-repo https://download.docker.com/linux/fedora/docker-ce.repo
dnf install docker-ce
Set docker to auto-start on boot and start the docker container service.
systemctl enable docker
systemctl start docker
Run the Pihole Docker Container
Now you’re going to pull down and run the latest docker pihole container. The following script will take care of all this for you, just clone the repository and run. This should work on both Linux and Mac OSX without any modification.
I am running this as root.
git clone https://github.com/ksylvan/run-pihole
Next, change directory into the repository and run the combined run-pihole script. We’re going to pass Cloudflare DNS (1.1.1.1) but substitute this for something else if you want.
cd run-pihole
./pihole 1.1.1.1
This will take about 10-20seconds to start up, you’ll want to query and wait for it to be fully instantiated before any further customization. You can query this via docker ps -a. You’re looking for “starting” status to turn into “healthy”
[root@oberschnutz ~]# docker ps -a
CONTAINER ID IMAGE COMMAND CREATED STATUS PORTS NAMES
2212eaa2d5ff pihole/pi-hole:latest "/s6-init" About a
minute ago Up About 2 seconds (starting) 53/tcp, 80/tcp, 53/udp pihole
Checking again in a 20 seconds we see it’s up and running now
[root@oberschnutz ~]# docker ps -a
CONTAINER ID IMAGE COMMAND CREATED STATUS PORTS NAMES
2212eaa2d5ff pihole/pi-hole:latest "/s6-init" About a
minute ago Up About a minute (healthy) 53/tcp, 80/tcp, 53/udp pihole
Access your Pi-Hole Container
Right now Pi-hole is running. If you don’t care about adding additional blocklists you can just point your local /etc/resolv.conf to use the Pi-hole container IP address or wherever you set your name resolution to use it.
Personally I just use http://localhost/admin
dig @localhost hobo.house
;; ANSWER SECTION:
hobo.house.		300	IN	A	192.0.78.25
hobo.house.		300	IN	A	192.0.78.24
If you happen to have these ports listening on localhost for something else then you can modify the pi-hole script and remove the local port mappings. Otherwise you can also use this container as an external service offering DNS and the HTTP interface.
Optionally it can provide DHCP via dnsmasq too if you uncomment out that option in the docker run area of the script.
At any point you can access a console in your docker container via:
docker exec -ti pihole bash
The admin password will be stripped from your local container, you can login and change settings as you like. I’m sticking with Cloudflare DNS for my Pi-holes.

If the admin password isn’t stripped and you want it to be, just pop into the container and run the appropriate commands (not recommended for a proper external service).
# docker exec -it pihole bash

root@1ac6a0af78b4:/# pihole -a -p
Enter New Password (Blank for no password):
[✓] Password Removed
To make this persistent where connecting to other wifi or wired networks won’t change this you’ll need to use the chattr command to make it immutable.
chattr +i /etc/resolv.conf
NOTE: This may break VPN connections which need to impose their own internal DNS – in those cases you’ll want edit your DNS after you’ve connected to place the Pi-hole DNS back in your /etc/resolv.conf after getting the VPN DNS entry.
If your VPN client provides pre and post scripting (OpenVPN CLI can do this) it’s better to have this happen automatically (chattr -i / connect / re-add pi-hole DNS / chattr +i ) but here’s how you’d do it manually.
chattr -i /etc/resolv.conf
Now connect to your VPN. After connecting you can add it back:
echo "nameserver localhost" >> /etc/resolv.conf
Now set your /etc/resolv.conf back to being immutable
chattr +i /etc/resolv.conf
At this time I don’t believe NetworkManager supports pre and post connection for VPN clients but the OpenVPN cli can do this for you.
I’ve written a simple Python script to swap your DNS to localhost and back again (taking a backup of your /etc/resolv.conf beforehand) to make things easier)
wget https://raw.githubusercontent.com/sadsfae/misc-scripts/master/python/mod-resolveconf.py
yum install bind-utils -y
sudo python mod-resolvconf.py localhost
To switch back to your old DNS settings:
sudo python mod-resolvconf.py system
Running Libvirt VMs on the Same Host as your Docker Pi-Hole
If you run virtual machines on the same host (like my Linux work laptop in this case) where the Pi-hole docker container runs and you use libvirt NAT you’ll want to tell libvirtd to not start dnsmasq DNS services. Otherwise you may get errors about Pi-hole not being able to bind to 0.0.0.0:53
Error starting userland proxy: listen tcp 0.0.0.0:53: bind: address already in use
First, edit your default Libvirt network settings via virsh. This will drop you into an editor mode, you can use the standard write/quit commands of whatever your default editor is. In my case this is vim so I’ll save with :w when I’m done.
virsh net-edit default
My default network XML looks like this without any changes:
<network>
<name>default</name>
<uuid>3ec02ddd-4487-4f4e-8af1-1d8e4d8d8175</uuid>
<forward mode='nat'/>
<bridge name='virbr0' stp='on' delay='0'/>
<mac address='52:54:00:56:5f:96'/>
<ip address='192.168.122.1' netmask='255.255.255.0'>
<dhcp>
<range start='192.168.122.2' end='192.168.122.254'/>
</dhcp>
</ip>
</network>
You want to remove the line(s)
 <ip address='192.168.122.1' netmask='255.255.255.0'>
</ip>
And you want to replace this:
 <forward mode='nat'/>
<bridge name='virbr0' stp='on' delay='0'/>
With this:
 <forward mode='bridge'/>
<bridge name='virbr0'/>
When all is said and done your config should look like this. References to IP address, MAC address and any extra bridge options like STP should be removed.
<network>
<name>default</name>
<uuid>3ec02ddd-4487-4f4e-8af1-1d8e4d8d8175</uuid>
<forward mode='bridge'/>
<bridge name='virbr0'/>
<dhcp>
<range start='192.168.122.2' end='192.168.122.254'/>
</dhcp>
</network>
Now, stop libvirtd and kill off all dnsmasq processes and restart and you shouldn’t get any conflicts with Pi-hole DNS.
systemctl stop libvirtd
killall -9 dnsmasq
systemctl start libvirtd
If for some reason dnsmasq still wants to listen on port 53 you can kill the process when instantiating / pulling a new docker image – it’s not needed anyway with these settings.
yum install psmisc -y
killall dnsmasq
In general, so long as you start your Pi-hole container first before libvirtd starts you won’t have any problems and you don’t need to change anything at all.
If you’re running semi-permanent VMs you probably want them set up proper bridged interfaces anyway.
This shouldn’t be an issue for bridged virtual machines as you’ll DHCP and pick up your DNS settings from your upstream provider.
Personally, I just boot up virtual machines for specific testing and don’t really need to bother with bridging their interfaces (I also want the Libvirt NAT layer of separation for them for testing purposes). I also just start libvirtd service on demand anyway. If your usage falls in this category you might benefit from using this libvirtd sandbox tool.
Updating the Docker Container
Updating the docker container is simple and straightforward.
docker rm -f pihole
docker pull pihole/pihole
cd run-pihole
./pihole
Docker Power Usage on Laptops
I haven’t seen a whole lot of power usage from running a Pi-hole docker container, on my Lenovo x270 it looks to be minimal – around 173 mW or 0.17 W.
73.8 mW 366.4 µs/s 14.8 Process [PID 3508] pihole-FTL no-daemon
100 mW 0.0 pkts/s Device nic:docker0
357 µW 72.8 µs/s 2.1 Process [PID 1154] /usr/bin/dockerd-current
0 mW 6.6 µs/s 0.00 Process [PID 3584] /usr/bin/dockerd-current
Pi-Hole Container Performance
The Pi-hole container is pretty lightweight, on average using aronud 50 MB of memory or around 0.36% of my 16GB of memory on my Lenovo x270 running Fedora 27.
You can run query the performance at any time via:
docker stats pihole


Great stuff! Thanks.
LikeLike
Hey Kayvan, let me know how you get on if you find some time to set it up.
LikeLike
Hello Will. Did you compare Pi-Hole and Shibby’s embedded Adblock?
LikeLike
Hey Igor, I did see the Shibby adblock feature in later versions (I’m running an older pre-multi WAN build so it’s not present in mine) but I did not try it yet.
LikeLike
Any ideas how to compare?
LikeLike
Yes, I will add something soon about it, a friend of mine has the newer version of Tomato / Shibby so I can do a good comparison. Basically it does the same thing but without the graphing and snazzy interface/dashboard. I am uncertain if the whitelist / blacklist / wildcard features are there either.
LikeLike
As I understand, adding your additional 3rd party block lists to Tomato adblock + enable dnsmasq logs + setup AdminLte to separate port of webserver will convert Tomato router to PiHole fork or something like that. But I don’t know how to do it :)
LikeLike
Aye, I believe this would work just as well. In my situation my Asus RTN66-U & Shibby Tomato is doing a lot already and I had a mostly idle Raspberry Pi2 so just making a dedicated Pi-Hole made more sense for me. I know of a few folks running Pi-hole inside a container on FreeNAS or just a lightweight VM too so you don’t necessarily need a Raspberry Pi. If your shibby tomato is underutilized you might be better off making that into a sort of Pi-hole solution?
LikeLike
Hi Wil. The first two lines of your additional ad block lists are four sources mashed together:
https://hosts-file.net/exp.txthttps://hosts-file.net/emd.txt
https://hosts-file.net/psh.txthttps://v.firebog.net/hosts/Airelle-hrsk.txt
Please fix!
LikeLike
@kayvan, fixed – thanks for letting me know.
LikeLiked by 1 person
Kayvan,
Nice to see your mention in above post and your Docker listings.
Can you help me with my #1,2 &3 questions on Alpine and Docker OpenWrt like packages below?
Thanks !
LikeLike
Hi! I know nothing about the Docker on Raspberry Pi. Or the alpine-based docker image.
You’d have to play with it, and the latest versions and tags from the Docker store are here:
https://store.docker.com/community/images/pihole/pihole
I also found this discussion:
Of course, if you do play with it and come up with a nice configuration, it would be awesome if you would come back and share here with what you were able to do.
LikeLike
Most usefull and educationnal i ve seen. Cheers
LikeLike
Great post! Initially pihole seemed to have a negative performance impact on my home network. After following this procedure and making the tweaks to the conf files, everything works great now. Very detailed and helpful post. Thanks for sharing.
LikeLike
Thanks @tball78, for me increasing the dns-forward-max really made a difference for heavier traffic – I’m glad you found it useful.
LikeLike
Comprehensive lists can be found at:
https://tspprs.com/
LikeLike
Our URL has been updated to https://blocklist.site/app/
LikeLike
Thanks @Garrett I added that to the list of other block sites as well.
LikeLike
Hi Will
That is GREAT info! Thanks for that.
I have a thing….I have a guest VLAN/Wi-Fi on my Tomato router that normally cannot access my “stuff”, but I have had to open up the LAN Access to let the guests access the DNS. As Pi-hole is a docker container it shares the LAN IP address with a load of other containers that I do not want guests to have access to…….do you have any idea how to limit that access to only port 53?
Cheers!
Dave
LikeLike
Actually….I think that I have managed to work it out:
Get rid of the LAN Access rule and add these lines to the Firewall scripts:
iptables -I FORWARD -i br1 -p tcp -d 192.168.10.12 –dport 53 -j ACCEPT
iptables -I FORWARD -i br1 -p udp -d 192.168.10.12 –dport 53 -j ACCEPT
That works and i cannot access a web site on the regular vlan from the guest Wi-Fi.
Let me know if that sounds right please?
Cheers!
Dave
LikeLike
Looks like I replied before I read your follow-up message. Yes, that should work even better as the LAN access rules really just correspond to bridge and iptables rules on the Tomato end anyway. That way you’re only specifying the access you need explicitly, that’s a better solution!
LikeLike
Hey Dave, probably adding a route in Tomato like you have via LAN access is the first step, you could then try adding a custom iptables rule into Tomato to then allow only UDP/53 to that host for DNS queries and a following rule to DENY everything else (as iptables is read top-down) I would experiment with this. The FORWARD chain should catch this and do the right thing hopefully.
Another option is to use an iptables rule on the pi-hole itself (or the Docker host? My container-fu is weak) to allow connections from only some IP addresses like your trusted hosts for web interface to it, but allow UDP/53 for everything else. Hope this helps.
LikeLike
Will,
Great details and best explanation with updates- was just browsing the Pihole Docker and Pi-hole.net page talking about FTLDNS etc. !
I am looking to install Pihole Docker on my S905X/W Android Box 1G RAM, 8 G flash running LibreElec, currently on SD card.
And I figured that besides using this Box with Pi-hole as media player, it could also be used as a secondary router serving DNS and adblocking for a few devices connected to it via WiFi AP ( the LibreElec WiFi tether setting in Kodi menu.)
1. While I read through the Pihole Docker pages, it talked about a 164MB Debian build requiring 500MB RAM (RAM might be a typo- you say 50MB which sounds right.)
So of course an Alpine base build instead of Debian will be much lighter, given the native 9MB Pihole install.
Are there any guides to building Pihole starting from available Alpine ARM64 base containers?
2. If I want to use the LE Box as mini router, would it make sense to have OpenWrt like QoS features (priority, anti buffer bloat- cake SQM)?
How would I install above packages on this LE Box with Pi-hole container?
LE has no package management, but Alpine base should behave much like OpenWrt “apt-get install package” with “apk install package” instead? Alpine is also a router based Linux distro like OpenWrt, just less known.
Or, could the available Debian based Pihole container install QoS/other packages on itself via Dockerfile ADD, or package manager?
3. So this continues from #2.
Could we use the available Alpine base container to add to it OpenWrt packages via ADD in Dockerfile or other method, then run these OpenWrt capabilities in this custom Docker container atop the LE OS, in addition to the Pihole Docker?
4. You mentioned DBINTERVAL which is good insight.
What should the setting be for LibreElec/Pihole Docker running from emmc internal memory instead of from SD card?
Any other config change suggestions for above?
Keep it coming. Also read your autossh article, the answer to my dilemma about ssh login to devices behind proxies.
5. Maybe another method would be vnc server on such devices since vnc should always be able to tunnel through firewalls?
LikeLike
Hey @Shippy, I’m glad that you found this useful – comments below
I just based the Docker portions here on @Kayvan’s work, he’s probably a better person to ask about Docker-related sundries.
I wouldn’t worry too much about QoS though if you’re interested maybe add it in later and compare as a baseline? Unless you have a very large network / many devices you’re really not going to see too much traffic overhead, more important than anything is maintaining a longer DNS resolve cache timeout.
I would just keep things the same as if you had a normal SD card.
Hey, cool glad to hear that you found that useful as well. I try to add anything here as usage expands or there’s new stuff to tweak.
Your mileage may vary but I never have Xorg / Runlevel 5 on anything unless it’s an active desktop. I can see this might be useful for Kodi but the Chorus 2 web interface / API is pretty good anyway for controlling it if you aren’t using the IOS/Android app and that’s a simple proxy through SSH if you’re totally remote.
e.g. if my Kodi is on 192.168.0.22 and my home address is home.com
ssh sadsfae@home.com -L 5902:192.168.0.22:8080
Now I can access http://localhost:5902 and login to Chorus 2 web interface for Kodi/Libreelec (assuming you enabled it in settings up).
I wouldn’t forward VNC anyway due to security risks, always tunnel it through SSH. You can run x0vncserver (vnc binary designed to run on the local :0 desktop connection) and just access that the same way you’d access Chorus above:
ssh sadsfae@home.com -L 5903:192.168.0.22:5900Now point vnc client (Remmina is good for this) to localhost:5903
You can start x0vncserver with the following command (if you trust your local network)
x0vncserver -display :0 -SecurityTypes noneOtherwise, always enable a SecurityType
LikeLike
Will,
Thanks for the quick reply.
How do you set the DNS resolve cache timeout? Same as dbinterval?
FYI, Pi-hole released v4.0 today with beta FTLDNS !
Hopefully Kayvan has the time to answer my queries.
LikeLike
It’s a DNS (via dnsmasq) setting in the guide:
cat > /etc/dnsmasq.d/02-custom-settings.conf << EOF#### EDIT SETTINGS
dns-forward-max=5096
min-cache-ttl=300
#### END EDIT
EOF
LikeLike
Will,
1. Should I use min-cache-ttl 300, or 600 as from the article, for a 1G RAM Android Box?
2. Re: QoS, on low bandwidths, 2-5 Mbps, wouldn’t it matter if you prioritize streaming over downloading?
Maybe the default SQF router setting works ok instead of cake-sqm at these low bandwidths?
LikeLike
I’d experiment and see what works – you can tail your pihole log with colors indicating cache hits, new lookups or blocks via
pihole -tStart with 300 and see where things sit, increase it to 600 if you’re seeing a lot of previously cached queries drop off and return as lookups again.
Everyone has their own stances on QoS – It’s really just slightly more civilized packet dropping, I’ve found more bad implementations of it than good ones so I usually don’t mess with it unless I’m managing a network that has a much higher cost traffic class (business VoIP etc). For home usage I don’t tend to mess with it, at least locally. If you’re doing external streams (like via Plex) it may make sense to prioritize this kind of traffic.
LikeLike
Thanks again for all the help!
I wish there were more blogs like this one.
LikeLiked by 1 person
Will,
FYI. I quoted your 50MB RAM figure for Pi-hole run from here, and the Pi-hole guys agreed.
Big change from their original 500MB figure…
https://discourse.pi-hole.net/t/diginc-docker-pi-hole-on-alpine-base-aarch64-qos-priority-cake-sqm/11525
LikeLike
Ah good to know. I imagine if it wasn’t a typo they were just being very conservative with hardware estimates.
LikeLike
The URL for https://raw.githubusercontent.com/crazy-max/WindowsSpyBlocker/master/data/hosts/win10/spy.txt has changed to https://raw.githubusercontent.com/crazy-max/WindowsSpyBlocker/master/data/hosts/spy.txt
LikeLike
Thanks Kayvan, I updated the guide with the new URL.
LikeLike
Hey Will. I have a new repo related to dockerized piHole and your configurations/additions.
https://github.com/ksylvan/run-pihole
It simplifies the config and setup. If you’re on a Mac or Linux (works with Fedora and recent Debian/Ubuntu releases), just connect to your network as you normally would, and then run the ./pihole script which should figure out your current DNS and instantiate a pihole container which uses those servers as your upstream DNS setup. Then point your DNS to localhost (127.0.0.1)
LikeLiked by 1 person
Great work on this Kayvan, I’ve updated the guide to use your run-pihole repository and instructions – it’s really simplified things.
LikeLike
Thank you for this article.
it seems so complete. So much info!
Thank you, thank you, thank you
LikeLike
Great, I’m really glad it was useful for you!
LikeLike
Awesome article! Got me set up quickly. One thing, on the line where you specify the Chinese sites you block via wild card, you have “-wild” it should be “–wild”
LikeLike
Thanks for the suggestion, it looks like this syntax was changed in 4.0+. I’ve updated the post.
LikeLike
Very useful guide. For what it’s worth, AdvancedTomato is no longer being updated. People seem to be switching to either the following fork
https://bitbucket.org/AndreDVJ/advancedtomato-arm/downloads/
or to freshtomato (https://freshtomato.org). The latter retains Shibby’s UI, the former that of AdvancedTomato. Clearing NVRAM is recommended for switching from AdvancedTomato to FreshTomato. I haven’t yet decided which I’ll opt for. I like AdvancedTomato’s UI, but so far don’t see a compelling reason to make the jump either way. I’ll probably do it on my Asus RT-N16 backup router first (currently I used this with no password and an SSID guestwireless when I have visitors); that’s still on Toastman’s version of Tomato.
I’m going to use your list additions, thanks. I’m going to give my sister a gift of a 512Mb Pi with Pi-Hole set up and ready to go. I’m wondering if it could handle the (huge) combined list at tspprs.com, which I am not going to bother with for now as I can see some retractions (false positives) that shouldn’t ever have been necessary.
LikeLike
Hey, thanks for the feedback and I’m glad it was useful. What an excellent idea: pre-made Pi-hole as a stocking stuffer! I haven’t looked at the newer offshoots of tomato as I’m pretty happy with the Shibby build but if I get a new device will take a poke, thanks for the info about it. So far as performance my blocklist denotes around 500k domains once duplicates are removed. I don’t think it’ll be an issue with a 512mb pi especially with improvements to FTL lately in 4.0 and 4.1 (which was just released). At the same time I haven’t done much testing with anything more than 1M blocked domains either, probably you’d just need to try it out and see. It’s easy to go overboard on blocklists and have to dial it back down again.
LikeLike
Sorry, to clarify: my Asus router is my backup router / guest wireless access point that is normally switched off. (Currently I’m using a Netgear R7000 as my main router). My first selection criterion for any router is “Will it run Tomato?” I will not run stock firmware if I can avoid it. Too many cases of backdoors left in.
LikeLike
Your mileage may vary, but in my experiences a lot of consumer-grade routers/devices Netgear and D-Link have really gone down in quality. It used to be the old Netgear WRT54Gs (that ran Linux instead of VXWorks) were great and sort of the staple for things like dd-wrt, openwrt, tomato. These days I much prefer the ASUS or Buffalo branded routers as they come with a bit better hardware and are almost always mod-friendly.
LikeLike
Yes, I agree. I used Asus before and it was a better bang for the buck. I’m on DSL line in the countryside and using a Netgear DG834 v4 in bridge mode as my modem as spares are somewhat easy to come by (power outages w voltage surges in winter happen every year and I’ve lost a few things despite protective measures, including a UPS, modems, and a router in recent years). Not putting all my eggs in one basket with a high-end DSL router. Cheap, secure, reliable and mod-friendly before Darth Vader looks :-) I’ve been reading favourable things about Ubiquiti gear but haven’t used and don’t know if it can be modded. Do you know?
Thanks for advice on block list numbers.
LikeLike
Hi Will, thanks for this excellent post. Very usefull. A friend recommended pi-hole a couple of days ago. Same evening I installed version 4.1. Very easy procedure. You mentioned changes to dnsmasq and a restart through systemctl restart dnsmasq. However I get a message like service not existing. Has this been removed in version 4? Have you seen other updates in version 4(.1) we need to know of?
Running pi-hole on a Raspberry Pi 3b which is also running samba for file sharing, serving flightradar24 with data and being an AP to extend the wifi network at the same time.
LikeLike
Hi Sander, I’m glad that you found it useful. Yes, in version 4.0 dnsmasq is removed and bundled with FTL – probably the upgrade process should handle this for you however there was a solved Github issue open for it. I believe I needed to simply re-run
pihole -r(repair) and everything after that was fine.Once on 4.x everything should be smooth sailing, I had zero issues updating from 4.0 -> 4.1 and beyond both on my home Rpi2 as well as the “travel pi-hole” Docker container on my laptop.
LikeLike
Hi Will, thanks for your swift reply. Only thing I had to change was the setting regarding the listening interface. Default is eth0, but I guess because of the Access Point had to change this to all interfaces (as you wrote already).
LikeLike
Great article! We have put together a categorized group of blocklists free for everyone to use at https://blocklist.site/app Check them out!
LikeLike
Nice collection, I added it to the guide.
LikeLike
Hi,
I have pihole running on my openvpn server so that makes it easy for me. I’ll have to create a vlan for my wife’s work laptop though as she’s always complaining about blocked Google searches being blocked. Small inconvenience hahaha!
The shibby adblock is not as good as used to slow my rtn66u and cause lockups.
I love pihole it’s fantastic and I’ll be trying your tweaks later. Good effort and thanks!
LikeLike
Hey Hopmeister, I hope it’s useful. Pi-hole does take some burn-in and testing – sometimes the blocklists need a few things whitelisted. You’ll just have to watch the query log (drilling down by specific device is useful) and see what kind of things are being blocked, once you get it right it’s hard to beat!
The default black lists in the guide are fairly curated and I update them if I find something that breaks functionality, at least for me – if you come across anything that’s blocking legitimate traffic and you use those just drop me a line here and I’ll update them.
LikeLike
Hi Will,
My wife is amazed at the speed now. I’ve just swapped out my old ipfire pcfit2 for an Igel 850c with Opnsense and the speed increase was noticeable immediately. I used your settings last night and the boss wanted to know what I’d done to the internet as it’s now so fast!
I’ve now implemented a vlan using your settings, the only difference is that I used >
dhcp-option=tag:br1,option:dns-server,208.67.222.222,208.67.220.220
for her work phone & laptop (finally) and her own DNS and it’s working and she’s very happy as she’s home office based. She can surf her Google ads to her hearts content now hahahaha. Thanks for your pages. Power top will be next week!
cheers,
Hopmeister
LikeLike
Hello. thank for this wonderfull & helpfull page. I got a question. Why while i’m under openvpn provider i didn’t see all my clients on pihole mainpage, just the 192.168.1.1 the router ip?
LikeLike
You’re going to want to make sure anything using OpenVPN is still using the IP address associated for Pi-hole for their DNS (Some OpenVPN implementations also set their own DNS servers). Even though OpenVPN will give them their own ip address via their tunnel interface they should still have the original LAN / DHCP address provided by your router and should be able to access also the internal Pi-hole ip address to use as their DNS.
You can check the Network area in pi-hole UI and make sure they are using it (you’ll just see queries from their internal LAN IP). I hope this helps.
LikeLike
Checking back here again…
I just lost my Pi-Hole microSD card after 2 yrs and 4 months and had to restart from scratch (I’ve been meaning to setup a backup DNS server). I’ve been using Diet-Pi for installation and configuration and found it works perfectly though the Pi-Hole people are sniffy about and don’t support it. The list of installable applications is now very long — Pi-Hole is just one — and now includes Wireguard as well as such things as Nextcloud and Nextcloud Talk. I had paid no attention to it in a long time and was impressed at how the list of apps had grown.
In the first instance my reason for checking back here was to see if you had added anything on wireguard. I will try this with a 2nd Pi.
My second reason was to check if I’d missed anything on the conditional forwarding on Pi-Hole’s DNS settings.
Since I set up the Pi-Hole I switched my Netgear R7000 to FreshTomato (currently running 2020.1) and set it up again as outlined here, and with a separate VLAN for untrusted devices. This acts as my DHCP server, with all IP addresses mapped to MAC addresses. I chose to keep the router as the DHCP server to help minimize the consequences of losing an SD card.
What I had forgotten (to document –cough) was that the setup outlined here resulted in only IP addresses in the Pi-Hole query log, and that I’d fixed it by exporting a list of static addresses from the router to a HOSTS file and adding it to the Pi-Hole.
In the process of rediscovering that I tried the Conditional Forwarding (of local addresses) setting in the Pi-Hole’s DNS settings, entering the router address and my domain. This worked great at putting correct machine names in the query log but it broke the DNS function. I’m not sure I fully understand why. It looks like the domain is suffixed to all domain addresses, like so
mozilla.org.mydomain
google.com.mydomain
not just local hosts. I fixed it as I did the last time.
Alas… When I add a 2nd DNS server I’ll have 3 places to manage host names :-(
I did previously get OpenVPN and Pi-Hole working on the same Pi so that I could filter ads on my phone when away from home. Unfortunately, it was unusable in practice as I have a slow DSL connection. I’m hoping that wireguard will now make this viable.
LikeLike
I’ve been using tomato for 17 years. tell me if you want me to let you know if I think you need to rewrite certain parts of your site for better clarity.
LikeLike