
 Plex is a fork of the Open Source Kodi (previously XBMC) project from 2008, the Plex Media Server has evolved into what amounts to a free, personal Netflix + Spotify that lets you stream home content to devices or browsers with an optional subscription model for added features. Here’s how to use your own self-signed SSL certificates to encrypt connection streams.
Getting Started
I am going to assume you have Plex Media Server already setup, if not there are plenty of other guides to do this. We will focus on creating, installing and using your own self-signed SSL certificates to encrypt connection streams to the outside world. This is aimed for a CentOS7/RHEL7 installation, substitute appropriately for other Linux distributions.
Install the Requirements
We’re going to be using the openssl commands and a Python script to create our certificates.
yum install openssl pyOpenSSL wget -y
Create the SSL certificates
We’re going to do everything else as the plex user inside their home directory.
su - plex -s /bin/bash
mkdir -p ~/certificates/plex && cd !$
openssl genrsa -des3 -out plex.key 1024
This will prompt you for a passphrase, enter something here and remember it.
Generating RSA private key, 1024 bit long modulus
......++++++
..................................................++++++
e is 65537 (0x10001)
Enter pass phrase for plex.key:
Verifying - Enter pass phrase for plex.key:
Create the CSR
Next you’ll create the certificate signing request and be prompted with some questions. You can enter any value you want here, don’t overthink it. The only important thing that must match is the Common Name which should be valid FQDN / hostname of your home machine where any external clients will connect. There are plenty of free services that provide dynamic DNS for this if you don’t have the ability to add an A record somewhere.
openssl req -new -key plex.key -out plex.csr
Strip Out Passphrase
Now we’re going to strip the passphrase out of the keyfile, it will prompt you one more time for the passphrase.
cp plex.key plex.key.org
openssl rsa -in plex.key.org -out plex.key
Create the Certificate
openssl x509 -req -days 5475 -in plex.csr -signkey plex.key -out plex.crt
Create the PKCS12 Certificate
Plex requires a pkcs12 certificate to be generated, but we’re going to use a python script for that. You first need your ProcessedMachineIdentifier number from your Plex installation, thanks to the Reddit post that cleared this up.
Obtain your PMI Number
Obtain the long 30-35 character alphanumeric string after ProcessedMachineIdentifier= in the following file:
cat /var/lib/plexmediaserver/Library/Application\ Support/Plex\ Media\ Server/Preferences.xml
Let’s assume mine is ProcessedMachineIdentifier=”547bzw4423296e0ba072364f11c84kj3fae632ld5” for this example.
Bring it Home
Now you’ll snag the following Python tool, it will create your pkcs12 certificate as well as generate a long hash that you’ll need for Plex as the “private key” (this is confusing as you’d normally think it refers to your actual private key – not so.
wget https://raw.githubusercontent.com/sadsfae/misc-scripts/master/python/pem2plex.py
The syntax is plex.cert plex.key ProcessedMachineIdentifier
python pem2plex.py plex.crt plex.key 547bzw4423296e0ba072364f11c84kj3fae632ld5
If all is well you’ll see a long hash as the return, save this as you’ll need this later. It will also generate a certificate.p12 file. The hash is a decryption passphrase for the PKCS #12 file.
You should see something like this (save it).
3lc0d08ff0f3db302cee223e20769b196ea88d7470f534dbc3bc37a9ec51a6ed585bc39c98412c5130cldc57d3e927ea666b80a745bf68dd38f49cc6a33mksede3
At this point you should have the following items ready – certificate.p12 and the long hash (passphrase) above. Let’s move on to installing this in Plex.
Installing Certificate in Plex
Login to Plex Media Server and go to Settings -> Server -> Network and place the above info like below – the path to the certificate.p12 and the really long hash (passphrase) that was generated earlier. You will also want to put the Common Name you entered during SSL certificate creation here in the custom certificate domain area.
NOTE: Be sure that the permissions are correct on the certificates, they should be owned by the plex user. While you’re there set secure connections to required, at this stage in Plex development all clients should work fine with it.
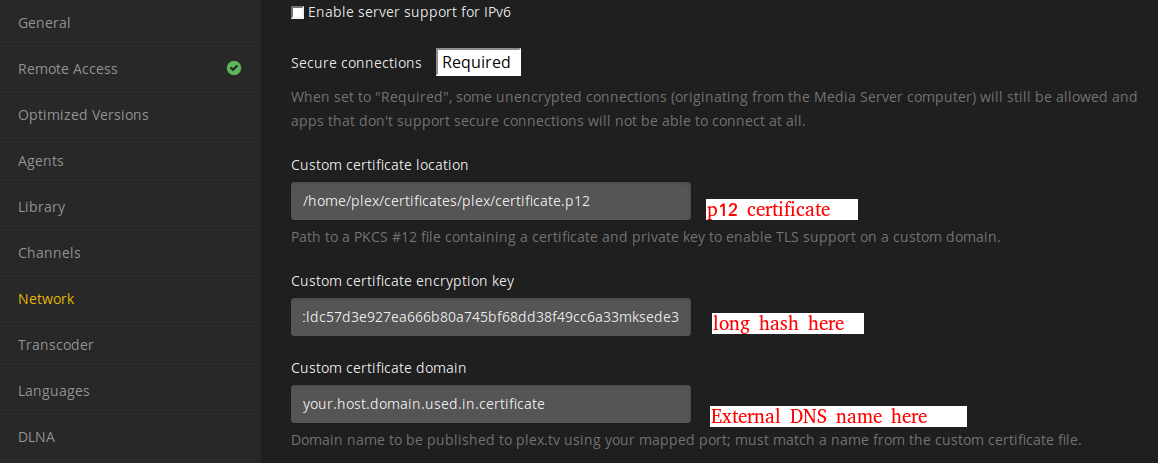
Lastly make sure you enter the full URL for your home server under Custom Server Access URLs.

Save your settings and restart Plex Media Server. You can also take a look at the logs to make sure everything is humming along – mine were located in /var/lib/plexmediaserver/Library/Application\ Support/Plex\ Media\ Server/Logs/Plex\ Media\ Server.log
systemctl restart plexmediaserver
NOTE: Router and DNS Rebinding
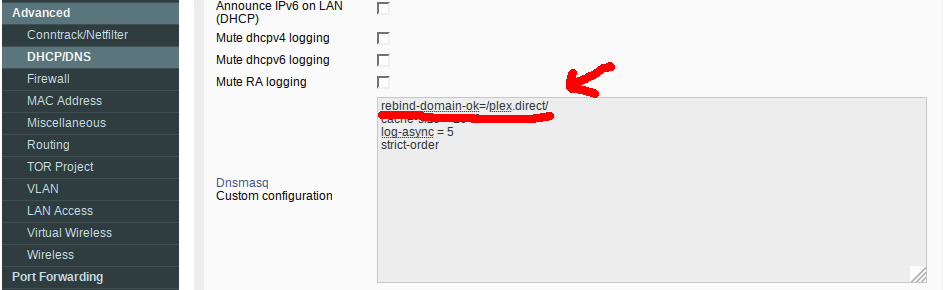
Plex does some interesting trickery with DNS rebinding to make their wildcard plex.tv certificates work along with your own self-signed certificates for connection streams once authentication is finished. If you’re using a popular Open Source router firmware like Tomato you’ll want to apply an option in DNSMASQ to allow for this.
I am running an ASUS RT-N66U on Tomato Shibby, so I use the following settings in Advanced -> DNS/DHCP DNSMASQ configuration (may need to reboot router to take effect).
rebind-domain-ok=/plex.direct/
Verification
You should now be able to refresh your Plex server URL and be prompted to accept a self-signed certificate. Click view and you should see the details you entered earlier when you created it. Happy Plexing!


Hey, Great Tutorial from you :)
But also with your Tutorial i get following entry inside of the Plex.log
“Dec 24, 2016 23:59:06.574 [0x7000007be000] ERROR – CERT: Found a user-provided certificate, but couldn’t install it.”
Andy ideas?
Thanks a lot
Greetings,
Arnaud
LikeLike
Hey Arnaud, check that the certificate, files and structure are readable (or ideally owned) by the plex user and that the permission are right. That is the most common cause for this error. Another cause might be the path and password settings.
LikeLike
Everything was fine but i copied the path from terminal to Plex and there was a BackSlash inside ;-)
LikeLike
Great to hear that you resolved it!
LikeLike
You have a different value in your guide vs the screenshot. Should it be:
domain-ok=/plex.direct/
OR
rebind-domain-ok=/plex.direct/
?
LikeLike
Judging by the dnsmasq docs, I think it should be: rebind-domain-ok=/plex.direct/
LikeLike
That’s correct, I’m using
rebind-domain-ok=/plex.direct/I updated the guide, thanks for posting this.LikeLike
For all confused readers – the “long hash” is just the decryption passphrase for the PKCS #12 file. If you use this openssl command, you will get also a working result:
“openssl pkcs12 -export -in cert_incl_intermediate.crt -inkey private_key.key -out output_pkcs.p12”
You will get asked for a passphrase to secure the PKCS #12 certificate – this will be the same to put into the plex web app field “custom certificate encryption key”.
LikeLike
I was able to assemble my own pkcs12 file with an arbitrary friendly name of the private key, and no passphrase, and Plex worked with it just fine.
LikeLike
Thanks! This partly worked for me. I was getting an error that it couldn’t load the user-provided cert. your way of getting the long hash worked and I no longer get that error. It still refuses to actually USE my own cert though and the one they provide gives me a cert error because the common name doesn’t match. I don’t see the advantage of their cert. My Plex server is behind a firewall and I will not have it exposed to the internet. I don’t WANT to access it remotely.
LikeLike