
 We use Foreman for systems provisioning and recently received a large shipment of Supermicro for Ceph. Out of the box they were a lot of trouble to get integrated/automated at the same level of our Dell gear but we managed, here’s our story.
Supermicro Value
At roughly 1/2 the price of most other enterprise server vendors the Supermicro servers are a bargain. Nothing is free however – what you don’t pay for in expensive idrac/ILO licenses and OEM mark-up you will pay with some reduced functionality in terms of provisioning and automation capabilities. This might not be a big deal if you’re a small shop with only a few servers but we have many, many racks and a very small team so it’s not efficient for us to be forced to do a lot of things by hand across many systems.
If servers were cars Supermicro would be a build-it-yourself kit and Dell/HP/UCS would be something you buy and drive off the lot.
On paper Supermicro has an excellent value, the amount of sheer hardware and resources you can get packed into a 4U chassis (6048r model) is very compelling. If you can get over the initial hurdles in getting them configured and get their provisioning automated you’ve probably come out ahead depending on your usage.
What Did We Get?
We ordered the following hardware, spanning 4 x racks.
- 30 x 4U 6048r (Ceph Servers)
- 36 x 2TB SATA
- 2 x 500G internal SATA
- 1 x 800G NVME
- 5 x 1U 6018r (Ceph Mons)
Supermicro Build and Software Quality
We found the physical build quality of the hardware and components to be satisfactory, our issues came with the rather flimsy, inconsistent IPMI and out-of-band interfaces and lack of standardization on PCI-E slot assignment. Here are some issues we ran into almost immediately:
- Java-based remote KVM functionality broken out of the box
- Inconsistent results when upgrading firmware
- No ability to manage disks via remote tooling
- Ability to upgrade BIOS tied to a licensing scheme.
- No way to permanently change boot/interface ordering remotely
- LSI RAID controllers don’t ship with a battery (BBU)
- 10GbE cards installed in different slots across same models
- LSI RAID SATA disks not plugged in consistently across SCSI bus IDs
What Are We Doing About It?
Physical gripes aside, we’re going to walk through some one-time setup tasks so you can get to provisioning Supermicro servers with the same speed and efficiency as you would other OEMs. This is specifically aimed at using Foreman.
Let’s tackle these individually and cover how to actually get things provisioned consistently in an automated fashion.
Out-of-band and IPMI Options
Being rather spoiled with the Dell racadm utilities and the level of automation they provide via XML or Ansible we were pretty bitter to find out Supermicro ships with no real, tangible enhancements outside of bog-standard IPMI.
Here are your options:
- ipmitool – the standard ipmi tool on Linux, you can use this to interact with things like boot order, power control and you can spawn a serial-over-LAN connection (sol).
ipmitool -I lanplus -H mgmt.ipaddress -U ADMIN -P PASS sol activate
Tip: Escape sequence is ~ . and if you’re SSH’d into another machine first use ~~. Basically append a ~ for every level of connection you’re going through.
- IPMICFG – Supermicro ships the IPMICFG utility as a platform-agnostic Java-based CLI however it doesn’t have much use outside of configuring elements within the out-of-band interface or retrieving information.
- KVM/HTML5 – If you upgrade the firmware on your server to a certain level it unlocks a non-Java HTML5 browser KVM window, this actually works pretty well.
- IPMIVIEW – Java-based 1990’s UI for administrating all of your management interfaces from one interface.
Tip: In IPMIVIEW you can scan for existing ipmi interfaces but you’ll need to pick a large network range. We’re using a bundle of /27 networks broken down by rack but to collect the IPMI interfaces for them all we had to collapse the scan browser to a /23 or larger.
Supermicro lists all of these program options here and also provides a basic out-of-band management web interface as expected though it’s very barebones.
The only tool we’re going to focus on here is ipmitool because we want to automate everything we can but I wanted to list the available options.
Update Firmware
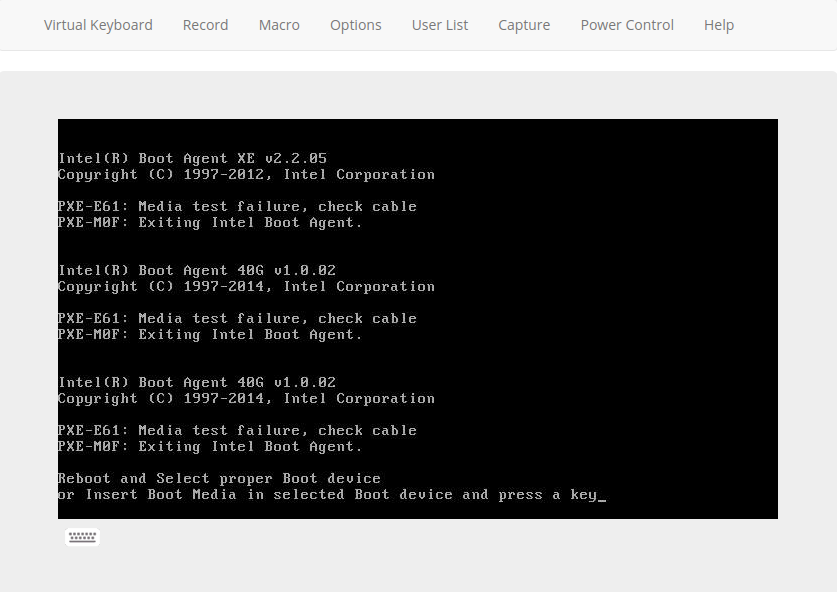
The first thing you’ll want to do is ensure you have fully functioning out-of-band capabilities. On our 4U 6048r systems the out-of-band java-based KVM shipped broken, resulting in a connection closed error no matter what combination of Java, OS and browser we tried. Upgrading to the 3.40 IPMI firmware also provided us with the option for the KVM/HTML5 brower which is much better (no Java!).
Be sure to check first before upgrading the firmware, our 6018r 1U servers came with the iKVM/HTML5 remote viewer already working so we could skip those.
Download Appropriate Firmware
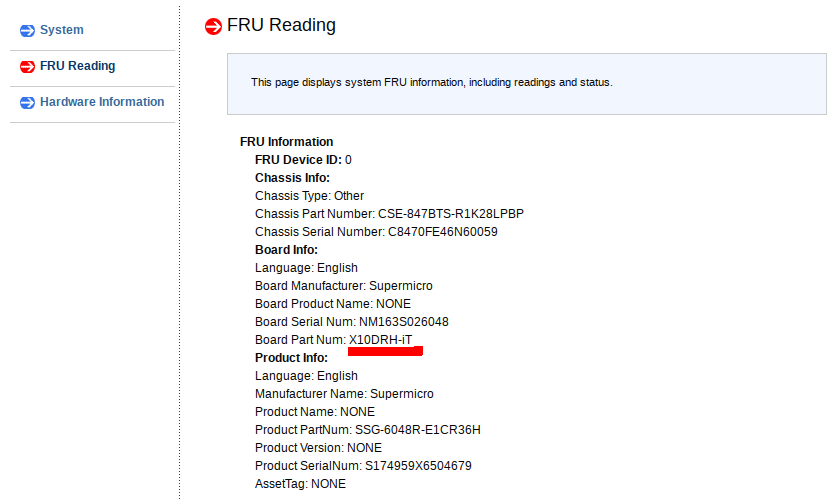
You’ll want to identify the model number of your unit and download the appropriate firmware.
Navigate to the FRU Reading and note the Board Part Num: field.
Download and Upgrade the Firmware
You can find the firmware here, making sure it matches the right model for you system. Unzip the .BIN file, then navigate to Maintenance –> Firmware Update.
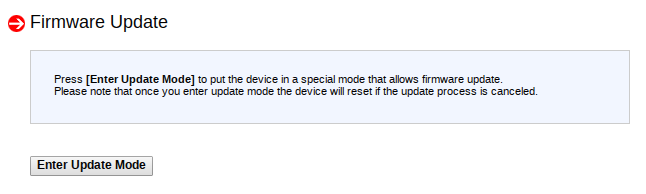
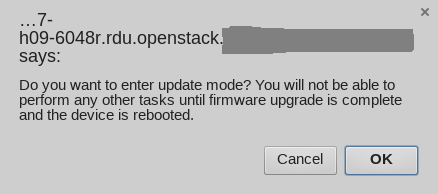
Enter Update Mode, browse for your .BIN and let her rip. Once uploaded you’ll be prompted one more time to execute upgrade. This might take a while. One important thing to note here, sometimes the iKVM option comes back as undefined. If you’re not particularly tied to the current settings you’ll want to uncheck all the boxes prior to committing.

Check the KVM/HTML5 Option
You should now have a useful iKVM/HTML5 option under your Remote Control menu and no more Java in your life.
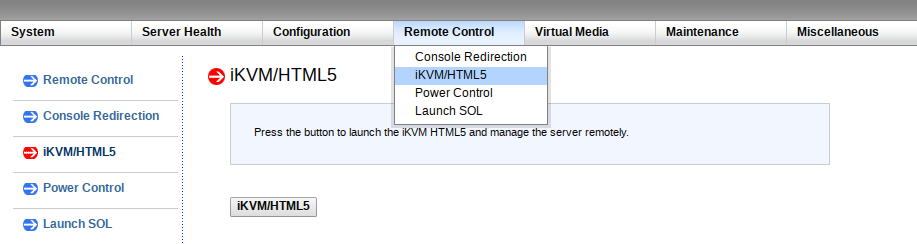
Note: If you still do not see the KVM/HTML5 option simply apply the same firmware file again (this happened to us twice).
Note: DO NOT update the BIOS, you actually need to pay for a license to upgrade the BIOS, it’s kind of a mess.
Setting up for Foreman
Foreman expects all machines to be set to boot from PXE, if a machine isn’t set to build it will simply pull a pxelinux.cfg TFTP stub that tells it to boot to localdisk but if it’s set to reprovision it can do so easily. Supermicro servers aren’t setup this way so you’ll need to do this in the BIOS. Note that ipmitool can set a one-time boot sequence, but it cannot establish a permanent change like this.
Set the Server to Boot into BIOS
The Supermicro out-of-band mechanisms DO NOT let you enter BIOS from a key sequence, this is either intercepted somehow or it skips over this. You’ll need to use ipmitool to set a one-time boot entry for booting directly into BIOS
Note: substitute 1.2.3.4 for the hostname or IP address of the IPMI interface for your Supermicro server.
ipmitool -I lanplus -H 1.2.3.4 -U ADMIN -P PASS chassis bootdev bios
Now reboot the machine via ipmitool
ipmitool -I lanplus -H 1.2.3.4 -U ADMIN -P PASS chassis power cycle
Configure PXE as Firstboot
You’ll want to utilize the KVM/HTML5 viewer or ipmitool to view the remote server screen here, change the primary boot order to be Intel XE NIC with the actual hard disk not far below it.
ipmitool -I lanplus -H 1.2.3.4 -U ADMIN -P PASS sol activate
or navigate to the iKVM/HTML5 browser in your IPMI web UI.
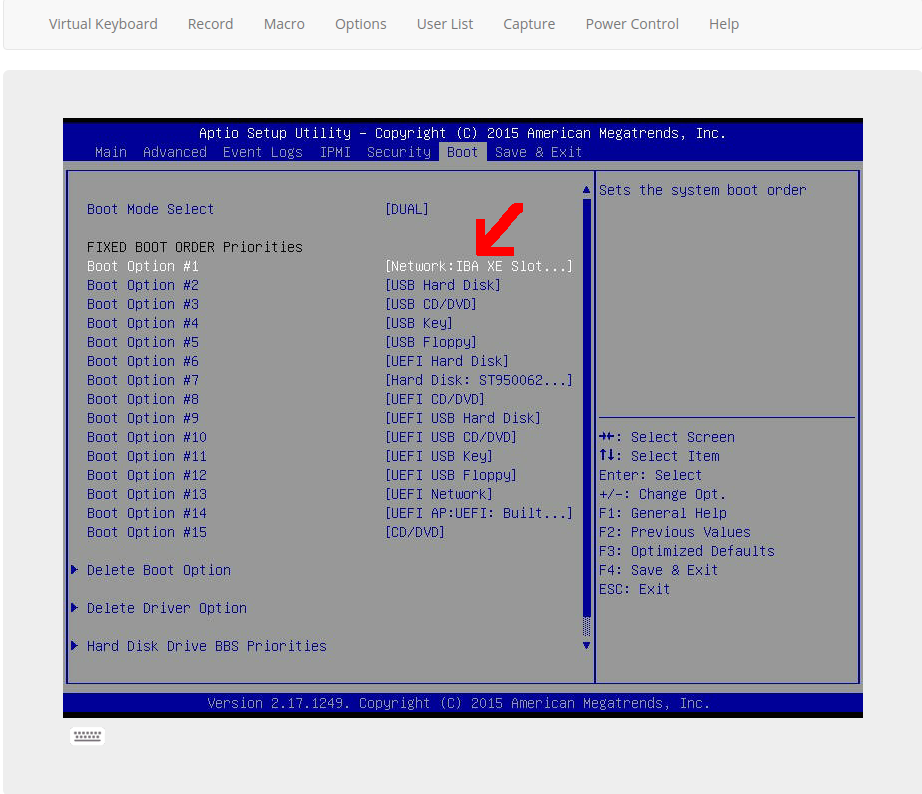
Save and Exit, reboot. Next you’ll want to watch the system boot and record the MAC Address unless you already know – you’ll be adding this to Foreman now.
Note: at any time you can set the first boot interface to be PXE persistently via the following command, however IPMI version 2.0 will not let you set interface ordering like we’re used to with the Dell racadm CLI tool.
ipmitool -I lanplus -H mgmt-address.example.com -U ADMIN -P PASS chassis bootdev pxe options=persistent
Setup Foreman Provisioning
The next section we’re going to cover workarounds, hacks and caveats to get our Supermicro setup with Foreman provisioning.
Create Foreman Partition Tables
Our decked out 6048r 4U machines came with 36 x 2TB SATA disks, 2 x internal 500G SSD’s and 1 x 800g NVME drive. We use the below partition table in Foreman.
Workaround: We had to purposefully use /dev/disk/by-path entries here because Supermicro will associate disks from the LSI RAID controller first before the internal disks, causing issues with installing a proper bootloader and MBR entries.
We also want to use some Ruby pattern matching to only apply this configuration to our Supermicros (aptly with a DNS shortname of 6018r or 6048r in the hostname) but do a generic partition layout for everything else.
<% if @host.shortname =~ /60.*r/ %>
zerombr
clearpart --all --initlabel
part raid.01 --ondisk=disk/by-path/pci-0000:00:1f.2-ata-1.0 --size=512
part raid.02 --ondisk=disk/by-path/pci-0000:00:1f.2-ata-1.0 --size=65536
part raid.03 --ondisk=disk/by-path/pci-0000:00:1f.2-ata-1.0 --grow --size=200

part raid.04 --ondisk=disk/by-path/pci-0000:00:1f.2-ata-2.0 --size=512
part raid.05 --ondisk=disk/by-path/pci-0000:00:1f.2-ata-2.0 --size=65536
part raid.06 --ondisk=disk/by-path/pci-0000:00:1f.2-ata-2.0 --grow --size=200

raid /boot --fstype=ext4 --level=1 --device=md0 raid.01 raid.04
raid swap --level=1 --device=md1 raid.02 raid.05
raid / --fstype=xfs --level=1 --device=md2 raid.03 raid.06
<% else -%>
zerombr
clearpart --all --initlabel
part /boot --fstype=xfs --ondrive=<%= @host.params["boot_drive"] || "sda" %> --size=512
part pv.1 --ondrive=<%= @host.params["boot_drive"] || "sda" %> --size=1 --grow
volgroup vg_<%= @host.shortname %> --pesize=4096 pv.1
logvol / --fstype=xfs --name=lv_root --vgname=vg_<%= @host.shortname %> --size=1 --grow
logvol swap --name=lv_swap --vgname=vg_<%= @host.shortname %> --size=8192
<% end -%>
Add Snippet to Create RAID Disks
Snippets in Foreman are simply small sections of custom code, logic and actions you can bake into the automated provisioning of hosts. Since Supermicro offers no remote way to setup our 1,080 RAID disks and we certainly don’t want to do this by hand we’ll use the StorCLI tool on the OS once it’s installed via a snippet.
We can get around the deficiency of no native tooling to remotely configure the RAID disks by executing this in kickstart %post via Foreman. After kickstart %post the host has to reboot once anyway so it would see newly created/initialized disks. Sneaky!
Create the Snippet
wget http://docs.avagotech.com/docs-and-downloads/raid-controllers/raid-controllers-common-files/1-15-05_StorCLI.zipunzip 1-15-05_StorCLI.zip
unzip storcli_all_os.zip
yum install storcli_all_os/Linux/storcli-1.15.05-1.noarch.rpm -y
# clear out existing LSI RAID VD
/opt/MegaRAID/storcli/storcli64 /c0/vall delete
# run one more time to clear current configuration
/opt/MegaRAID/storcli/storcli64 /c0/vall delete
# create all disks and VD's and present as JBOD
for x in $(seq 0 23); do /opt/MegaRAID/storcli/storcli64 /c0 add vd type=r0 drives=0:$x; done
for x in $(seq 0 23); do /opt/MegaRAID/storcli/storcli64 /c0 add vd type=r0 drives=1:$x; done
Above, ideally you’d copy the RPM out of the depths of storcli_all_os.zip and place on a webserver somewhere local to your Foreman and simply yum install it but we’ll leave this here as a general example.
Note: We have a total of 36 disks, but you can have a maximum of 24 disks per channel hence we have 0: and 1: channels above. You should probably check your disk configuration first to see how it looks and change accordingly.
Note: We found at least one system that had the SATA RAID disks plugged in backwards so we got 11 disks on the first channel and 24 on the second – above we’ll have storcli wipe both to be safe (if drives don’t exist it will just produce a non-fatal error nobody will see).
Fix Inconsistent PCI-E Slot Installations
On the same 4U 6048r units we found the 10GbE cards installed in differing slots across the units. Some have them installed in slot3 while others have them in slot5.
03:00.0 Ethernet controller: Intel Corporation Ethernet Controller 10-Gigabit X540-AT2 (rev 01)
Versus:
05:00.0 Ethernet controller: Intel Corporation Ethernet Controller 10-Gigabit X540-AT2 (rev 01)
This means that the interface names will also be different posing a problem for full automated provisioning. Because we set static addresses on the second interfaces of our machines (that coincide with a dedicated internal VLAN) we fix this in our static configs within Foreman.
- Append the following to your previous Foreman snippet if you hit this issue, adjusting to fit your environment as needed.
# setup em2, em3, and em4 and also ens3f1 or ens5f1 === WIP
o3=$(echo $def_address | awk -F. '{ print $3 }')
# deviate here as 4th octet, carriage return cause render issues
o4=$(echo $def_address | awk -F. '{ print $4 }' | awk '{ print $1 }')

# this is for the supermicros
if ip a show eno2 1>/dev/null 2>&1 ; then
cat > /etc/sysconfig/network-scripts/ifcfg-eno2 <<EOF
DEVICE=eno2
NAME=eno2
TYPE=Ethernet
BOOTPROTO=static
DEFROUTE=no
ONBOOT=yes
IPADDR=172.18.$o3.$o4
NETMASK=255.255.0.0
EOF
fi

if ip a show ens5f1 1>/dev/null 2>&1 ; then
cat > /etc/sysconfig/network-scripts/ifcfg-ens5f1 <<EOF
DEVICE=ens5f1
NAME=ens5f1
TYPE=Ethernet
BOOTPROTO=static
DEFROUTE=no
ONBOOT=yes
IPADDR=172.18.$o3.$o4
NETMASK=255.255.0.0
EOF
fi

if ip a show ens3f1 1>/dev/null 2>&1 ; then
cat > /etc/sysconfig/network-scripts/ifcfg-ens3f1 <<EOF
DEVICE=ens3f1
NAME=ens3f1
TYPE=Ethernet
BOOTPROTO=static
DEFROUTE=no
ONBOOT=yes
IPADDR=172.18.$o3.$o4
NETMASK=255.255.0.0
EOF
fi
Reference the Snippet in Provisioning Template
I hope you gave this snippet a useful name, we called ours ceph_scale_post and referred to it via a pattern matching if then Ruby clause within our main provisioning template like this:
# add ceph-related post stuff
<% if @host.shortname =~ /60.*r/ %>
<%= snippet 'ceph_scale_post' %>
<% end -%>
Our Supermicro server names have -6048r and -6018r in the DNS shortname so this catches only those.
Add Host to Foreman
Next we’ll use the hammer cli command to add the host to Foreman. Substitute your hostname, hostgroup, domain and mac for your environment.
hammer host create --architecture x86_64 --build 1 \
--domain openstack.example.com --environment production \
--hostgroup prov-b08 --name yourserver --mac 0c:c4:7a:19:69:b6
Provision the Server
Now your server will have proper DHCPD and DNS records, and assuming you have a working Foreman. Go ahead and provision it by rebooting the server.
ipmitool -I lanplus -H 1.2.3.4 -U ADMIN -P PASS chassis power cycle
Re-Occurring Provisioning Workflow
We wrote our own provisioning scheduler in Python called QUADS (quick and dirty scheduler – more on that later) which drives our provisioning workflow, including calling Foreman in the background. If you want to reprovision Supermicro machines now you only need two commands which are easily scripted:
- Set Host in Foreman to Build
Use hammer CLI to set the machine to build, this toggles the PXE stub to tell it to TFTP/Kickstart into an installation rather than boot from local disk.
hammer host update --name c08-h13-6048r.example.com --build 1
- Reboot Host Via Ipmitool
Use ipmitool against your Supermicro server IPMI interface to reboot it into the provisioning again.
ipmitool -I lanplus -H 1.2.3.4 -U ADMIN -P PASS chassis power cycle
You can combine any creative manner of for loops to re-provision an entire fleet if you desire.
IPMI Issues
We saw some issues with IPMI and out-of-band displays during machine provisioning, namely using ipmitool via sol activate we get no display if we attach while kickstart is in progress. If you have these issues you might try connecting via the iKVM/HTML5 viewer

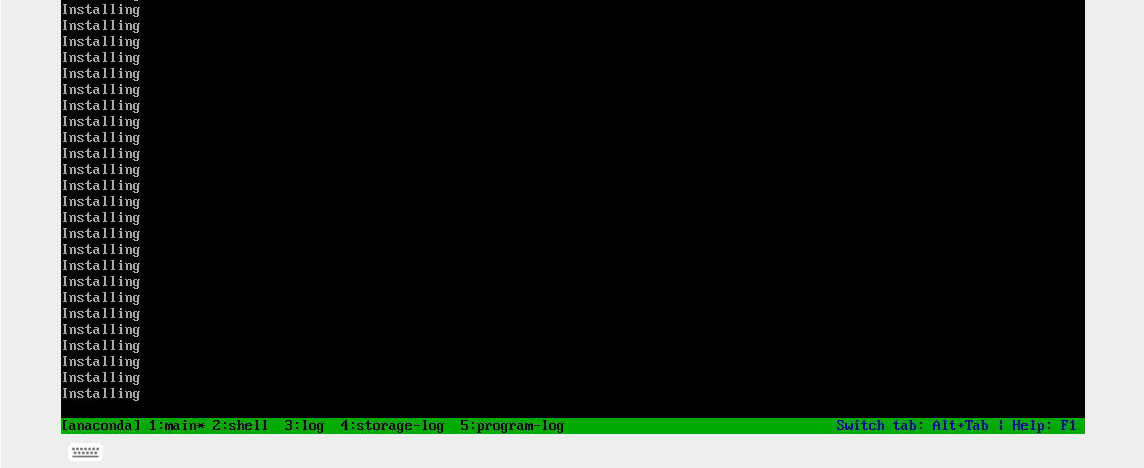
We also saw some garbled/missing text during kickstart on some provisioning during package installation as seen below.
The fix for pretty much every IPMI issue we’ve discovered is to upgrade the firmware (over top the existing version if latest) and uncheck the boxes to reset to factor default.
We’re Missing Stuff
Our LSI RAID controllers shipped without any sort of battery. This seems to be an extra charge, specifically 3108 Cache Protection line item which comes with:
- 1 x TR-TFM8G-LSICVM02 (SuperCap Module)
- 1 x BKT-BBU-BRACKET-05 (Mounting PCIe Card)
In the meantime we see this message during boot but it goes away and we have redundant power anyway but lose out on proper buffered writes in a power fault scenario.

The RAID cards identify as:
- LSI Logic / Symbios Logic MegaRAID SAS-3 3108
You can force writeback mode with these cards via the following command, add this to your Foreman snippet to enable this:
/opt/MegaRAID/storcli/storcli64 -LDSetProp -ForcedWB -Immediate -Lall -aAll
Additional Inconsistencies
Although not affecting actual performance and usage we found some humorous and inconsistent aspects of the rather bare-bones IPMI and out-of-band ecosystem provided by Supermicro.
PXE Options Not Consistent Among Models
On our 4U 6048r machines PXE is enabled on both 40GbE interfaces, however on the 1U 6018r PXE for the second interface is disabled. This caused us some issues with OpenStack deployments until we corrected it. Here’s how to fix it.
Set boot into BIOS on the next boot and reboot.
ipmitool -I lanplus -H mgmt-example.com -U ADMIN -P PASS chassis bootdev bios
ipmitool -I lanplus -H mgmt-example.com -U ADMIN -P PASS chassis powercycle reset
Once inside BIOS, go to Advanced -> PCIe Settings
Go to Onboard LAN2 OPROM -> Change to PXE
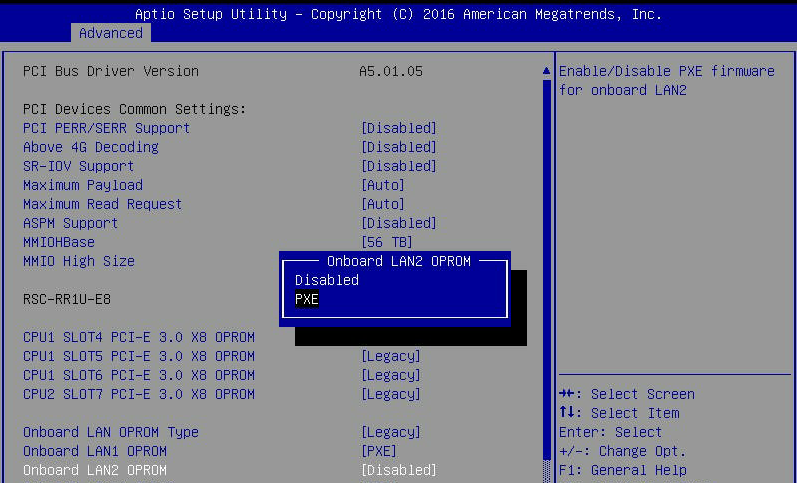
Save Settings and Exit
(On the 6018 it says “save settings and reset” on other models it says “save settings”)

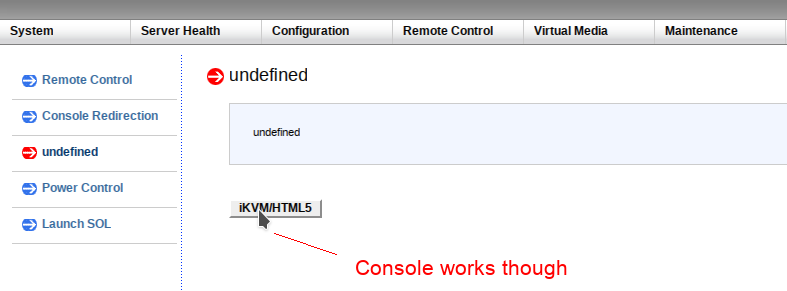
Inconsistent Remote Control
After updating firmware to add the iKVM/HTML5 viewer some systems display undefined instead of the actual iKVM/HTML5 option.
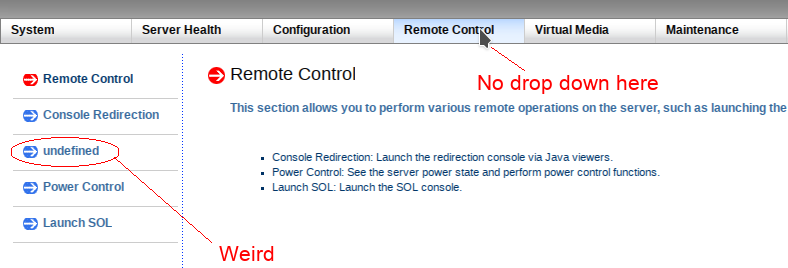
Clicking undefined still works, however. You can re-flash the firmware again and it usually updates the menus if it bothers you.
Language Support
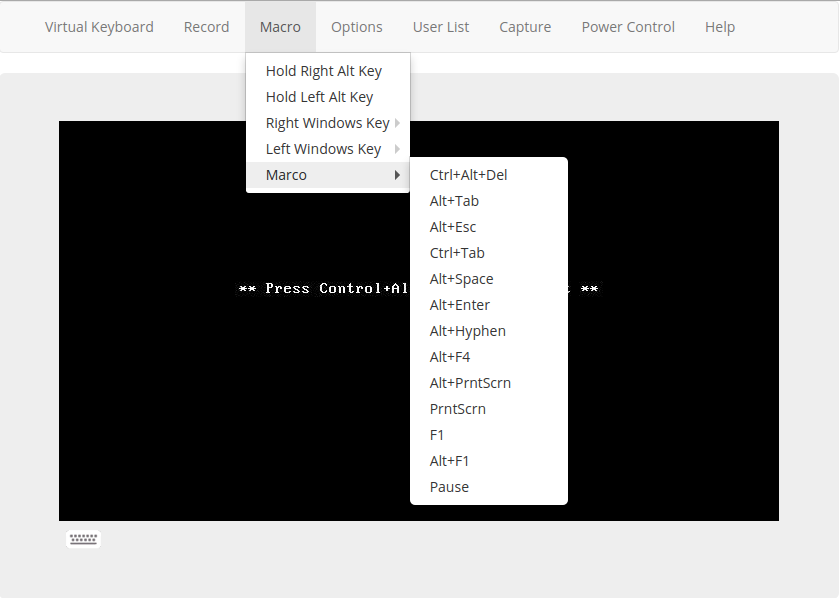
Apparently they support English, Chinese and ?

Marco Polo?
Easter egg or typo, you tell me. (Yes, I am sure that they meant macro).
Updating XL710 40GbE NIC Firmware
On some of our 6048r servers we had seem some intermittent connectivity disconnects so we’ve upgraded the firmware to the latest 5.05 from Intel’s site. Instead of doing this with an Ansible playbook it was actually faster to do this via ssh loops and screen sessions (since the connection may reset while firmware is upgrading)
Here’s the errors we saw, we’re not sure if the firmware actually fixes them or not but some folks on the development side were insistent we upgrade the firmware which I’m normally not a fan of ever doing unless the changelog says so:
kernel: i40e 0000:04:00.1 ens3f1: tx_timeout: VSI_seid: 519, Q 42, NTC: 0x14d, HWB: 0x14d, NTU: 0x124, TAIL: 0x14d, INT: 0x1
kernel: i40e 0000:04:00.1 ens3f1: tx_timeout recovery level 1, hung_queue 42
kernel: i40e 0000:04:00.1 ens3f1: NIC Link is Down
kernel: i40e 0000:04:00.1 ens3f1: NIC Link is Up 40 Gbps Full Duplex, Flow Control: None
If you need to do this, here’s a quick and dirty way to do it with screen:
Copy Firmware Image
I obtained the firmware here from Intels site and copied it to all the servers
for x in $(cat /tmp/supermicros.txt); do scp -o StrictHostKeyChecking=no -o UserKnownHostsFile=/dev/null XL710_NVMUpdatePackage_v5_05_Linux.tar.gz root@$x:~; done
Remote Extract Firmware
Extract the firmware via ssh to each supermicro.
for x in $(cat /tmp/supermicros.txt); do ssh -o StrictHostKeyChecking=no -o UserKnownHostsFile=/dev/null -n root@$x "tar -zxvf XL710_NVMUpdatePackage_v5_05_Linux.tar.gz"; done
Execute the Firmware Upgrade
We will run this in a for loop across all hosts, make sure you have GNU screen installed first. This is needed because the adapter bounces during the process and doing this over ssh may brick the adapter.
for x in $(cat /tmp/supermicros.txt); do ssh -o StrictHostKeyChecking=no -o UserKnownHostsFile=/dev/null -n root@$x "screen -d -m bash -c '(cd XL710/Linux_x64 && ./nvmupdate64e -u -l -o update.xml -c nvmupdate.cfg)'"; done
Update PreBoot ROM Firmware
You’re not done yet, because you’ve updated the NVM image you need to also update the ROM image PXE code. This will produce a warning if you don’t and PXE will still work but you may want to just do this anyway. Let’s follow our same hobo slop ssh for loop method.
Download the preboot firmware files here.
Copy them to all your hosts:
for x in $(cat /tmp/supermicros.txt); do scp -o StrictHostKeyChecking=no -o UserKnownHostsFile=/dev/null Preboot.tar.gz root@$x:~; done
Extract them on all your hosts
for x in $(cat /tmp/supermicros.txt); do ssh -o StrictHostKeyChecking=no -o UserKnownHostsFile=/dev/null -n root@$x "tar -zxvf Preboot.tar.gz"; done
Run the utility and Reboot
for x in $(cat /tmp/supermicros.txt); do ssh -o StrictHostKeyChecking=no -o UserKnownHostsFile=/dev/null -n root@$x "screen -d -m bash -c '(chmod +x /root/APPS/BootUtil/Linux_x64/bootutil64e && cd /root/APPS/BootUtil/ && Linux_x64/bootutil64e -UP=pxe -FILE=BootIMG.FLB -ALL -QUIET ; sleep 10 ; reboot)'"; done
After a reboot the new version should show:
# ethtool -i ens3f0
driver: i40e
version: 1.5.10-k
firmware-version: 5.05 0x800028a4 0.0.0
expansion-rom-version:
bus-info: 0000:04:00.0
supports-statistics: yes
supports-test: yes
supports-eeprom-access: yes
supports-register-dump: yes
supports-priv-flags: yes
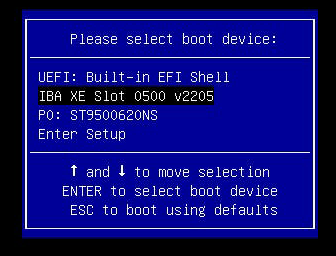
Booting to Black Screen instead of PXE
Unlike Dell or other vendors Supermicro doesn’t support much past the IPMI version 2.0 protocol for their out-of-band implementation. This means that things like setting persistent boot order changes are not possible and in general any advanced manipulation of things like PXE, iSCSI flags on NIC interfaces or NIC interface ordering and boot device ordering cannot be set remotely.
We had an issue where sometimes our 6048r units will simply hang at a black screen with a blinking cursor if we were missing a GRUB/MBR/OS, this was because it was defaulting to a UEFI shell instead of PXE booting to a NIC as it should.
The workaround for this is to hit f11 at the right time and use the boot menu to instead pick the PXE option or disk.
SuperMicro Refusing to PXE Boot
On some of our 6048r systems sometimes they will refuse to PXE boot or just stop PXE booting. To work around this we’ve used ipmitool commands to force it which seems to work.
Force the PXE boot flag:
ipmitool -I lanplus -H mgmt-c05-h09-6048r.example.com -U ADMIN -P ADMIN chassis bootparam set bootflag force_pxe
Set PXE Boot to be persistent:
ipmitool -I lanplus -H mgmt-c05-h09-6048r.example.com -U ADMIN -P PASS chassis bootdev pxe options=persistent
Powercycle the machine:
ipmitool -I lanplus -H mgmt-c05-h09-6048r.example.com -U ADMIN -P PASS chassis power cycle
Feedback
Thanks to the Reddit Sysadmin community for their recommendations on using things like StorCLI. Please leave any feedback and comments below.


Great post, thanks for sharing! Also, I believe the additional language support is Japanese (order in the image shown is ‘English, Japanese, Chinese’)
LikeLike
You can mass set boot order with the SUM tool (it might be a licensed thing, but all of our SMC servers seem to work with it). Basically you set the BIOS like you want it on one server, save the config, and then apply it on all the other machines.
https://www.virtuallifestyle.nl/2016/08/the-best-way-to-update-supermicro-bios-is-via-supermicro-update-manager/
LikeLike
Hi @boomertsfx – good to know about this, thanks for posting about it. I’m wary to pay for anything else at this point so far as licenses as this is something we’d only need to set once (though it would save some time for very large, net-new deployments. In my opinion this sort of functionality should come out of the box or be provided when you buy a server like other vendors but other people might find it useful.
LikeLike
I opened a support ticket with Supermicro to get the download link for SUM. According to support, I didn’t need a license to use it. After I installed the windows version for testing, it accessed the configurations. Haven’t tried firmware update yet.
LikeLike
Ah yeah, the “SuperDoctor” software requires a license/purchase – that’s the utility that can remotely query servers for health information, you can then query that via Nagios. That’s what we’re going to be investigating shortly so will report back here with our experiences.
The cost I was quoted was OOB is $15 per node, DCMS is $100 per node. One time.
LikeLiked by 1 person
We are using SUM: https://www.supermicro.com/products/nfo/SMS_SUM.cfm . I should have been more specific.
LikeLike
Great writeup and similar to our own experiences.
One IPMI tip: Instead of passing the IPMI Password in plaintext on the commandline every time, try the IPMI_PASSWORD environment variable and the `-E` flag for ipmitool. This is a little more secure and reduces typing. Or specify the password in a file using `ipmitool -f`.
“`
stefanl@mgmt1:~ $ IPMI_PASSWORD=password
stefanl@mgmt1~ $ ipmitool -I lanplus -H 1.2.3.4 -U ADMIN -E chassis bootdev pxe
“`
LikeLike
Fantastic write up of your experiences with Supermicro! Very insightful of their OOB system.
LikeLike
I am bumming on the lack of supermicro imm/bmc access unless you have the licenses. All of this should be activated and available. Cheers for the great write up.
LikeLike