
 I’ve been an ardent user of the Tomato Linux Open Source router firmware, specifically on the ASUS RT-N66U home routers using the ‘Shibby’ builds. They let you take full advantage of enterprise (and kitchen sink) features on the broadcom-based residential routers with support for OpenVPN, TOR, VLANs and a litany of other useful functions. We’re going to cover setting up port-based and wireless VLAN support for traffic isolation on a network using the RT-N66U and Shibby build 1.32. Let’s get started.
Why VLANs and Isolation
Simply put, the internet of shit things. I’ve accumulated a few devices over the years in my home which I do not trust completely – things like a Samsung Smart TV and I didn’t really trust anything that’s blackbox or not completely Open Source for obvious reasons. Tomato will be using Linux bridges, iptables and vlans under the covers to provide your private network with a bit more security.

What this Accomplishes
Using isolated VLANs for wired and wireless clients via this guide will let you:
- Put untrusted internet-connected devices and appliances on their own isolated network so they can’t sniff, attack, poke, prod or wreak havoc on your private, trusted network.
- Access devices on the isolated network from your private network but not vice-versa.
- Example: Put your Android Smart TV on an isolated network – you can still control it from your smartphone, laptop, etc by connecting to the isolated WIFI network but when the manufacturer stops releasing security patches two months after you bought it or that sweet NSA sleeper cell backdoor decides to activate it can’t become an attack vector into your private network.
- Example: Put your Android Smart TV on an isolated network – you can still control it from your smartphone, laptop, etc by connecting to the isolated WIFI network but when the manufacturer stops releasing security patches two months after you bought it or that sweet NSA sleeper cell backdoor decides to activate it can’t become an attack vector into your private network.
- Provide a separate, virtual guest WiFi network or wired connection that allows internet access but no access to the rest of your network.
- Optionally whitelist and restrict all outbound traffic per VLAN/network.
Why Tomato / Shibby
Long before I upgraded my home network to the ASUS RT-N66U I was a long-time user of DD-WRT and OpenWRT firmware to unlock the features and stability of my routers. I moved to Tomato/Shibby because it had the best support for my device. Also, DD-WRT started to languish in updates and releases with chipset support never being updated and their new focus on more commercial uses. Lastly, the Shibby Tomato derivative seemed to be the most active project with releases very often with new features ported in all the time.
Setup and Environment
I’m not going to cover setting up an ASUS RT-N66U or supported model with shibby firmware as that’s already covered in more detail elsewhere (in particular the comments are useful). It most cases you can simply put the router in TFTP mode and shoot the shibby image over. Here’s what I’m working with:
- ASUS RT-N66U (Broadcom BCM5300)
- Shibby Tomato 1.28 build 132 64K AIO
- Existing 2.4GHz and 5.0GHz Wireless Networks
- Existing flat 192.168.0.1/24 internal network using static DHCP
- Everything done in UI, verification via SSH to the router
Update: 2018-02-28: I am now using Pi-Hole and a Raspberry Pi2 to handle DNS for further privacy, filtering and to ward off advertisements and trackers. I’m still using the Tomato setup here however so check that guide out after you’ve got this how you like it.
Create a new Bridge Interface
The first thing you’ll need to do is create a new bridge interface, this allows you to associate a new VLAN with a physical port (and later associate a virtual wireless SSID if needed). For this I used br1 but you can use whatever you like.
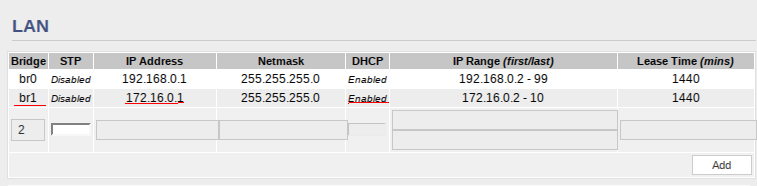
- Navigate to Basic –> LAN and create a new bridge.
- Enter an RFC1918 private address range (e.g. 172.16.0.1/24)
- Enable DHCP
- Click Add
- Scroll to the bottom and save, router will reboot.
NOTE: DO NOT use 10.0.0.1/24, for some reason (bug?) this range will not work even though it’s a valid RFC1918 address range.
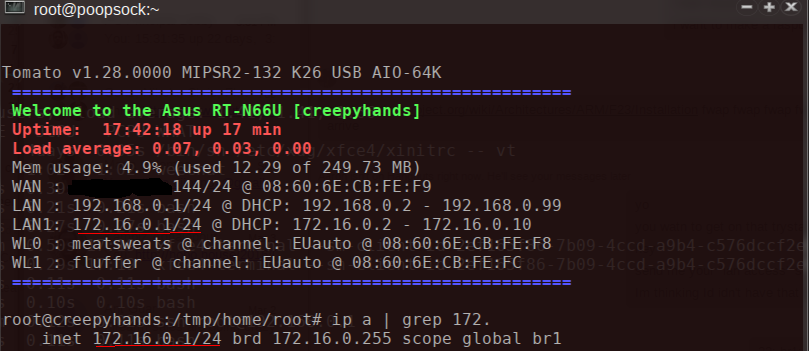
Verify the Bridge
After your router reboots you can check the bridge was created successfully, it will be in the MOTD when you SSH into the router and the ip a command should also show it.
Create a New VLAN
Now you’re ready to create your new VLAN, this will be associated with the br1 bridge (or whatever you created above) for either a physical wired port on your router or a new virtual wireless network. Don’t touch VLAN1 or VLAN 2 with the WAN bridge.
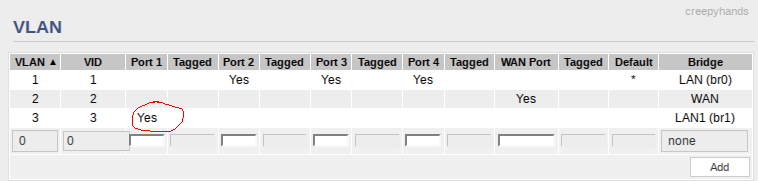
- Navigate to Advanced -> VLAN
- Select VLAN ID
- Select the new bridge
- Uncheck/remove any port(s) you want as members from VLAN 1
- Associate them to the new VLAN
- Click add
- Scroll to the bottom and save, router will reboot again.
The idea behind this is anything (a device, another switch with lots of devices, etc) plugged into ports of your choosing will inherit the isolated VLAN membership you create. If you wanted to span across multiple wired devices you can simply plug a switch into this port, and any devices would inherit those VLAN settings.
How it Works
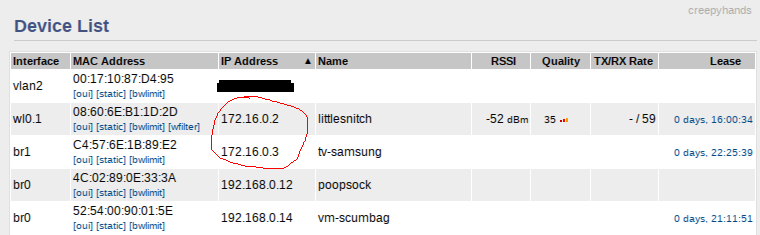
At this point you’re done, any device (or switch with set of devices) plugged into port 1 above should now DHCP against VLAN3 – 172.16.0.1/24 network and traffic will be totally isolated from your existing networks. Note that you can access devices from the other VLAN but they will be isolated from accessing things on your original network. They will be using a virtual gateway on your router for all traffic for internet traffic (the br2 you created earlier).
Add a Virtual Wireless Network
You can extend this network segregation by adding a virtual wireless network and associating it with the VLAN and network you’ve created. You’ll be creating a virtual wireless interface against either your 2.4GHZ or 5.0GHZ adapter with it’s own SSID, broadcast and authentication – for all intended purposes this will appear as an isolated, net-new access point. This is extremely useful for guest traffic or insecure wireless access without exposing your internal network.
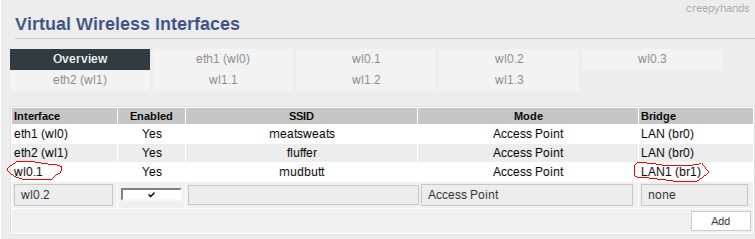
- Navigate to Advanced -> Virtual Wireless
- Choose a virtual wireless interface (wl0.1 or wl1.1)
- This will be a parent alias under the wireless band you choose, so choose 2.4GHz for general devices or the 5.0GHz band for higher-speed, lower range newer devices.
- Enter SSID name
- Mode: Access Point
- Associate your new bridge
- Click add
- Scroll to the bottom, click save
Now any client that connects to this wireless access point will also be on your new isolated VLAN.
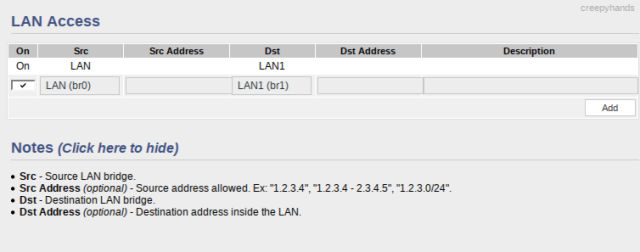
LAN Routes and Restrictions
Lastly you’ll want to check the LAN access settings and have a default ingress route that exists from your default VLAN1 –> VLAN3.

For simple connections like SSH, HTTP etc. you should be able to access things in the isolated VLAN but not vice-versa. For more complex connections (like screencasting YouTube from your phone or tablet onto a TV) you may need to connect to the virtual wireless SSID associated with your isolated VLAN.
Allowing DNS Queries
I am running a Pi-hole setup at home for my DNS and I also needed to define an explicit route for DNS queries to/from machines in my “naughty” VLAN.

Above, you can see I added a route for traffic from LAN1 (isolated VLAN) to LAN (normal LAN network) explicitly for the IP addresses of my smart TV and my Pi-hole device for the purpose of DNS traffic.
How it Works on the Backend
Under the covers Tomato is just using bog-standard Linux bridges, iptables rules and a routing table. The Shibby Tomato UI does a great job of abstracting all of this into the UI and making it all work so you don’t need to worry about it.

Optionally Restrict VLAN Outbound Traffic
With the internet of shit things you might want to restrict all outbound traffic to only things you choose, nobody knows what the hell some of these internet connected home devices and appliances might be doing.
In the below example I’ll show you some iptables firewall rules used to restrict a Samsung Smart TV to only access Netflix. I ended up not doing this because Netflix has way more streaming IP addresses than I could track down and use, and I haven’t had time to run packet captures to get them all.
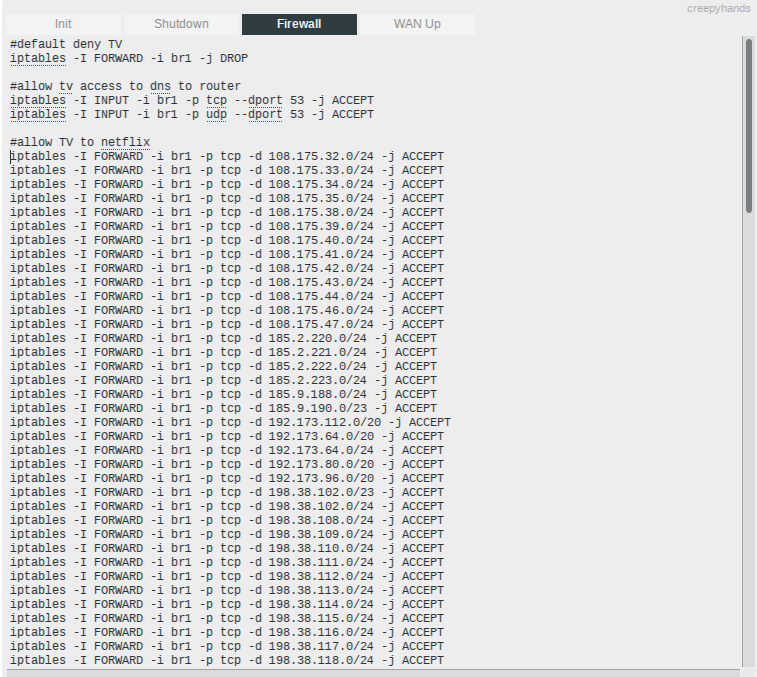
- Navigate to Administration -> Scripts
- Select the Firewall tab
- From here you can paste iptables rules
- Reboot to take effect
A more paste-friendly ruleset could be used below.
#default deny TV
iptables -I FORWARD -i br1 -j DROP

#allow tv access to dns to router
iptables -I INPUT -i br1 -p tcp --dport 53 -j ACCEPT
iptables -I INPUT -i br1 -p udp --dport 53 -j ACCEPT

#allow TV to netflix
iptables -I FORWARD -i br1 -p tcp -d 108.175.32.0/24 -j ACCEPT
iptables -I FORWARD -i br1 -p tcp -d 108.175.33.0/24 -j ACCEPT
iptables -I FORWARD -i br1 -p tcp -d 108.175.34.0/24 -j ACCEPT
You could also block outbound traffic to certain IP addresses for all devices and router interfaces (like Windows 10 Spying / Data collection URLs) by using -i any. You need to use IP addresses not hostnames.
iptables -I FORWARD -i any -p tcp -d 108.175.32.0/24 -j DROP
Here is a list of common Microsoft advertising / tracking IP addresses that Windows will phone home to (regardless if you turn this feature off or not). They are also available in this pastebin. However a much better way to block this is to use Pi-hole block lists instead.
iptables -I FORWARD -i any -p tcp -d 131.107.255.255 -j DROP
iptables -I FORWARD -i any -p tcp -d 157.56.149.60 -j DROP
iptables -I FORWARD -i any -p tcp -d 94.245.121.253 -j DROP
iptables -I FORWARD -i any -p tcp -d 23.32.168.218 -j DROP
iptables -I FORWARD -i any -p tcp -d 65.55.44.109 -j DROP
iptables -I FORWARD -i any -p tcp -d 65.52.108.254 -j DROP
iptables -I FORWARD -i any -p tcp -d 23.45.180.32 -j DROP
iptables -I FORWARD -i any -p tcp -d 23.45.180.104 -j DROP
iptables -I FORWARD -i any -p tcp -d 65.52.108.254 -j DROP
iptables -I FORWARD -i any -p tcp -d 65.52.108.254 -j DROP
iptables -I FORWARD -i any -p tcp -d 23.45.180.104 -j DROP
iptables -I FORWARD -i any -p tcp -d 23.45.180.32 -j DROP
iptables -I FORWARD -i any -p tcp -d 13.107.21.200 -j DROP
iptables -I FORWARD -i any -p tcp -d 204.79.197.200 -j DROP
iptables -I FORWARD -i any -p tcp -d 204.79.197.200 -j DROP
iptables -I FORWARD -i any -p tcp -d 65.52.108.90 -j DROP
iptables -I FORWARD -i any -p tcp -d 65.52.108.90 -j DROP
iptables -I FORWARD -i any -p tcp -d 134.170.111.154 -j DROP
iptables -I FORWARD -i any -p tcp -d 134.170.111.154 -j DROP
iptables -I FORWARD -i any -p tcp -d 131.253.61.84 -j DROP
iptables -I FORWARD -i any -p tcp -d 131.253.61.64 -j DROP
iptables -I FORWARD -i any -p tcp -d 131.253.61.80 -j DROP
iptables -I FORWARD -i any -p tcp -d 131.253.61.98 -j DROP
iptables -I FORWARD -i any -p tcp -d 131.253.61.66 -j DROP
iptables -I FORWARD -i any -p tcp -d 131.253.61.96 -j DROP
iptables -I FORWARD -i any -p tcp -d 131.253.61.68 -j DROP
iptables -I FORWARD -i any -p tcp -d 131.253.61.82 -j DROP
iptables -I FORWARD -i any -p tcp -d 131.253.61.96 -j DROP
iptables -I FORWARD -i any -p tcp -d 131.253.61.64 -j DROP
iptables -I FORWARD -i any -p tcp -d 131.253.61.80 -j DROP
iptables -I FORWARD -i any -p tcp -d 131.253.61.82 -j DROP
iptables -I FORWARD -i any -p tcp -d 65.55.52.56 -j DROP
iptables -I FORWARD -i any -p tcp -d 65.55.52.56 -j DROP
iptables -I FORWARD -i any -p tcp -d 204.79.197.213 -j DROP
iptables -I FORWARD -i any -p tcp -d 40.77.225.248 -j DROP
iptables -I FORWARD -i any -p tcp -d 40.77.225.248 -j DROP
iptables -I FORWARD -i any -p tcp -d 65.52.108.254 -j DROP
iptables -I FORWARD -i any -p tcp -d 40.77.228.74 -j DROP
iptables -I FORWARD -i any -p tcp -d 65.55.44.108 -j DROP
iptables -I FORWARD -i any -p tcp -d 40.77.228.92 -j DROP
I would consider just doing DNS filtering via Pi-hole entirely if that’s an option for you.
Summary
The ASUS RT-N class of routers combined with the Shibby tomato firmware is a very powerful tool for home networks (or small business networks in a pinch). I’m still experimenting with other things you can do with them including using the native OpenVPN client and server functionality. Please leave a comment or feedback below if this was helpful to you or you’ve got any suggestions I can add.


When I follow these instructions, devices on VLAN1 cannot access devices on VLAN3. But devices on VLAN3 can access everything else. So it seems like you have this backwards. The way you have it set up, it looks like your evil TV on VLAN3 can access everything on your home network, but nothing on your original VLAN1 can control the TV. So either you have your smartphone (TV remote app) on VLAN3 too, or it’s using WiFi direct and bypassing the router entirely. For another example, if “trusted” is defined as a device where you have root, the trusted machines are the “high value” machines at the bottom of this page (but for our purpose the 2nd router is a VLAN of course.) https://www.grc.com/nat/nat.htm
Also there is some text missing from the article: “You could plug in a single” (blank)
If you want to prevent untrusted devices from hacking each other, I guess you would have to put them on separate VLAN’s, then put all your trusted devices on another VLAN. How then would a trusted PC access the web server in an untrusted device on another VLAN? This article is a good start, but we need better examples. Also be advised that Shibby’s Tor client may be broken (seems to always use the same exit node.)
ps: dont forget this for your web site: https://letsencrypt.org/
LikeLiked by 1 person
Hey, thanks for your comments, I’ve made some corrections.
On my setup it’s like this, in that VLAN3 cannot access VLAN1 but not vice-versa. In the case of the TV I do have to connect to the VLAN3 virtual wifi to control it (screencast etc). I have the following set in my LAN access settings, but I don’t remember if I set this or if it was the default (let me know what yours is set and I’ll update the guide – I added this part anyway).
For example here’s me trying to access a local webserver (on VLAN1) from my wall-mounted Android tablet (on VLAN3)
root@grouper:/storage/emulated/legacy # telnet 192.168.0.44 80HTTP/1.1 408 Request Time-out
I’ve also tested this by plugging a laptop into port1 (VLAN3) – I cannot ssh to anything on VLAN1 but vice-versa works, and I can access everything from the router as it holds the virtual gateways for all VLANs.
Thanks for your suggestion about letsencrypt, It seems letsencrypt is setup across the board now.
LikeLike
I never heard about that firmware before. I updated my firmware before but it never worked as planned. maybe i did something wrong that made the device not functioning properly. That’s why right now. im afraid to do modification on my wireless device.
LikeLike
There’s usually a way to revert back to the normal firmware if you run into problems. If you don’t need any additional functionality out of your router then maybe it’s not worth the effort – but in most cases it’s very hard to brick things with the shibby/tomato line and you can always revert back to stock ASUS.
You might checkout Merlin firmware instead, it’s a bit more like the stock ASUS it just performs better though doesn’t have all the features that shibby/tomato has.
LikeLike
Shouldn’t I be able to log into the ap in the 172.16.0.1 subnet from the 192.168.0.1 subnet? I’m not able to log into the ap via ethernet lan. I can log on to it via wireless to change settings and connect to it to get internet connection. I copied your settings here to test out. I am unable to ping from the this ap to another device on my main network 192.168.0.1 subnet which I assume is good, isolation. You mentioned that one should be able to access devices on the isolated network from your private network but not vice-versa. Thanks for your input here.
LikeLike
Hey Jim, take a look under
Advanced -> LAN Access.in the Tomato UI. There are some settings you can add to facilitate what LANs can access the other ones. I have mine setup like you mentioned, but it has some flexibility to allow additional ingress/egress traffic between different networks.Just be careful here, that if you allow full ingress/eggress between LANs you may void any separation that you want to keep. Try experimenting with only adding access from your private LAN to the isolated LAN and see if that accomplishes it. For my setup I just leave it as-is and if I really want to access devices from wireless clients in my protected LAN I’ll temporarily switch SSID to the isolated lan (for instance, display casting for YouTube to my SmartTV).
LikeLike
As shown in this article I have my ap 172.16.0.100 static plugged into lan port 1, vlan 3. My PC obtain IP auto is plugged into lan port 2, vlan 1. I wish to be able to log into the ap for management purposes through the lan network and not through wireless. Under lan access in tomato, I have lan(br0) 192.168.0.1 as the src and lan(br1) 172.16.0.1 as the destination. I still can’t access the ap through the lan. Thanks in advance.
LikeLike
On my tomato I have an interface listening on the isolated VLAN/LAN.
Can you access the AP management UI via the
http://172.16.0.1address instead?This works for me with no changes, as the AP management UI listens on all interfaces on the Tomato router.
LikeLike
I can login to the tomato router at both ips 192.168.0.1 and 172.16.0.1. I can’t login to the router setup as an access point ip 172.16.0.100 connected to the 172.16.0.1 vlan on the tomato router through the 192.168.0.1 vlan to which my pc is connected. Thanks.
LikeLike
Sorry, I guess I don’t understand what you’re trying to do. As I understand it, that separation is to be expected. You should be able to ping/access resources from your private networks to the isolated 172.16.0.x VLAN but not vice-versa (because there’s only an ingress rule, unless you add an equivalent egress rule) besides established-related traffic. If you need to access the Tomato UI from the 172.16.0.x networks that’s what the
http://172.16.0.1listening port is for, the only way I can see to change this is to add some static routing rules.You might be able to do this through the UI within
Advanced -> LAN Accessand add a specific route from vlan3 (172.16.0.x) to vlan1 (192.168.0.x), if that’s not possible you can add custom routing rules (in the form of iptables/ebtables) in the Tomato UI underAdministration -> Scripts -> Firewall, but be careful with this.LikeLike
I have a router configured as an access point connected to the tomato router. I’m trying to login into this access point. The access point is at 172.16.0.200 static ip. The ethernet cable connects from the lan point of this access point to the lan port of the tomato router vlan 3. My pc is connected to vlan 1. The PC gets its ip auto. Perhaps I don’t understand what the article is about. I thought it was to allow vlan 1 to access vlan 3 but not vice versa. I’m trying to simplify management of the various devices in the network.
LikeLike
Ok, I think I see what you mean. I’m not sure this covers what you’re trying to do. If you were to connect a dumb switch to that (isolated) VLAN port on the tomato all LAN connection then going into that switch should inherit those settings (and become a member of that 172.16.0.x network, gaining any one-way isolation).
If you’re doing Layer4 traffic (DHCP – auto IP) on a router I don’t think it will inherit these settings as it’s operating higher on the OSI layer model than Layer2 (VLANs) and may not understand and forward the tags needed to isolate traffic while providing routing behavior. You can usually go lower, not higher unless the devices are managed or support a shared configuration (like VLAN trunking/spanning). This is just a guess, not knowing what your network looks like.
One thing to try, instead of plugging a router into the LAN port where you’ve setup the isolated VLAN try plugging in a machine by itself – it should work as illustrated in this post, or try a dumb Layer2 switch for the same effect. When you plug in another router (and possible enable Layer3/4 services on it) I’m not sure it would work as illustrated here. I hope this helps.
LikeLike
Do you mean file sharing between computers when you state “Access devices on the isolated network from your private network but not vice-versa”? If not,what type of devices? Thanks.
LikeLike
I am referring to accessing resources via ICMP, or simple established-related connections from my protected, internal network to a lesser secure one but not vice-versa but not full-blown file sharing, as that will defeat the purpose of VLAN separation between two different broadcast domains (172.16.0.x and 182.168.0.x for example).
An example might be I can SSH to a less trusted machine or device from the more trusted (default) VLAN on the 192.168.0.x network range but not the other way. In my case I put IoT devices like smart TV, tablets, guest(s) and things I don’t want accessing my internal network on the 172.16.0.x network – they can still access the internet and I can still access them, but they cannot attack, wreak havoc or snoop on my default network.
LikeLike
Doesn’t “shibby” tomato support ipset.
If so why not just dump all the netflix IP addresses in a set ?
LikeLike
That’s a great suggestion, it does indeed have
ipset. I haven’t tried this yet as I’ve since reverted the stringent rules (Netflix just has too many CDN IP addresses to track/manage) but I can certainly give it a shot. I found one reported issue from an older build but that was some time ago, so it’s worth testing out. Thanks for the suggestion.LikeLike
ipset work great.
It’s even more convenient with dnsmasq, so you can filter (or exclude) entire domains. Also, IP ranges work great (e.g. 108.175.0.0/16 would cover many of netflix’s IPs).
LikeLike
https://goo.gl/photos/hTdYMPXtEL7aDpmT6
You can do exactly that in gui, I added separate netmask’s for the heck of it, two wireless vlans that can only see each other, virtual gateway and got Internet access, cannot see anything else, especially another network that is hop away, works brilliantly.
LikeLike
I have several vlans created. All devices attached to these vlans can access internet with no issue. I am using tomato build 132 on an asus rt-n66u router. When the windows 10 computer and windows xp computer is configured manually for dns no opendns oops! page but when the computers are set to obtain dns auto and use router for opendns the oops! page appears. I have the opendns servers, all 3, entered in the tomato dns settings. I tried all of the standard procedures flushdns and clear broswer cache. The opendns support has said “From what I can see right now, your router isn’t actually able to use OpenDNS servers and send them out on your network. The NSLOOKUPs that you’ve performed proves this, along with the test you did by applying the OpenDNS servers directly on your computer(s).” Is there a bug in tomato build 132 with this? Thanks in advance.
LikeLike
I created a couple of new bridges today, one for guest and a second to get vmware esxi off of my regular private net. Guest wls br3 works fine. The br2 does not. I stole 3 memeber interfaces from br0 and assigned to br1 and reboot. When it comes back up the 3 interfaces i stole from br0 and assigned to br1 are back on br0 as well as staying on br1. I havetried several different scenarios to try and get this to work but no dice
LikeLike
Wanted to advise on using VPN tunneling with a Tomato router, often the router CPU will be the bottleneck for encrypted traffic. Make sure you prioritize a fast CPU!
http://www.enginoor.com/list-of-tomato-compatible-routers/
LikeLike
That’s a good point Steve, the RT-N66U is a bit older and could be a bottleneck when handling VPN traffic. For new buyers I’d say the AC models or greater would be a better choice.
LikeLike
Thanks for this guide – it’s great! It has worked well for me on my primary router, but I can’t figure out how to use it on my secondary router that acts as an extender connected via a wired homerun. I followed another guide to set that up and it forwards DHCP requests through to the primary router, and I thought I could just treat it similarly with these wireless VLANs but it doesn’t appear to be working. Any suggestions?
LikeLike
Thanks for the guide, one problem that I’m having though. When I assign the the port to the new vlan and reboot, that port becomes active on both vlans (showing on vlan1 and vlan3). Any ideas? Sadly, the device that’s connected to that port is pulling it’s ip address from the first vlan. More details here, hopefully I can get it fixed soon. http://www.linksysinfo.org/index.php?threads/cant-remove-port-from-vlan.73259/
LikeLike
Same here on Tomato Firmware 1.28.0000 MIPSR2-138 K26 USB AIO-64K.
Assigned ports 1 – 3 to Vlan1 (192.168.x.x) and port 4 to Vlan3 (172.16.x.x). After reboot port 4 is checked on both Vlan1 and Vlan3.
_Although_ network traffic appears to be separated and IP address are being properly assigned to devices from the appropriate subnet; so it’s working as intended.
LikeLike
Shibby is one of the better versions of Tomato but the best and most attractive, in my view, is AdvancedTomato. See AdvancedTomato.com.
LikeLike
I haven’t seen AdvancedTomato yet, I’ll check it out.
LikeLike
I know this is an old thread but wanted to mention this in the event another (like me) finds it during a search. AdvancedTomato is ONLY a better GUI. It sits atop Tomato by Shibby, it is not firmware. You also need to make sure the versions match (Shibby & AdvancedTomato). See the FAQ for both “Differences between AdvancedTomato and Tomato by Shibby” and “Do you support or plan to add support for my router” on the FAQ page of AdvancedTomato at https://advancedtomato.com/faq
LikeLike
I’m wondering if having an internet connected smart tv on its own vlan the way you’ve described would cause connectivity issues if wanting to use plex client on the smart tv which is served from a plex server on the private LAN?
LikeLike
I have a plex client on my smart TV so I can check for you, but what I imagine would happen is that Plex will fall back to a non-direct connection but still work since it’s still available via plex.tv.
LikeLike
Ok, I seem to be able to connect to other Plex servers without issue using the Samsung Plex app (version 2.007) but I cannot connect to my own. I do however sign my own SSL certificates and listen on a non-standard port. I also tried adding my plex server via the external IP/port to no avail. If you have your Plex Media Server setup with the defaults it may work just fine however.
LikeLike
Good how to!
LikeLike
Hi, I’ve tried your set up on my Tomato Router and I have some problems.
PC 1 is connected to VLAN1
PC 2 is connected to VLAN3
PC 2 cannot SSH into PC 1 through the public IP when connected to VLAN3 but can SSH into PC 1 on a different network (even on 4G). So it is not firewall problem nor port forwarding problem.
How do I allow PC 2 that is connected to VLAN3 to allow SSH to *public ip address*?
LikeLike
Hey Julius,
I think what you might be experiencing is internal connections will use the routing table on your router, so while you have specified the external/public IP address (and assume to go out the WAN and back in) your router has interfaces on both VLANs and is instead routing your traffic internally anyway because it’s in the routing table. This is a guess, but a packet trace should reveal this. If so, that’s by design to isolate your other machines from ingress/egress traffic from this sort of ‘purgatory’ VLAN where I put questionable things like smart TV’s, Windows and other potentially harmful technologies. You might need to also do a packet trace on your router to see the entire flow also.
LikeLike
Hello there,
I’m having an issue with the LAN Access Settings section. Even if I specify all my VLAN to be able to communicate, they do not, no matter what I do. I’m using Advanced Tomato based on Shibby 140. I can clearly see the corresponding rules in iptables but they are just never match. I see absolutely no packet going through these rules. Any idea would be greatly appreciated.
Best
LikeLike
My VLANs are setup in a way to be totally isolated from the other network(s) so I haven’t messed much with this. Is this with both wired connections (where you may have associated a VLAN to a particular physical port) and also with virtual wireless? Have you tried both?
On the Tomato side you’d need (I believe)
1) Static routing rule added between VLANs
2) LAN access rule for bridging traffic between two VLANs
Maybe you’ve already done this and your iptables rules and brcrtl settings show this. If so I’m not sure what to try from here. This guide by default assumes total isolation but those two settings should let you leak routes between VLANs/networks.
LikeLike
Hello there,
Yes, everything is correctly configured.
I have configured 3 bridges: br0, br1 and br2. I also have three virtual wireless networks: eth0, wl0.1 and wl0.2 which are respectively mapped to br0, br1 and br2. Finally, I have created three VLANs respectively named LAN, LAN1 and LAN2 which are mapped to br0, br1 and br2.
I want to be able to communicate from br0 to br1 and br0 to br2. Also from br1 to br2.
Routing table is ok, iptables rules too. They are just never matched which tells me something is wrong with iptables. But I just don’t know what to try next. I have tried to play with rules but no success until now. LAN Access Settings section is also correct. Very weird.
LikeLike
Hey Maxime,
Does the tomato use ebtables? Perhaps there’s an additional ruleset that that isn’t being setup (sounds like a bug if the UI equivalent doesn’t do the right thing on the system end).
One strange thing I noticed with the VLAN settings is it just does not like 10.x.x.x RFC1918 private address ranges, I had to use 172.16.x because it would simply refuse to work when I used 10.x.x. I’m not sure what ranges you’ve chosen.
I don’t know what else to suggest here, you might try the tomato forums? If you find out please let me know and I can update the guide. Sorry I wish I had more suggestions here.
LikeLike
Think I found part of the problem. When my VPN is on I can’t make my VLANs to communicate together. But as soon as I disconnect from VPN, everything works fine. I guess there is an issue with the routing table when VPN is ON. The gateway might be changed which is weird considering I enabled openvpn route-nopull option.
LikeLike
Perhaps the static route put in place via your tomato settings is being usurped by the route injected via OpenVPN? What do the route and ARP settings looks like when you’re connected and not connected?
LikeLike
Here is my routing table when I am connected to the VPN. You can see the tun11 interface.
Destination Gateway / Next Hop Subnet Mask Metric Interface
88.142.XXX.1 * 255.255.255.255 0 vlan2 (WAN)
192.168.2.0 * 255.255.255.0 0 br2 (LAN2)
192.168.1.0 * 255.255.255.0 0 br1 (LAN1)
192.168.0.0 * 255.255.255.0 0 br0 (LAN)
10.8.8.0 * 255.255.255.0 0 tun11
88.142.XXX.0 * 255.255.254.0 0 vlan2 (WAN)
127.0.0.0 * 255.0.0.0 0 lo
default 88.142.XXX.1 0.0.0.0 0 vlan2 (WAN)
When I am not connected to the VPN here is what I get:
Destination Gateway / Next Hop Subnet Mask Metric Interface
88.142.XXX.1 * 255.255.255.255 0 vlan2 (WAN)
192.168.2.0 * 255.255.255.0 0 br2 (LAN2)
192.168.1.0 * 255.255.255.0 0 br1 (LAN1)
192.168.0.0 * 255.255.255.0 0 br0 (LAN)
88.142.XXX.0 * 255.255.254.0 0 vlan2 (WAN)
127.0.0.0 * 255.0.0.0 0 lo
default 88.142.XXX.1 0.0.0.0 0 vlan2 (WAN)
LikeLike
I am trying to do it on a Asus RT-AC68u with the latest Advance Tomato version installed 3.4-140 . I can create the new bridge (br1) and verify it with putty , but when i try to create the new VLAN id3 even i uncheck port number 1 from the first line (VID 1) when the router reboot the port 1 appears checked at both vlan number 1 and the new number 3 … I can not unmatch from first línea . i tries alzó with port 4 with the same result.
I repeated the process 4 times , erasing nvram and nothing …. Any idea? Please help me
Thanks in advance
LikeLike
Hey Gerardo,
The only strangeness I’ve seen like this is when trying to use a 10.x.x.x network for one of the VLANS, none of my settings would save and things would simply not work. Nothing immediately comes to mind on the exact cause of the behavior you’ve described – hopefully someone else out there has seen it? Dumb question but you’re hitting “apply” before “save” right, and things just aren’t retaining the settings?
LikeLike
Very useful guide.
However, I’m experiencing difficulty.
Wanted Port4 to have Internet Access only (no access to the local network).
– Created a new LAN (br2)
– Modified existing VLAN – disabled Port 4
– Created a new VLAN – enabled Port 4 only
Problem is that devices connected to Port 4 do not get a valid IP (should be 192.158.3.x) – only 169, meaning DHCP is not functioning there.
Screen caps: https://drive.google.com/drive/folders/1xcVkGqrYan7UftbBZgBG4R8ITF3zXdsT?usp=sharing
LikeLike
Hey Paulo, does static IP and a gateway work instead? I had issues using some RFC1918 private address spaces like 10.1.x and for some reason 172.16.x was the only range that worked for me.
LikeLike
Hi!
I’m afraid that changing address range to 172.16.x.x didn’t activate DHCP for Port 4.
Could you describe in more detail the alternate solution?
My aim would be to give Port 4 just Internet – no access to other devices.
LikeLike
I have a suspicion DHCPD might not be binding to the VLAN you’re using, make sure that you have it enabled like so:
Sometimes it requires a reboot to take effect.
On the router you should have a gateway for each VLAN
For example, ssh’ing into your tomato you should see something like:
–snip–
LAN1: 172.16.0.1/24 @ DHCP: 172.16.0.2 – 172.16.0.10
–snip–
Setting a Static IP Address
You can set a static IP by using that interface as the gateway to work around DHCP if it still doesn’t work.
On Linux this can be done via
ifconfig devicename 172.16.0.100 netmask 255.255.255.0Now try pinging 172.16.0.1
If that works add it as a gateway and try to hit something externally
route add default gw 172.16.0.1Now ping 8.8.8.8 or 8.8.4.4 if that returns add your routers DNS
echo "nameserver 172.16.0.1" >> /etc/resolv.confI hope this helps.
LikeLike
This help me a lot with the setup I was making which was a IP camera setup making sure the video streams couldn’t be seen from the internet.
Because I do use a central computer on the main Vlan to access these camera I needed to make a change to the firewall option here as the example you provided block all forward traffic from br1 and not just the external.
I used
iptables -I FORWARD -i br1 -o ppp0 -j DROP
this still gave br0 access to all the equipment on br1 but blocked br1 from the internet.
LikeLike
Hi,
Will this work with my tomato shibby device (E3200) in router mode (ie as a switch for an upstream gateway)? Basically, I want to use my main router/AP (google home mesh) as the gateway, but use the E3200 to create an isloated VLAN.
Here is my setup:
Modem
|
router / gateway (192.168.86.1) / AP private lan (192.168.86.0/255)
|
tomato-shibby router (LAN port 4) on br0 / VLAN1
tomato-shibby router (LAN port 1) – on new VLAN3 (br1)
I have disabled the WAN port on my E3200, bridges WAN port to primary LAN (br0), added static default gateway (192.168.86.1) and static DNS under Basic settings -> LAN. Under Advanced Settings -> Routing -> Misc, changes mode to router.
However devices on VLAN3 are unable to access internet. I suspect As an experiment , under Advanced settings -> LAN access, I also enabled LAN1 to LAN.
Below is routing table:
Destination Gateway / Next Hop Subnet Mask Metric Interface
127.0.0.0 * 255.0.0.0 0 lo
172.16.0.0 * 255.255.255.0 0 br1 (LAN1)
192.168.86.0 * 255.255.255.0 0 br0 (LAN)
default 192.168.86.1 0.0.0.0 0 br0 (LAN)
LikeLike
Hey Avneesh, this should still work on a port-level by the Shibby Tomato but you may need to use static addressing and manually set DNS servers if enabling DHCP on that port isn’t an option. On the tomato you’d need a route upstream for outbound traffic I would think.
LikeLike
Hi Will Foster,
Sorry to the delayed reply – could only come back to this today.
DHCP is working with Port4 as desired.
Read your suggestion and made a few changes, so that my configuration now looks like:
LAN
Bridge STP IP Address Netmask DHCP IP Range Lease
br0 Disabled 192.168.1.1 255.255.255.0 Enabled 192.168.1.1 – 249 1440
br1 Disabled 172.16.0.1 255.255.255.0 Enabled 172.16.0.2 – 9 1440
VLAN
VLAN VID Port1 Port2 Port3 Port 4 WAN Port Default Bridge
1 1 Yes Yes Yes LAN (br0)
2 2 Yes WAN
3 3 Yes LAN (br1)
Virtual Wireless Interfaces
Interface Enabled SSID Mode Bridge
eth1 (wl0) Yes networka Access Point LAN (bro)
eth2 (wl1) Yes network5 Access point LAN (br0)
wl0.1 Yes guest Access Point LAN1 (br1)
Thank you again for both the tutorial and support.
LikeLike
Hey that’s great – I’m glad you got it working!
LikeLike
Thanks for the article, its been really helpful.
I have set up an isolated LAN and Wireless Access point bound to that LAN as per your instructions and it all seems to be working.
But it seems like you can access my Tomato Router via SSH and HTTP from both the main and the isolated LAN. Is this as it should be? and is there any way to disable access from the isolated LAN?
Thanks
LikeLike
Hey Ben, I’m glad the guide was helpful. For the isolated VLAN to work it needs a listening interface from the Tomato to serve as it’s gateway, you could firewall off HTTP/SSH off via iptables for connections to these services originating from the isolated VLAN network range. You can do this from within the Tomato UI.
LikeLike
I”ve just tried this with an rt-n12 d1. It does give me a second bridge with different ip addresses, but everything is accessible from every interface. Perhaps a limitation of this cheap hardware?
What I would really like to do is to create a routed wifi for people, but be able to link a couple of lan ports to the wan interface so that the 3 devices plugged into wan port and lan ports 1 and 2 all find themselves receiving dhcp addresses from the wan.
does that seem to be complicated? Thanks for your efforts here.
LikeLike
On the backend this is all just controlled via iptables on the Tomato, but try experimenting with the “LAN Routes and Restrictions” routing rules, these should translate directly to static routes. It might help to just take a peek at the physical iptables, routing table and brctl / bridging rules on the Tomato itself via ssh.
You can also experiment with adding your own rules in the advanced area of Tomato. My setup is totally isolated in that anything in my 172.x.x VLAN (it has it’s own virtual wireless SSID and I’ve dedicated one physical port on Tomato to it also) is isolated from the rest of the network. Hope this helps and I’m glad that the guide was useful so far.
LikeLike
All works as explained. Thanks. I have my IoT (phillips hue) in an isolated vlan, but homekit is not working when my phone is connected to the main Wireless LAN. Any advise? – I tried with port forwading, but not luck yet.
LikeLike
Hi Will,
Thanks for the great guide, it really helped me last year with setting up a VLAN for guest wi-fi on my router. Everything worked beautifully!
Now I have a new conundrum – do you know if it’s possible to have Tomato assign a device to a particular VLAN based on its MAC address?
Exactly what I’m trying to do: Have a guest VirtualBox VM restricted to VLAN3. The host is connected to a physical port on router mapped to VLAN1. Both the host and guest are running Windows 7. From what I understand, using the “Bridged Adapter” option in the VM configuration is my only option here.
What I tried (unsuccessfully):
– Assign a static IP into VLAN3’s IP range in guest OS. Result: no network connectivity at all, network shows up as “Unidentified network”.
– Assign a static DHCP lease in Tomato into VLAN3’s IP range. Result: guest OS cannot obtain an IP address at all, no connectivity.
– Create a VLAN in the host OS’s Intel Ethernet driver configuration (screenshot https://i.stack.imgur.com/JYwoc.jpg) (I don’t know whether this would actually help me, but I was trying everything at this point). Result: the configuration program fails with a “Cannot create VLAN” message no matter what I tried (enabling 802.1Q tagging in [advanced-vlan.asp] didn’t help).
So I’m at a loss here… any ideas are greatly appreciated!
LikeLike
The way Tomato handles VLAN isolation is abtracted below what your OS or NIC would be able to see – it’s at the port level. I believe that it does this via wireless by the SSID used (virtual wireless in the case of tomato). I am not sure about mac address separation but the Tomato forums would be the best place to ask.
Regarding the setup you have, these are port-based VLANs so bridging the adapter should work so long as it’s using that physical port at the end of it.
The same would apply if you were to say plug another switch into that VLAN port .. all devices on that switch should inherit the same settings. I hope this helps, let us know how it goes.
LikeLike
Still useful, thanks. Are you still using Shibby? I’ve switched (w Netgear R7000) to FreshTomato(.org).
LikeLike
Thank you. I am still using Tomato Shibby, specifically 1.28.0000 MIPSR2-132 K26 USB AIO-64K
LikeLike
I’ve been using tomato for 18 years. I couldn’t make my living without it, or at least not so easily. But it seems to have a weakness when I compare it to my ubiquiti devices on the subject of vlans. With ubiquiti I can create vlans which will cross routers no problem. I can do it in my house at night. Tomato seems to oblige me to go to the site with a cable. Is there a way around this? thanks.
LikeLike
How do I setup the wireless networks on my other access points? Here is my setup, I’m using a Linksys R7000 with FreshTomato, I have PiHole setup on my Raspberry Pi for my whole home DNS server. Attached to these by ethernet are three other routers acting as access points. A TP-Link Archer C9 flashed with DD-WRT, an Archer D9 with stock firmware, and a Linksys E4200 with stock firmware. All of these other routers run as access points all under the same WiFi network. I want to create a virtual network or a guest network to run from all of these in order for my IoT devices to be on the secure network. How do I set that up?
LikeLike
And I’m getting (warning: WL driver reports BSSID 00:00:00:00:00:00) on the FreshTomato Virtual Wireless Network page
LikeLike
Still a great guide in 2021. I was getting ready to give up because I couldn’t access my IOT vlan from my main one. Found the weird bug with the subnet 10.0.0.1 on this tutorial, changed the ip to 192.168.1.1 and now it works great! Thank you!
LikeLiked by 1 person
This is great starting guide but for some reason my “main vlan 192.168.1.0/24” can not acces my “IoT vlan 172.16.0.0/24”. I have followed this guide by adding the LAN access from LAN (main vlan) > LAN (IoT vlan) but i still can not ping it the device.. I have read people are saying this guide has it backward, how so?? can some one help??
LikeLike
Networking is a deep subject and many router nerds appear as dark, neurotic hackers guarding their knowledge like gollum and usually answer a question with another question where the exchange ends with insult. TYVM for this guide. It is simply the best and most extensive help for VLAN for any firmware I’ve found.
LikeLike